How often do you see a sample on someone's blog and then try to re-create it? Are you always successful? Do you try to change it?
I saw a card like this on Lisa Curcio's blog, and knew I could make a similar, yet different card. And I used a trick that she demonstrated, which is a really good trick!
Stampin' UP! brought out an embossing folder duo, Thanks & Hello, and I was just starting to experiment when I caught Lisa's post. She had embossed a strip of Vellum, and then added it to her card. So I tried it.
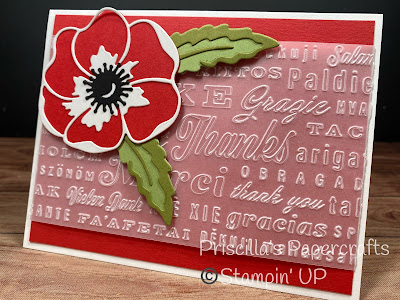
When the Vellum is embossed, the images turn white. It's so cool!
And as Lisa suggested, I took a longer piece of Velum than I needed (I actually cut it 6" long when the front of the card was 5-1/4" wide) so when I was done embossing it there was 3/8" more on each end. I scored each end at 3/8", then folded the ends around a piece of Poppy Parade cardstock, cut to 4" x 5-1/4". When you adhere just the tabs in the back, you don't need to add any adhesive to the front, under the Vellum, where it can show through. Great idea!
I cut one of the poppies from the Poppy Moments dies, using Poppy Parade (how fitting!) and Basic White, along with a Basic Black center. The leaves are Pear Pizzazz and Old Olive. The poppy pieces were put together and it was added to the card front with Dimensionals.
I love this hint about adhering the Vellum from the back! Give it a try; I know you'll love it too!


No comments:
Post a Comment