Tuesday, February 25, 2014

Happy Birthday, Evan!

My son just had a birthday.  He's no longer a "kid", but he's definitely a "kid at heart!"
He's also very creative and loves tools.  So what better card to make for him than a "card in a box"?

As you've seen before on my blog, I am really enjoying making these little dioramas in a box.  Here's Evan's card:
This is what he saw when he opened the envelope.  The really neat thing about this card is that it folds flat for mailing. 
Balloons were punched from the Birthday Basics Designer Series Paper using the Small Oval Punch.  I stuck them to the new Gold Bakers Twine, used Dimensionals to pop them up, and anchored them with a sentiment from Happiest Birthday Wishes (an oldie, but goodie!), colored with Stampin' Write Markers.  

Turned around, the card looks like this:
A party in a box!
Lots of stamps from A Dozen Thoughts, Banner Greetings, Express Yourself and Hello Lovely, along with cupcakes from Topsy Turvy Celebration.  More punched balloons appear to be floating--I cut thin strips of Window Sheets and adhered the balloons to them.


A fun card for someone who really appreciates it!  Happy Birthday, Evan!


Let's get creating!


Sunday, February 23, 2014

A Time for Sympathy

My daughter-in-law's Grandma Millie recently passed away at 90-years young.  I'd met Millie on many family gatherings, and I know she'll be missed.

I happen to be one of the luckiest mothers-in-law I know, as I consider the parents of both of my DILs friends.  So when I heard about Millie's passing, I knew I had to send a card to the family.

I saw a card like this on Stampin' Connection, a demonstrator-only website, and decided it would be perfect as a sympathy card.
The Hardwood background stamp is so beautiful!  I truly looks like a wooden fence or door or side of a barn.  Stamped in Early Espresso on Sahara Sand cardstock it became a delightful background for a lattice of flowers.  The lattice is punched from the Chevron punch; two strips were layered to create the fence.  This is then decorated with a bunch of Petite Petals in Calypso Coral, Crisp Cantaloupe and Daffodil Delight, all punched with the Petite Petals punch.
Leaves of Garden Green were cut, using the Little Leaves Sizzlet (love this one!) as well as from the Bird Punch
One of the framelits from the Chalk Talk set was just the right size for my sentiment, from Love & Sympathy.  Stamped in Garden Green on Whisper White, it's then layered on Garden Green and Crisp Cantaloupe cardstock, all cut from the same framelit (can you guess how I layered them?  Just cut the colored ones in half and line them up). 
Now because I let the flowers run off the edge of the card, I had to make a slightly-oversized envelope.  Have you seen the 
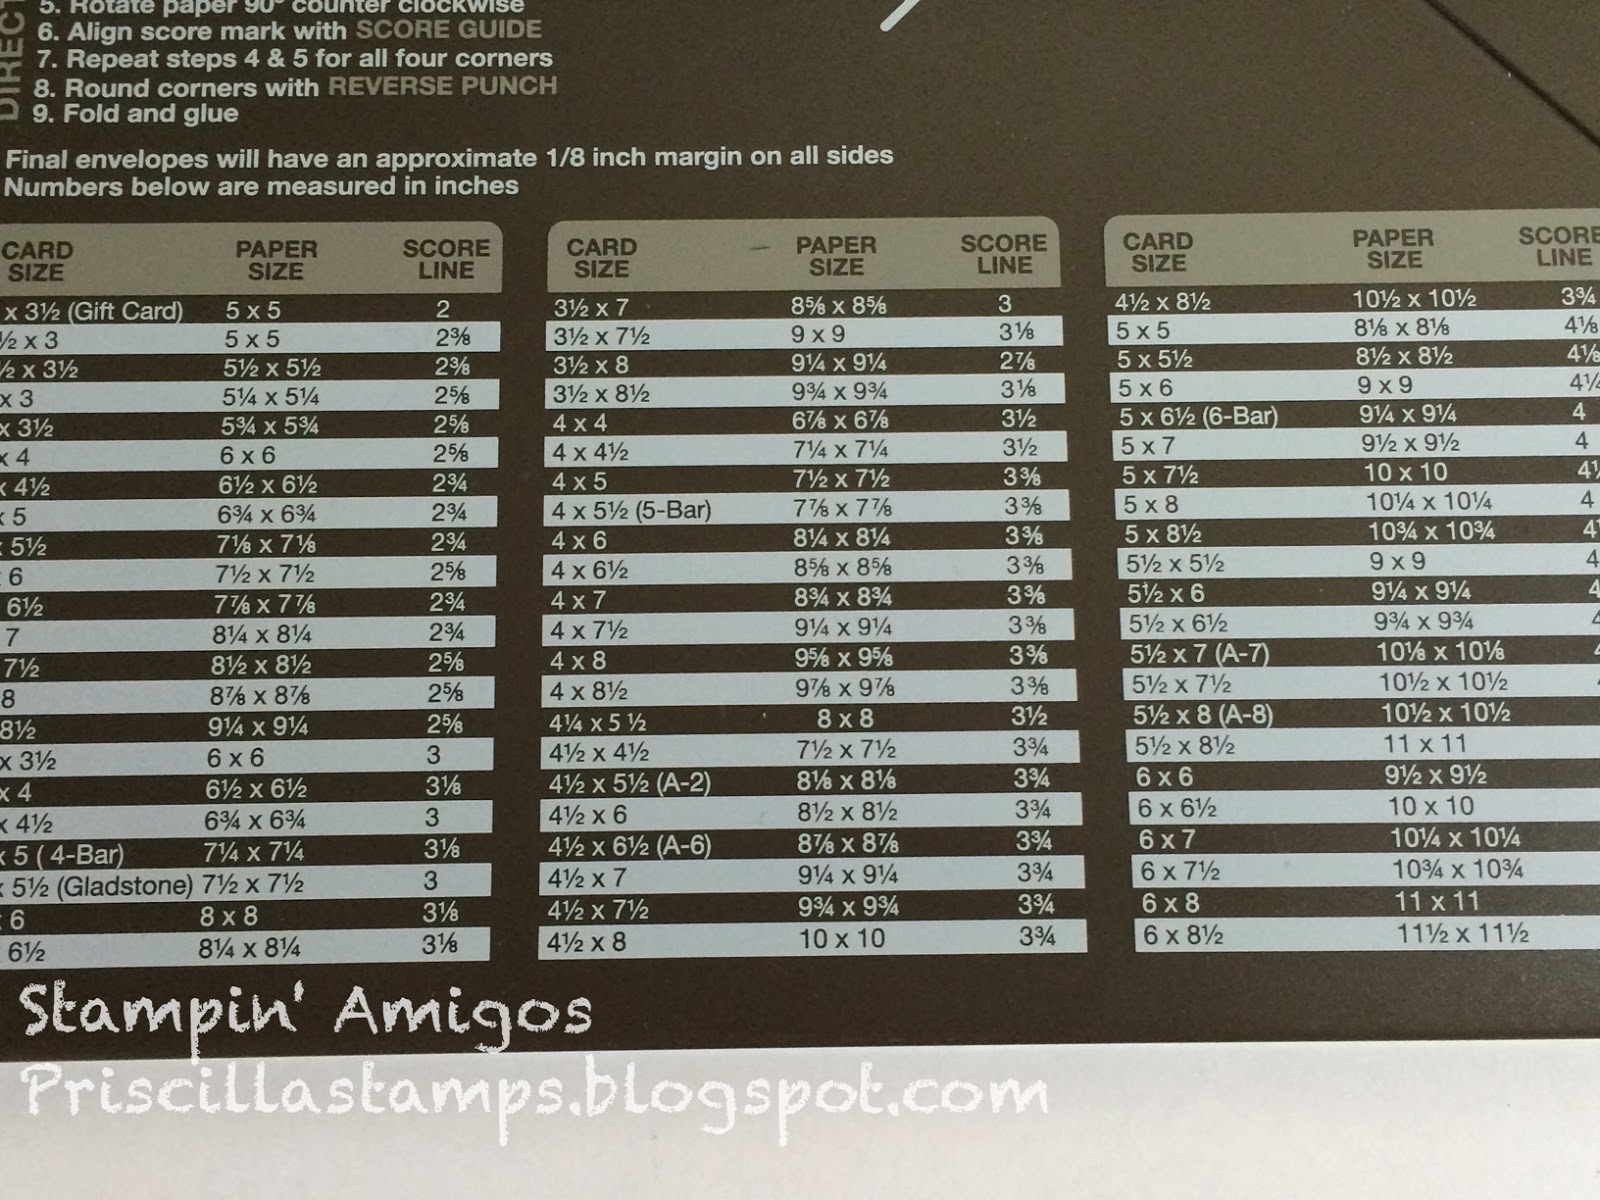
Envelope Punch Board yet?


This nifty little tool is one that MUST be part of your collection!  It makes envelopes in 66 sizes!  From small to large, just about all your envie needs will be met! 
So easy to use!  Choose your envelope size and note the "paper size" column; cut your paper and
use the lines to place, punch and score your envelopes.  So easy!  And you can make your envelopes to match your cards (as I did here using the Regals Designer Series Paper Stack in Garden Green). 

The Envelope Punch Board is not in our annual catalog yet, so if you are interested, head over to my on-line store and enter Item Number 133774; just $19.95 for one of the coolest tools you'll own!

Let's get creating!


Friday, February 21, 2014

Love You to the Moon

Are you sick of my "cards in a box" yet?  I'm still having a great time creating these, so bear with me...here's another:


Another valentine, for my 3-year old grandson, who LOVES space!  He's been fixated on the moon since he was too young to talk, and he can now tell you all about the solar system. 

So a special card-in-a-box for him...

The box is made using Midnight Muse card stock, and I added panels on each flap using the same color.  Stars were stamped in Encore Silver Ink, and also punched with Silver and Champagne Glimmer papers.  


The card uses the "Blast Off" set; I stamped the spaceship using Encore Silver Ink, then masked it off and stamped the alien using Lucky Limeade (retired, but a perfect alien color).  The astronaut was stamped in Midnight Muse; everything was fussy-cut and carefully placed on the z-fold inserts.  I added a few small glimmer paper hearts, punched with the Owl Builder Punch


Ethan, I love you "to the moon and back"...

Let's get creating!


Thursday, February 20, 2014

I Dig My Grandsons

I've been posting Valentine's cards this week, and yes, I know I'm late.  However, I didn't want to take a chance that my grandchildren would see them before they got them in the mail...and I think you could use these ideas (layouts, colors, stamps, papers) for cards of any occasion.

So here is the card I made my two young grandsons (one lives in Northern CA and the other in SoCal, so I didn't worry about them getting the same cards!).

I let the Retro Fresh Designer Series Paper choose my color theme--Baked Brown Sugar, Tangerine Tango and Coastal Cabana.  Then I used the Deco Labels Thinlets to cut a hole in the front of the card (I did this in two steps, as the thinlet is not "deep" enough to cut through all three layers).


Isn't that sun perfect?  It's cut with the Starburst Framelits, and I punched clouds using the Cupcake Builder Punch--these were run through the Big Shot with the Perfect Polka Dots embossing folder.  

The "hill" is just torn paper, run through the Big Shot with the *FREE* Decorative Dots Embossing Folder (*FREE* during Sale-A-Bration with any $50 order).  My truck was stamped using "I Dig You" (retired, but one of my favs) and fussy cut, then popped up on Dimensionals.  Two hearts were cut using the Hearts Framelits and Champagne Glimmer Paper


Happy Valentine's Day, Jacob and Nathan! 

Let's get creating!

Wednesday, February 19, 2014

A Swinging Valentine

I have a granddaughter who loves to send me one-word texts:  "Hi"
She frequently follows it with lots of colorful hearts (she's 7). 

So when it was time to send her a Valentine, I thought this would be perfect:


The Label Card Thinlet comes with a few words to cut:  'Hi' and 'I {heart} U'
--these were perfect for each side of my swinging label.


Using the Labels Card Thinlet die, I extended the right side, creating a flap to open.  Start with a 5-1/2" x 8-1/2" piece of cardstock (I used Crisp Cantaloupe), and feed the right side of your paper over the top of the thinlet, with the left side under the left of the die.  When you cut the die, it "scores" it in just the right place to make an extra panel.

The pretty Sweet Sorbet Designer Series Paper (FREE during Sale-a-Bration!) gave me my color palette.

 So do you think my granddaughter liked her card?

Let's get creating!


Monday, February 17, 2014

A Pumpkin Valentine

Here is one of the valentines I created for one of my granddaughters.


 Using the January Paper Pumpkin (Love it!!!), I turned the card "inside out" and added a piece Coastal Cabana to the inside so it would peek through the cute cut-out.  The doily was part of the kit; I just cut it in half and adhered it to the top of the card.  Pennants were a snap with the  Pennants Framelits--they just needed a quick stamp from the "arrow" stamp included in the 'pumpkin'.  Coastal Cabana arrows were cut using the Label Card Thinlets die; a glittery heart was punched using Silver Glimmer Paper and "LOVE" was stamped in Calypso Coral, popping it up on Dimensionals.  All that was needed to finish it off was a sweet bow made out of the Silver Bakers Twine.

So cute!

It's not too late to get in on the fun...go to https://mypaperpumpkin.com/en/ to sign up, and cash in on a FREE set of 2013-14 Stampin' Write markers!  Please choose me as your demonstrator!

And let's get creating!

Saturday, February 15, 2014

There's Still Time!

My Paper Pumpkin is getting better and better!  Check out our February kit.


Like what you see?  It's not too late to sign up for the March kit (which I previewed at Leadership, and it's great!).  AND for a limited time, get a FREE set of 2013-14 Stampin' Write Markers!

Go to https://mypaperpumpkin.com/en/ to sign up now! 

Friday, February 14, 2014

Happy Valentine's Day!

Wishing you all a lovely Valentine's Day--I hope you are spending it with someone you LOVE!

Another mish-mash Valentine's Day card, using everything but the kitchen sink!  Popular at my February Card Club!

This one uses En Francais, stamped in Versamark, heat embossed with Gold Embossing Powder, and trimmed with an edgelit along the right side.  It's then mounted on a piece of Basic Black cardstock.  The Real Red card base was embossed with the Sophisticated Stripes embossing folder and the Big Shot, and a 2" layer of the Fancy Foil Designer Vellum (with the gold hearts) was added.  Then came the layer with En Francais, and a few strips of Watercolor Wonder Designer Washi Tape helps hold the vellum in place.

"pssst..." from Happy Watercolor was embossed in gold, and was cut out with one of the Word Bubbles framelits, then popped up on Dimensionals.  "i {heart} you" is a design in the Label Thinlets Card Die, and is cut in Gold Foil Sheets with the Big Shot, then added to another Word Bubble.  A red heart was punched from Red Glimmer Paper and adhered with a Mini Glue Dot.

Finally some random gold sequins were pulled from the the Gold Sequin Trim and adhered with the Two-Way Glue Pen

i {heart} you!  Thanks for visiting!

Let's get creating!


Thursday, February 13, 2014

Happy Valentine's Day

Here's a pretty Valentine that we made at our February Card Club:
Stamps:  En Francais, Happy Watercolor
Ink:  Versamark
Paper:  Real Red, Designer Vellum, Basic Black, Gold Foil, Red Glimmer Paper
Goodies:  Gold Embossing Powder, Heat Tool, Label Framelits, Adorning Accents, Word Bubbles, Sophisticated Stripes Embossing Folder, Big Shot, Gold Sequin Trim, Trio punch (Heart), Watercolor Wonder Washi Tape, Dimensionals, Two-Way Glue

Hope you get some special time with your sweetheart!

Let's get creating!

You Make Me Happy!

Quick post, and a quick card:  Using the adorable stamp from See Ya Later (a FREE Sale-a-bration set), this card came together easily.  Daffodil Delight and Basic Grey are striking together. 

The sun is a 1-3/4" circle punch, and the rays are stamped with Banner Blast (FREE Sale-a-Bration set) and cut with the Banner punch (also a FREE Sale-a-Bration offering).  Clouds were punched with the Scallop Circle punch and the Cupcake Builder punch, embossed with the Perfect Polka Dots embossing folder and the Big Shot, and popped up with Dimensionals

With all the rain we are suddenly getting in Northern California (FINALLY!) this card makes me happy!

Remember:  Now's the time to cash in on FREE Sale-a-Bration items!  One free product with each $50 order...no limit!  Head on over to my on-line store and order your FREE goodies now!   http://www.stampinup.net/esuite/home/priscillastamps/

Let's get creating!

Wednesday, February 12, 2014

A Special Valentine

For my January Card Club, I wanted to showcase a Valentine's Day card, but really wanted something different.  I had seen a black and gold card, and it got the old creative juices flowing.  Before I knew it, a card was born:
I started with a Basic Black card base.  The "skid marks" from Gorgeous Grunge was stamped using Versamark, as was Off the Grid.  These were then heat embossed using Gold Embossing Powder.  Then the fun began!

I added an "arrow" using the beautiful new Fancy Foil Designer Vellum (comes with three patterns--gold stripes, gold polka dots and gold hearts--it also comes in Silver) and a strip of the Watercolor Wonder Washi Tape.  Then I heat embossed the heart from Language of Love on Basic Black cardstock, again in Gold embossing powder, and punched out with my Heart Punch

I also punched two Gold Foil hearts, embossing one with the Stripes Embossing Folder and the other with the Perfect Polka Dots Embossing Folder and the Big Shot.  These were popped up with Dimensionals.

Finally the stamp from Happy Watercolor, "psst..." was stamped in Black Staz On on Very Vanilla, cut into a banner shape and popped up with Dimensionals.
The inside is very simple:
From Express Yourself

This one is for my husby--I know he'll like it!

Let's get creating!


Tuesday, February 11, 2014

Weekly Deals

Look what Stampin' UP has for you this week!  Great deals!!!  Head on over to my website and go shopping!  http://www.stampinup.net/esuite/home/priscillastamps/


Tasteful Trim Bigz Die Item # 120893
Regular Price: $42.95 US/$52.95 CAN
Discounted Price: $32.21 US/$39.71 CAN
Artisan Label Punch Item # 130920
Regular Price: $15.95 US/$21.95 CAN
Discounted Price: $11.96 US/$16.46 CAN
Gumball Green 3/8" Stitched Ribbon
Item # 126848

Regular Price: $8.95 US/$12.25 CAN
Discounted Price: $6.71 US/$9.19 CAN
Floral Frames Framelits Dies Item # 127012
Regular Price: $26.95 US/$32.95 CAN
Discounted Price: $20.21 US/$24.71 CAN 
Honeycomb Textured Impressions Embossing Folder Item # 129378
Regular Price: $7.95 US/$9.95 CAN
Discounted Price: $5.96 US/$7.46 CAN
Primrose Petals Classic Stampin' Pad
Item #126858

Regular Price: $5.95 US/$7.25 CAN
Discounted Price: $4.46 US/$5.44 CAN
Whisper White 1/4" Stitched Grosgrain Ribbon Item #126877
Regular Price: $4.95 US/$6.75 CAN
Discounted Price: $3.71 US/$5.06 CAN
Let It Snow Kit - Digital Download
Item # 132963

Regular Price: $9.95 US/$10.95 CAN
Discounted Price: $5.97 US/$6.57 CAN


Monday, February 10, 2014

Thinking of a Friend

A friend, and fellow-stamper, has recently undergone quite a serious surgery.  I've been sending her good wishes, and this is my most recent creation:
This started with the Smokey Slate polka-dot piece in the middle.  Have you seen the Happenings Simply Created Card Kit?  This fabulous kit comes with everything you need to make 15 cards...and not just any cards, but really cute ones!  It's a great gift for a beginning stamper, for the person who loves to create but doesn't have much time, or for someone who wants to purchase an item at the Stampin' UP party you are hosting, but doesn't know where to begin {*grin*}.


Anyway, the kit comes with Whisper White card bases and three different Smokey Slate layers--one with stripes, one with large polka dots, and the one shown here, with small polka dots.  There are also die cut shapes, banners to stamp (stamp is not included), silver Glimmer Paper banners, Silver Baker's Twine and buttons...like I said, EVERYTHING you need to make some super cards.

But I like to be different.  So I took the Smokey Slate layer, and created this card instead.  It's mounted on a piece of Whisper White, and then adhered to the Midnight Muse card base. 

The stamp from Embellished Events was stamped using Gumball Green ink on Whisper White, and framed with the smaller filmstrip from the On Film Framelits, cut from Midnight Muse.  A banner, stamped with the sentiment, was added, and then the In Color embellishments were placed, using Mini Glue Dots.  Cute, huh?

I think this will bring a smile to my friend's face!

Let's get creating!