Friday, May 27, 2022

Pretty Boxes

 While I adore card-making, sometimes I need another paper product - gift boxes.  And I have become pretty good at creating boxes for various occasions.  Take today:  I needed two little gifts for friends who are celebrating their birthdays.  Fortunately I have a stash of greeting cards 😉 and I've found that most of my friends love to receive a package of hand-made cards.  But how to package them?

I've got two samples to share with you today.  AND I have a template for you, so you can create your own.


First up, a floral box, using the Hues of Happiness designer paper.  


I started with a Melon Mambo box bottom (hard to see here, but scroll down - it's more clear with the second box).  Then I created a box-top using the floral paper.  

And check out that tag:


Made with the new Designer Tags dies, this is a true beauty!  I cut two of the main die pieces, one in Melon Mambo and the second in Basic White.  But I added the rose die to the Basic White one, leaving a cut out and allowing the Melon Mambo underneath to show through.  LOVE!  

And for my second box (for a friend who travels to Hawaii frequently and loves the beach):


A Soft Succulent box with the Texture Chic patterned paper for the top.  So pretty!


I think you can see that the cardstock box bottom is taller than the top, so some of the color shows under the patterned paper.  


And it's decorated with a gold-embossed Soft Succulent shell from Season of Chic, mounted to a Tailored Tag with a Distressed Gold "fishnet" underneath.  

Ready to make your own box?  This will hold approximately 5-6 embellished cards with envelopes.  

Start with a piece of cardstock, measuring 7" x 8-1/2", and score on all four sides at 1-1/4".  Snip the four corners as shown:


(Ignore the extra score line on the top of the paper - my goof!  I only scored at 1", and it needed to be at 1-1/4" 😩).

Here's a close up of how each corner should look:


Then fold on the score lines (burnish with a bone folder to get crisp edges) and glue the corners.  

For the top of the box, choose a patterned paper and cut it to a "smidge" over 6" x a "smidge" over 7-1/2". This time score all 4 sides at 3/4", and cut the corners the same as above.  Burnish the score lines and glue to form a box top.  

Then just decorate as you like.  

I can guarantee that your friends and family members will LOVE getting a pretty box of hand-made cards.  Win-win-win!  We get to make cards (happy!) and we get to give them away (happy!) AND your friends get to give them to THEIR friends (happy!).   What could be better?

Give it a try, and make your friends happy!  ðŸ˜Š


Product List

Wednesday, May 25, 2022

Celebrating In Color: Paper Pumpkin May 2022


OK, ain't gonna lie.  When I first saw this Paper Pumpkin I fell in love with the card bases!  I love the new In Colors, and the graphic designs and gold foil details made me swoon.  But...I felt the cards were rather plain with their die cuts and banners.  

Normally I make my Paper Pumpkin kits as they were intended.  I rarely get very creative with them, and I'm usually very happy with the results.  But I knew I could do more with this kit.  So today I have a bunch of card alternatives for you.  

Let's start easy - I pretty much followed the instructions on these:


The only changes I made to these Sweet Sorbet cards were in heat embossing the greetings and adding extra embellishments.  


Same for these Orchid Oasis cards.  I used the same color cardstock with gold-embossed sentiments, but this time I added an additional circle cut with the Stylish Shapes dies.  Oh, and gold pearls.


Then I got a little fancier.  For the Starry Sky card on the right, I used the die-cut from the kit but mounted it on a gold foil circle (Stylish Shapes).  And for the seashells card (Friends are Like Seashells) I heat-embossed the greeting and the shells with gold and then gave them a watercolor wash and cut them out.  I just felt the background reminded me of the sea.  

And then I got even fancier:


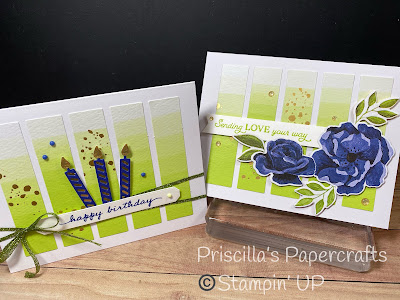
Ok, I'm loving the Parakeet Party cards!  The strips were placed as directed in the instructions, but I embellished with candles (Sentiment Silhouette dies) and the Parakeet Party Metallic Ribbon.  For the one on the right, I used some die-cuts from the Hues of Happiness designer paper (this is going to be an anniversary card for my brother).  

And finally - Tahitian Tide:


Wait!  What?  Two really different cards.  The one on the left used one of the die-cuts from the kit, and I heat embossed "birthday" from Biggest Wish with gold embossing powder.  Some Gold Glitter Dots finished it off.  

But this one:


Yeah, that's my fav!  The Tahitian Tide banner just reminded me of tropical seas, so I whipped out Paradise Palms and the Horizon dies to complete this card.  So cute!  

So that's it:


A beautiful selection of In Color cards all from one kit!  What have you done with yours?

Are you a subscriber?  The June kit looks great:


And now is the perfect time to subscribe so you don't miss another month!  Click here for more info and to sign up.  

Tuesday, May 24, 2022

Shabby "Chic"

 I'm not very good at "vintage" cards, or "shabby chic" cards, but when I saw a few of the papers in the Texture Chic designer paper package, I thought I would try to create a faux shabby chic card.  What do you think?


I started with two patterns of then paper, one with a Petal Pink background and gold dots, and one with a wood-look background with printed shells.  They were both cut with the Deckled Rectangle dies and mounted on Soft Suede cardstock, then added to the Petal Pink card base.


Look at all these details!  Soft Succulent shells embossed with gold, a gold "fishnet", some lovely frayed ribbon, and a fun greeting!


And what would a "warm and beachy" day be without a palm tree?  I used the Palms dies and Soft Suede cardstock - no stamping on this tree!


I dunno...does this have a shabby vibe?  Probably should have sponged a little Soft Suede around the edges to "vintage" it up a little.

Well whatever, I like it!  Do you?


Have you ever thought about becoming a Stampin' UP! demonstrator?  Whether you want your own home-based business, or just want a discount on fabulous products, now is a great time to join!  The $99 Starter Kit has an incredible bonus offer this month - in addition to the usual $125 in your choice of products, you will get an additional $66.50 in new In Color Products:

  • 2022 - 2024 In Color Grid Paper
  • 2022 - 2024 In Color Ink Pad Collection (5 full-size ink pads!)
  • 2022 - 2024 In Color Cardstock Collection
  • 2022 - 2024 In Color Designer Series Paper Assortments
Get all of this plus FREE Shipping! 

There is never any obligation to do anything more than enjoy your Start Kit.  You can craft alone, join friends or family, or host classes and parties - all your choice!

Why not take advantage of this fabulous offer and join now?  Click here for more information.  

Product List