Saturday, December 31, 2016

Goodbye 2016 - Hello New Catalog! Woohoo!

Yes, it's just about time to say goodbye to 2016, but before we go, I wanted to give you a sneak peek of another great item coming soon in the new Occasions Catalog.  This is sure to make your crafting heart go pitter-pat, especially if you enjoy coloring your stamped images.  Take a look:


Yes, Watercolor Pencils are a-comin' your way.  These little gems work well alone, but add a Blender Pen or Aquapainter, and a whole new world opens up.

The new Occasions Catalog is just about here.  Available January 4th!

And don't forget, your favorite items from the Holiday Catalog are still available until 11 p.m. on January 3rd.  Stock up now!

Thursday, December 29, 2016

More Paper Pumpkin Ideas

On Monday I shared with you the December Paper Pumpkin.  And told you that IF you are a subscriber, you can get more of these wonderful kits.

Well, here's another peek at this fun orange box along with some other ideas of what to do with it:


Wanna try?  Click here to subscribe.  You can stop at any time; there is no obligation.  What have you got to lose?

Wednesday, December 28, 2016

Another Gift-Giving Idea

I know, I know...Christmas is over, but here is a fun way to give a treat to your friends any time of year.  I happened to make these for colleagues in my office, but they would be a cute way to say "thank you for that thing you did" any time of year.

I saw this idea on Susan Itell's Simple Stampin' blog, and ran with it.

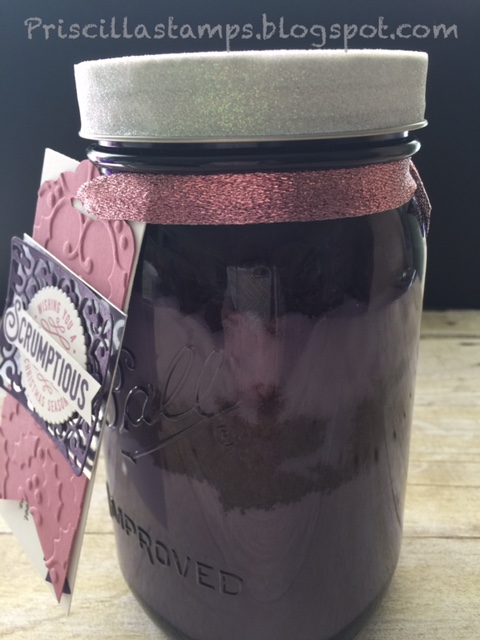
Chocolate Chip cookie fixings in a jar!  Now Susan used clear Ball jars (1 quart size) and you can see the ingredients better, but I mistakenly picked up some PURPLE (special edition) jars.  When I got home, I was initially disappointed, but then decided to have a little fun.

So after washing and drying the jars (thoroughly!), I filled them with the following:

     1-3/4 cup flour
     3/4 teaspoon baking soda
     1/2 teaspoon salt
     3/4 cup dark brown sugar (packed)
     1/2 cup white sugar
     1-1/2 cups chocolate chips

Next I added some sparkly washi tape around the lid of the jar:

And then I made a tag, using Sweet Sugarplum and Elegant Eggplant.  The tag was punched on one end with the Scalloped Tag Topper punch, and on the other end with the Banner Triple Punch.  Then I ran it through the Big Shot with the Holly embossing folder:


A piece of Silver Foil is under the lacy cut out of the Cheerful Tags Framelits Dies in Elegant Eggplant.  The stamp is from Here's to Cheers--stamped in Sweet Sugarplum and again using an Elegant Eggplant marker and just highlighting "Scrumptious".

I hand cut the banner and layered it over the stamped image (which was cut using the Layering Circles framelits).

The tag was tied to the printed directions to make the cookies using ribbon from the 3/8" Glitter Ribbon Combo Pack.

The directions say:
Empty contents of jar into a large bowl.
In separate bowl, combine 3/4 cup of butter (use the real stuff), 1 egg and 1 yolk, and 1 teaspoon vanilla.  Beat until cream.  Add to the dry mixture.
Drop by tablespoonful onto an ungreased cookie sheet, and bake ina a preheated 375 degree oven for 8-10 minutes.  Cool on a rack, grab some milk and enjoy!

Here they are all packaged up and ready for distribution...

Try this the next time you need a small gift.  It was a huge hit among my coworkers!

Purchase products by clicking on them; it will take you directly to my on-line store:


Product List

Monday, December 26, 2016

December Paper Pumpkin

Holiday over, and now we move to celebrating a new year.  What?  What about the old year?  I have lots to celebrate, and this month's Paper Pumpkin is perfect to reflect on the past year and the blessings I have experienced in 2016.

Take a look:


Don't subscribe to Paper Pumpkin?  Well, now is the perfect time to join, because once you do, you'll have access to past kits, and this month's Pumpkin is now available.  And best yet?  It's NOT just a refill kit--it's the WHOLE SHABANG!  Rotary stamp and all!

So take a chance and try a one-month subscription!  What have you got to lose? Click here to subscribe. 

Saturday, December 24, 2016

Got Gift Cards?

So here we are, down to the wire...
Are you ready for Christmas? 

Just in case you need some last-minute gift ideas (and figuring you have 20 minutes to craft) here's a cute way to present gift cards:

I made boxes using cardstock and the Presents and Pinecones Designer Series Paper (almost all used up!). 

Simply measure the length of your gift card and add 3/4" x 2 (1-1/2" total) to your measurement.  Write that down.  Then measure the width of your gift card and add 3/4" x 2 (1-1/2" total) to your measurement.  Write that down.  The numbers you have written are the size of your card stock for the box bottom.  Cut to size and score 3/4" on all four sides.  Fold, using a bone folder, on all the score lines, and then slit the corners; glue into a box shape.

For the top, measure the length of your card and add 1/2" x 2 (1" total) to your measurement; write it down.  Then measure the width and add 1/2" x 2 (1" total) to that measurement and write it down--use these written down measurements to cut your card stock, then score 1/2" on all 4 sides.  Fold, using a bone folder, on all the score lines, slit the corners and glue into a box shape. 

Decorate as desired:

Quick, easy and fun!

Another gift card presentation uses your Envelope Punch Board:

Just measure your gift card, determine the size of the envelope you need on the front of the punch board, and make your envelope.  I adhered some Designer Series Papers to mine, and then added a bellyband to hold it closed.

Decorate as desired, and your gift giving is sensational! 

 Wishing you all a very Merry Christmas! 


Friday, December 23, 2016

Time for a Sneak Peek

Well it's just about Christmas, but I've run out of Christmas cards, so I'm going to give you a "present"--a sneak peek of some goodies to come.

The Occasions Mini Catalog goes live on January 4th; you can purchase from the Holiday catalog until then (don't miss the fabulous Year End Clearance sale!) and then we'll transition to the new one.  So here's a little peek of something to come:

This wonderful birthday card is full of surprises!  And just about everything is brand new!    Let's take a closer look and I'll explain...

Let's start with the popped-up panel--this comes from the Balloon Pop-up Thinlits Dies.  I cut it out with Peek-a-Boo Peach, then began to layer on the color.  The top balloon was cut using another of the framelits and Watermelon Wonder card stock, and the striped balloons are Pool Party.  I also used the coordinating Balloon Bouquet Punch for the under-layer of Watermelon Wonder.

And the banner was stamped with Pool Party ink, then the sentiment was stamped with Watermelon Wonder ink.  I added some little stars from the In Color Enamel Shapes.  And see that bow?  Also part of the framelit set--I love Stampin' UP!'s coordination!

The whole panel is popped up over two coordinating pieces of  Designer Series Paper--Party Animal, using Foam Adhesive Strips, and then this card became a shaker card (adding a Window Sheet behind the popped up panel).  The Sprinkles Embellishments were perfect, along with a few of the Fancy Frost Sequins (Holiday catalog).

And of course, this card has to have a coordinating envelope--more of the DSP on the flap pulls it all together.

Can't wait to get  your hands on these products?  Join my team and you can take advantage of one of the perks of being a demonstrator--you get to order before anyone else!

Or, contact me and I'll be sure you get  your own Occasions Catalog, just in time to place your order when it goes live on January 4th!


Product List