Thursday, October 25, 2018

October Paper Pumpkin

My October Paper Pumpkin just arrived, and it's perfect for autumn card-making. Take a look:


Not yet a Paper Pumpkin subscriber? Did you know you can do a one-month trial for just $19.95?  Or you can subscribe and then put your subscription on hold (or even quit) at anytime?  And everything you need to create your kit is included, except scissors. Why not give it a try? Click here and give it a go!

Wednesday, October 24, 2018

Hand Delivered Congrats!

My daughter recently received a promotion at work, so naturally she needed to get a congratulatory note from me.  Hand Delivered made her card fun and pretty:


Because I loved the way this came out, I chose to use it at my Card Club, along with a choice of background Designer Series Papers, "wardrobe" change and different colors:
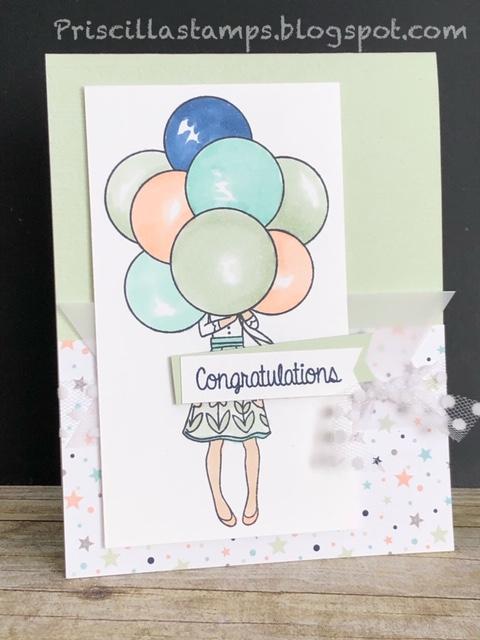

My first card uses Soft Sea Foam as the card base, and the star pattern from Twinkle Twinkle Designer Series Paper.  The second has a Pool Party base, with the striped paper from the same DSP pack.  And did you notice the girl's skirt?  Florals and stripes--so fun!


The balloons were colored using Stampin' Blends in coordinating colors.  And each card has a slice of vellum card stock behind the main panel, along with a knot of 5/8" Polka Dot Tulle Ribbon.

And a side by look for comparison:


Which is your favorite?


Tuesday, October 23, 2018

Happy Birthday to Stampin' UP!

Today's the day!  Stampin' UP!'s 30th birthday, and you get to party right along with us.  Take 15% off a select group of stamp sets TODAY only!


To see all the stamps on sale today, click here.  Then pull out your credit card (your husband told me it's OK!  😉) and place your orders!

Happy Birthday, Stampin' UP!


Monday, October 22, 2018

Get Ready, Get Set, SHOP!

It's Stampin' UP!'s birthday, and you get the present.  Take a look:


That's right - for 24 hours only, on Tuesday, October 23, select stamp sets are on sale for 15% off!

Here's a list of included sets.  If the one you've been waiting for is on the list, don't miss the 24-hour sale!

Click here to see all the included stamps.

Wednesday, October 17, 2018

Country Home

Not a stamp set on my radar, I ended up ordering it after seeing so many beautiful projects with it.  So when Country Home made a home in my home (😁) I knew I had to introduce it to my Card Club friends.

This is one of the cards we made this month:


Other than the coloring, this was a very simple card.

Basic Black is the base, and also the layer under the main panel.  The gorgeous Galvanized Metallic Paper, when embossed with the Tin Tile embossing folder looks just like an old-time tin ceiling.  💗


The milk jug, oval, "thanks" and the flower stamps were all placed on the Stamparatus, ready for my friends to stamp.  It allowed everyone to have perfect alignment and made it easy for their cards to look great.  Then I gave a quick tutorial on using Stampin' Blends, and everyone got to work creating their individual masterpieces.  A piece of Granny Apple Green Textured Weave Ribbon and two pearls (colored with the Granny Apple Green Blend pen) were all that was needed to finish this handsome card.

Products used are listed below; click on a photo to order in my online store.

Product List


Tuesday, October 16, 2018

A Fall Card

Having been traveling for 6 weeks, I was missing my Card Club.  AND I was having a little difficulty finding my stampin' mojo, if you get my drift.  So when it was time to hold my October Card Clubs, I wanted to start the class with something easy.  And elegant.  And a crowd-pleaser.  What to do?

Well here's one that meets all three of those criteria:


Very easy!  But with a fun technique - Emboss Resist.

We started by stamping the leaf from Colorful Seasons with Versamark ink on Whisper White cardstock.  Then we heat-embossed it with White Embossing Powder.


Next we used sponge daubers and three colors - Daffodil Delight, Pumpkin Pie and Cajun Craze, to add ink to our leaf.  Then we just swiped over it with a tissue to let the white veins show.  So easy and so effective!

The leaf was cut with the coordinating Seasonal Layers Thinlits dies and we flicked the edges with a bone folder to give it a little dimension.  Then the leaf was adhered to a Whisper White square, cut with the Stitched Shapes Framelits.

This was adhered to a scalloped square (Layering Squares) of Cajun Craze.  We placed a few Dimensionals on the back of the square and created a little "nest" of Copper Thread, sticking it to the Dimensionals.


The card base is Thick Whisper White, and we used a piece of Tear & Tape adhesive to hold our (retired - oops!) Burlap Ribbon in place.  Then our square was added with the Dimensionals.

This card is so elegant, and a definite crowd-pleaser.  AND it is extremely versatile - we left off a sentiment, knowing that it could easily become a "thinking of you", "birthday", "with sympathy", "friend", "hello" card...the possibilities are endless!  

I've listed all supplies needed below; just click on a photo, order in my online store, and you'll be on your way to a simple, elegant card that is sure to please any recipient!  

Product List


Wednesday, October 10, 2018

Dashing Deer

One of the prettiest new stamp sets in the Holiday catalog is Dashing Deer.  When I attended a demo get-together a few weeks ago, one of the cards we made used this beautiful set, along with Shimmer Paint. Wowza!  What a combo:


Stamping with Blueberry Bushel, and embossing on the Galvanized Metallic Paper makes a beautiful card!

Add a little Shimmer Paint:


Oh. Em. Gee!  So gorgeous!

To get this effect, we mixed a few drops of Blueberry Bushel reinker with the Frost White Shimmer Paint.  Then we sponged it directly on our stamp, and stamped on Whisper White cardstock.  You must work fairly quickly, and be sure to wash your stamp well when done (and then clean/recondition it with Stampin' Mist), but it leaves a shimmery image in the color of your reinker.  


The card base is Blueberry Bushel; the Galvanized Metallic Sheet was embossed with the Swirls & Curls embossing folder.  I cut my deer with the coordinating Detailed Deer Thinlits dies and popped it up on an oval cut with the Layering Ovals.

And inside:


This got a little royal treatment with some stamping on the Galvanized sheet and the addition of some rhinestones.

Simply gorgeous! 

Want to try this technique?  I've listed the materials used below; just click on a photo and go directly to my online store. 

Product List