Monday, August 31, 2020

Simple, Fast and Cute

How often do you need a card that is quick and easy to put together, yet is still cute?  Like when your husband asks you for a birthday card for a co-worker, and it's already 7:30 and he needs to leave at 8?  Or when your neighbor tells you it's their anniversary, like TODAY!

Well, here's a quick and easy card that I made as a Christmas card, but the template could be used for any occasion:


Literally, this is a 10-minute card!  Just a card base (in any color) with a same-color layer, embossed with any embossing folder, a piece of patterned paper adhered to a slightly larger layer of coordinating cardstock and popped up on Dimensionals, and a quick sentiment.

Let's take a closer look:


A sentiment:  choose something for the occasion - birthday, anniversary, new baby, holiday; stamp on a rectangular piece of neutral cardstock (I used Banner Year on Whisper White).


Choose your patterned paper:  I used Plaid Tidings, cut to 3" x 4-1/2", and layered it on Cherry Cobbler, cut to 3-1/8" x 4-5/8".

And choose a coordinating cardstock for your card base:  cut to 5-1/2" x 8-1/2" and score at 4-1/4".
Then using a piece of the same color cardstock cut to 4" x 5-1/4", emboss it; I used the Tasteful Textile embossing folder.

I wanted my greeting to stand out a bit so I just cut a 3" x 3-3/4" piece of Cherry Cobbler and used the Banners Pick-a-Punch punch for the flagged end.

And then decorate with a few jewels.  This has the Gold Glitter Enamel Dots for a little glitz!

Done!


Helpful Hint:  You can make up these cards in advance and have them ready at a moments notice.  Just cut a few pieces of cardstock, emboss a matching layer and add your patterned papers, and keep them in a convenient place.   Then pull out a stamp set, stamp, adhere and you're ready to go!  Your neighbor will be delighted that you remembered their anniversary, and your husband will be grateful that his colleague will get a birthday card.  He may even treat you to dinner!
I call that a win-win!  😉


Got Bonus Coupons?  Today is the last day to redeem them!  Don't miss out on your savings!


Will you be placing an order today?
If your order is less than $150.00 please consider adding my current host code to the bottom of your order form.  For every order added, I'll send you a hand-made thank you card and a FREE gift.  If your order is over $150.00, do NOT add the code - you'll be eligible for host benefits and I will still mail you a card and gift.

E2YP2B67


Product List


Friday, August 28, 2020

Team Swap

My Ink Master team gets together on Zoom every two weeks.  When the new August - December 2020 Mini Catalog came out a few weeks ago, we all decided to participate in a card swap.  We would each make a card (actually we all made 9 of the same cards) using at least one new product from the new Mini, and we would send them to each other, thereby collecting 9 cards with new stamped images, new patterned paper, or a new accessory.

Fun, right?

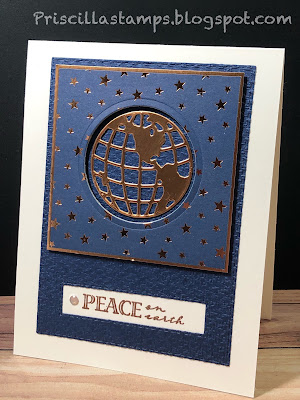
So my swaps were mailed last week, and by now I think everyone has it, and it's safe for me to share. This is what I did:


I chose to use the Wrapped in Christmas stamp set, along with the Brightly Gleaming paper (a returning goody from last year, and one I couldn't wait to get my hands on!).


And when your card says "Peace on Earth", what better image to use than that globe?  The World Map dies were perfect for this card.

Let's break down the steps:

  • The card base is Thick Whisper White, cut to 4-1/4" x 11" and scored at 5-1/2"
  • There is a layer of Misty Moonlight, 4-3/4" x 3-7/8", which has been embossed with the Tasteful Textile embossing folder
  • I cut a rectangle toward the bottom of the Misty Moonlight layer, using the Stitched Rectangle dies
  • Before adhering the Moonlight layer, I held it in place and stamped my greeting through the hole, using Versamark ink (I lined this all up once, using the Stamparatus, then I stamped all my cards in the same place)
  • The greeting was heat-embossed with Copper Embossing Powder
  • Then that Brightly Gleaming paper with the copper stars - a 3" x 3" square, mounted to a pieced of Copper Foil that is 3-1/8" x 3-1/8"


  • Before adding the Brightly Gleaming layer, I cut a circle (through both layers - Brightly Gleaming and Copper Foil), using the World Map dies - there's one that is the perfect size for the globe to fit in; then I popped the layer on the card front using Dimensionals
  • The globe was cut from Copper Foil using the World Map dies (there are two - one for north/South America, and one for the other hemisphere, including Europe), and nestled into the cut circle using tiny slivers of Dimensionals

  • And the card was finished off with a Gold Glitter Enamel Dot.
Here they all are, lined up and getting ready for mailing:


Whew!  I usually don't like making multiples of cards, but using the Stamparatus and cutting all the pieces, then using an assembly line to put them together was actually quite rewarding!

Over the next few days, I'll share the cards I received from my teammates.  It's a great collection!


Don't forget to redeem your Bonus Days Coupons this month!  They expire August 31.


Will you be placing an order today?
If your order is less than $150.00 please consider adding my current host code to the bottom of your order form.  For every order added, I'll send you a hand-made thank you card and a FREE gift.  If your order is over $150.00, do NOT add the code - you'll be eligible for host benefits and I will still mail you a card and gift.

E2YP2B67


Product List


Wednesday, August 26, 2020

Wednesday's What's On the Desk?

It's another What's on the Desk Wednesday, where I take orphaned pieces of cards (never used) and turn them into something.  Want to follow along?

I have a box of pieces that I collect when I die-cut shapes, stamp images or tie ribbons that I don't end up using.  Rather than toss them, I toss them in my box.

This is what I was looking at:


So I started pulling out pieces:


And then started playing:


How about colors?


Layout?


Hmmm...OK, what next?


And then?


OK, let's finish this up:


A few more sprigs, some Sunflower dies for white pops, a sentiment (silver embossed) and a bow.


Yes, pretty...and now for the finished card?


Ta da!

Lots of bits and pieces, die-cuts, embossed layers and mixed colors and textures...not bad for digging stuff out of a box!  😁


What do you do with your leftovers?


Product List