Friday, September 30, 2016

Specials for World Card-Making Day

 wcmd_shareable-2_oct0116_na


October1st is World Card-Making Day, a day set aside for stampers everywhere.  Time to dust off those stamps and make/send a card...no particular reason--it can be a birthday card, a congratulations card, a sympathy card, or one to encourage the recipient.  But getting a hand-made card in the mail is a wonderful pick-me-up, and this is the day to celebrate it!

And Stampin' UP! is celebrating by offering YOU up to 25% off of several essential card-making supplies.  For five days only, you can save...take a look:

wcmd-kit

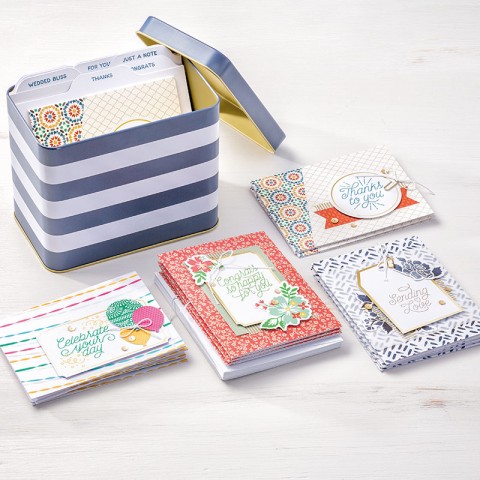
One of the best values is the Designer Tin of Cards.  This adorable kit comes with a cute striped tin and the makings of 16 cards.  All you supply is the stamps (check out Designer Tin of Cards--made to go with this kit), inks (Crushed Curry, Cucumber Crush, Dapper Denim and Emerald Envy) and adhesive.  Usually priced at $27.00, this kit is on sale for five days only at $20.25!

Other items available during this special sale include the Envelope Punch Board and Envelope Paper.  And of course, to make cards, we have card stock on sale too.  Finally, another great deal is the Fast Fuse Adhesive--buy one and get the refill free!  And who doesn't love FREE?

Check out this flyer for all the details...and make a card on World Card-Making Day! 

All items can be purchased here

Wednesday, September 28, 2016

Tin of Tags

I fell in love with one of the new items in the Holiday Catalog this year.  The Tin of Tags is the cutest!  Look:

This snappy little red polka-dotted tin is stuffed with almost everything you need to make (are you ready for this?)  30 - THIRTY - tags!


Yes!  It comes with printed tags (3 each of 10 designs), die-cut shapes, baker's twine, tassels, wood snowflakes and bows, sequins, washi tape and doilies!  WHEW!  Pick up the coordinating stamp set, Tin of Tags, and a few ink pads, and you're ready to go.

Let's see what you can make:


And here are a few close ups:

While I was waiting for my new granddaughter to come home from the hospital last month, I pulled out my tin one evening (it traveled very easily to Maryland with me).  I had been saving some ink spots from past Paper Pumpkins and had all the right colors.  So all I needed was a little adhesive, my acrylic block, and I was ready to go!  I sat down and stamped, glued and embellished, and in no time I had 30 tags ready for the holidays, as well as other occasions.

This is a great project to make with friends or kids.  Easy, quick, little mess and you make something that we all need--tags for gifts!  Perfect!

Tin of Tags (#142011) and the matching stamp set (#142180) can be ordered here.  Get yours today!


Sunday, September 25, 2016

Look Who's Helping!

I've been very busy prepping for a holiday card class.  I have 16 people coming to make Christmas cards and there is A LOT of Big Shot dies to be cut.  Because the class would last 24 hours if everyone had to cut their own, I enlisted the aid of someone special to help me cut all the dies:


I told my husband I'd pay him $10 to work with a "tool".  He agreed...and I put him to work!  Poor thing, he had no idea what he'd be getting into.  But after a few turns of the crank, he was on a roll, and churning out diecut after diecut!

And after a few minutes, he was actually smiling:


See?  Anyone can do this...

Come back next week, and I'll show you all the cards we were making. 

(And if you want to leave him a nice message, I'm sure he'd appreciate it!  He worked with me for two evenings and one afternoon!  Whew...)


Friday, September 23, 2016

Check Out This Paper Pumpkin!

Mine arrived today (well actually yesterday, but the postman put it in my mailbox and I couldn't get it out--had to leave him a note to please put it in the larger "package box"!  GRRR)

Anyway, LOVE this month's Pumpkin--such a cute project and perfect for this time of year.  I'll love giving these for Halloween, and also making up some for Thanksgiving.  If I have any left, I'll do some for Christmas!  How fun!


Want to get in on the fun?  Subscribe to Paper Pumpkin and get your own little orange box each month.  It will have everything you need to have 30 minutes of creative heaven time just for you!

Click on the link on the right...and start having some fun with Paper Pumpkin!

Wednesday, September 21, 2016

Take Another Look

Let's take another look at a card posted for the Watercooler Blog Hop (here):

This card uses almost all of my favorite stamps and dies from the Spooky Fun and Halloween Scenes Edgelits Dies sets.  And I had such fun creating it.  The card layout was new to me.  I had seen some of these fun-fold cards on other blogs, and decided this was the perfect time to try it myself.  Look what happens when you open it up:

The card is 5-1/2" x 11", scored at 2-3/4" and 5-1/2".  An easy way to make one of these is to first cut your cardstock 6-3/4" x 11"; score as above, then cut 1-1/4" off the long side.  Flip this piece over and you have the bottom edge of your card with the score lines already in place.

But because I was using the fence from the Halloween Scenes Edgelits, I cut this separately (one loooonnng piece, moving the die and matching it up all the way along the edge).  I set that piece aside to use later.  I also cut out two of the trees, using Basic Black.

Next I took three pieces of Whisper White cardstock to create the panels of the card.  These were sponged with "spooky sky" colors; I placed my trees on the panels so I knew where to start my sunset, and then sponged Crushed Curry, Tangerine Tango, Perfect Plum, Elegant Eggplant and finally Night of Navy across the top of the card, blending the colors as I went along.  Once the sponging was done, I adhered the panels to my card.

But I still needed a "hill" in the center, connecting the two trees.  So I just laid the trees next to a piece of Basic Black and hand drew/cut my hill.  These were all adhered to my card.

I also stamped my witch (Memento Tuxedo Black), pumpkins, tombstones and bats.  The witch, pumpkins and tombstones were cut out with the matching dies, and I stamped the ghosts on Vellum cardstock and fussy-cut them.  These are adhered behind the tombstones.

Now that long phrase...as I was making the card, I knew I wanted something along the bottom, but what to write?  I kept thinking and thinking, and suddenly I had a rhyme:  "Witches and goblins, oh what a fright; spooky, scary Halloween Night"

I admit that I had no idea how long this phrase would be; I carefully snipped the Whisper White strips, following the curve of the fence, and just started stamping the phrase, using Labeler Alphabet (love this!  So easy to line up the letters in the words).  As I got to the "spooky, scary" part, I knew I was in deep doo doo...I didn't have enough room.

What to do...what to do...

After all the time I had put into creating this, I wasn't letting a few little words stop me...

I just extended my phrase, adding in one more strip of white cardstock.  So there!

And there you have it!  Creative genius at work...certainly not perfect, but I'm in love with the end product.  And I'm pretty sure my grandkids will love this too!

All products can be purchased here


Monday, September 19, 2016

week-3 


Take a look at the wonderful offers available for this last week, but don't delay--they go away on Wednesday, 9/21!


Lots of Project Life stuff for the scrapbooker in you.  Don't scrapbook?  Project Life can also be used for cards.  And don't overlook the Layering Ovals Framelits Dies!  Wowsa!  One of my favorite things...and will be one of yours too!

All items can be purchased here.


Sunday, September 18, 2016

Blog Hop Details

Welcome!  If you've been visiting my blog for the past few days, you'll have seen the Watercooler Blog Hop and the projects I submitted.  This week I'll be showcasing the items I made in more detail.

Today we'll look at this one:


I love this card!  But it took me quite a while to make, mainly because I didn't have any idea what I was doing when I started.  LOL

I had been playing with my Detailed Santa Thinlits Dies but each card looked kinda the same.  I made several cutting the Santa out in Whisper White, and then I tried one using Basic Black.  That started my creative juices flowing.

So for this card, I cut my Santa with  Whisper White, and then I cut scraps of Blushing Bride and Real Red for the face and hat.  This took me two tries--hint--after cutting, lift the die with all the pieces intact and place it on your Die Brush pad (if you don't have one of these, you NEED one!) and vigorously brush over the die.  Carefully lift the thinlit and leave the pieces of paper on your pad--these are what you need to fill in the blanks, and if you move them around too much, you won't know which ones go where.  Ask me how I know...

I carefully placed my pieces in the cut out spaces--they fit really nicely.  Then I picked up the whole piece and adhered it to a Window Sheet.

Now for another tricky part--cutting just the right size opening in my Real Red base and my Basic Black layer. 
I started with the black, and cut a square just a tad smaller than the edges of my white frame.  Then I used that as my stencil and cut the red card stock slightly larger (the white one is sandwiched between them, so you won't see the red, but it gives it more stability).  Oh, and do you see that Cucumber Crush strip along the top?  That's a decorative edge die that comes in the set (there are two different ones); I cut it just out of the black layer, and placed two thin strips of Cucumber Crush behind it, leaving the center open so you see the red card base through the little circle.

After all that work I panicked when I thought about heat-embossing my sentiment from Greetings From Santa on the bottom of the black layer, but my Stamp-a-ma-Jig made it easy!  Whew!

For my inside, I laid another Santa cut out on the Whisper White card stock for placement, and inked my Naughty or Nice stamp using Real Red and Cucumber Crush (and Basic Black) Stampin' Write Markers.

A few black stars (also a die in the set), and I was ready for my blog hop!

This is not a card to mass produce, but it sure is a special one for a special boy or girl!

All products can be purchased here


Thursday, September 15, 2016

The Wacky Watercooler Blog Hop--What We Love About the New Holiday Catalog


Yes it's time once again for another Watercooler Blog Hop, and this time we'll show our new Holiday Catalog a little love.  Whether you've hopped on here, or come from Marie's fabulous page (weren't her ideas over-the-top wonderful?), I hope you'll enjoy our creations and get some inspiration for your holiday projects.  There are nine stops on this tour; just click on the buttons below to move along.

We have been asked to prepare three items featuring our favorite products from the Holiday Catalog, and I had a hard time choosing.  So I just started creating, and ended up picking three of my creations to share with you.  I hope you like them.

Let's start with Halloween and a double Z-fold card:

Oh my what a fun time I had creating this beauty!  I love Halloween and I especially LOVE creating spooky sky images.  So this card was right up my alley...

Featuring Spooky Fun, I used almost every stamp, and then I used almost every framelit in the Halloween Scenes Edgelits Dies.  Look what happens when I open up the card:

I sponged the sky on three panels of Whisper White card stock, then added the die cut trees.

The fence was cut and added to the border, and I created my own phrase using the Labeler Alphabet stamp set.

My only problem was that my Halloween phrase was longer than my card (insert frowny face), but that didn't stop me--I just added another fold-out extension, and kept on going.  My my, I really love this card!


Let's move on to something more sedate.  I couldn't wait to play with the White Gift Boxes.  Is there anyone else like me who just can't resist a good gift box?  And these are perfect--3" x 3" x 3", and include an acetate sleeve to slide over the box; take a look:

Did I mention these are white?  Because of the "food-safe" quality, they are slightly waxy on the outside, so stamping on them would prove challenging.  But no problem for me--I just covered them with another fantastic product from the holiday catalog--Presents and Pinecones Designer Series Paper!

2-3/4" squares for all sides made these boxes so pretty.  And I added a little trim from the Flourish Thinlits dies and some Cherry Cobbler card stock.  Then I slipped on the sleeve and tied it all up with yet another wonderful new item--Candy Cane Lane Baker's Twine.  It has red metallic thread that is so sparkly!


And see that tag?  Oh my my...another favorite new thing--the Merriest Wishes stamp set with matching Merry Tags Framelits Dies.  But with a twist--this tag is supposed to have a cut out tree; instead, I saved the pieces from the cut out, and glued them together to make a tree.  Such fun!

And I topped it off with a tassel from the Tin of Tags Project Kit--just an extra piece of fun to make your packaging special!

OK, OK, now to my very favorite project--I fell in love with the Detailed Santa Thinlits Dies when I first laid eyes on them.  HAD. TO. HAVE. THEM!  But all the cards I started making with them looked similar, until...

BOOM!  I filled in the cut out face and head with Blushing Bride and Real Red pieces, and suddenly my Santa came alive!  And I put him on a Window Sheet, so you can see through to the inside of the card.

Ain't I clever?

Oh, I'm in love...

Well that's it for me.  I'll have details for each project over the next week, so be sure to pop back in starting Sunday.

And now off you go to Christine's blog, where you are sure to find more creative inspiration!  I love her work.  Thanks for stopping by!

http://mytanglewoodcottage.net/

http://wackywatercoolerstamping.blogspot.com/


http://mytanglewoodcottage.net/


Sunday, September 11, 2016

New Video - Pouncing with Plastic Wrap

You may remember this card, one which was entered into the Watercooler Wednesday Challenge (and I was so excited to have my card picked as a winner!):


 I originally had another idea, so I decided to remake my card and experiment with the background, using a technique that is an oldie, but goody.    It came out so nice that I used it in my Card Club this month...everyone loved the background and I heard, "I see a video coming..."

So naturally I couldn't disappoint anyone.  Here's my second attempt at this card, changing up the background and showing you this great technique:  Pouncing with Plastic Wrap!


 I hope you'll give it a try!


Saturday, September 10, 2016

Easy Thanks

Want to know how to create a beautiful card in minutes?

Sometimes we just don't have time to sit and create a card.  Well here's a wonderful product that will help you finish a card in no time flat:

The beautiful Serene Scenery Designer Series Paper Stack has 48 sheets of gorgeous 6" x 6" paper just ready for your stamps.  One side has pretty patterns, and the other side has photos, like this beautiful seashore.

Just use your stamps (here I used Wetlands) and a sentiment (Floral Phrases), cut to size, add to a piece of cardstock (I used Whisper White Thick), and you're done!  Presto!

I've done a few other cards with this paper stack;  see them here and here.

And get yours here!

Here's a video from Stampin' UP! showing off this wonderful paper:


Friday, September 9, 2016

Special Offers Week 2

SpecialOffers_Header_Demo_Sept2016_NA
Week 2 - September 8-14


Don't forget about the Special Offers that Stampin' UP! has going on right now. 


We're in Week 2, and there are some wonderful bargains on brand new products.  Take a look:


All items can be ordered here.

Thursday, September 8, 2016

One More Slider Card

If you saw my last post (here),  you saw my slider card for my grandson, Ethan.  His younger brother, Jacob, has to have everything Ethan has, so of course I couldn't make one a card and not have one for the other.

So...here is Jacob's card:

I L.O.V.E. the Shooting Star stamp set with the matching Sliding Star Framelits!  So much fun to make interactive cards that move.

Today's card is a bee hive, with momma bee circling the hive and baby bees flying around.

The card is So Saffron, 5" x 5", with a layer of So Saffron (embossed with the retired Hexagon embossing folder) on top.  Between the layers is a piece of Subtles Designer Series Paper Stack in So Saffron.

The hive was stamped on So Saffron with So Saffron ink.  The bees were stamped in Memento Tuxedo Black and colored with So Saffron and Basic Black markers.  All were cut out using the framelits.  I also cut a Whisper White scalloped circle, using the Layering Circles Framelits - love those!

 A Subtles Enamel Shape was added to the sentiment.

Jacob is my sweet honeybee...such a cutie!  I know he'll have fun spinning his bee around the hive.

All products can be purchased here


Tuesday, September 6, 2016

Shooting Star

Many of you know that I've just returned from a trip to the East Coast to visit my grandchildren.  Ethan and Jacob now have a new baby sister.  I had such a good time with the boys while we waited for the new little one to come along, and Ethan told me he wanted to build rocket ships when he grows up.  So naturally I had to make something for him:

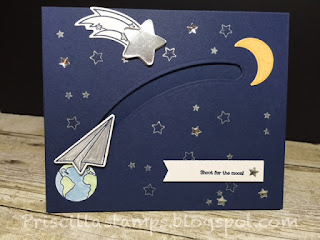
This new set, Shooting Star, with the matching Sliding Star Framelits Dies, is sensational!  The framelits help you make slider cards--interactive cards that move.

Ethan and I played with paper airplanes, and this set has one!  So fun!  I stamped the earth, shooting stars and plane using Night of Navy ink on Whisper White card stock.  The framelits make it easy to cut them all out.  The moon was stamped in So Saffron, on So Saffron card stock, and also cut with the framelits.

Then it's time to put it all together...easy peasy!  The base is Night of Navy, and there is a top layer of Night of Navy that has the slider "track" cut out (using the framelits).

You can see the pennies I used to help the plane slide--one penny below the track, one penny on the back of the plane, and held together with a Dimensional.  As the card is moved, the plane can spin or move along the track all the way to the moon!

Stars were stamped in retired Silver ink, and I added some of the new Metallic Enamel Shapes--silver stars to the background and the sentiment banner.

Shoot for the moon, Ethan!

Products can be purchased here