Sunday, October 31, 2021

A Wall of Plants

Do you ever get something new and just HAVE to play with it?  Well, that was me, yesterday.  I had placed an order and it arrived, containing the Paper Lattice that goes with the Plentiful Plants bundle.  I didn't think I "needed" those paper lattices, but they got the better of me and I placed my order.  And then they arrived...

So even though I am in in the midst of prepping for a large Cards-by-Mail class along with an in-person class next week, I dropped everything to have a play.  Look:


 Oh, yes, I'm in love!  Such a cool background for these beautiful little plants!  

But I wanted to do something a little different from all the samples I had seen.  So I started by cutting a piece of Soft Succulent cardstock to fit the full front of a card (4-1/4" x 5-1/2") and then cut a Stitched Rectangle out of the middle of it.  I then carefully added Tear & Tape Adhesive to each side and adhered the Paper Lattice.  


This layer was added to the card base (also Soft Succulent, but with a piece of Vellum cardstock on top to soften the color a little) using Dimensionals so it's popped up.  

Then the fun started - I stamped and cut lots of plants, using various shades of greens.  I also cut a few directly from the coordinating patterned paper (which has several images that fit the dies).  


Each plant/flowerpot was adhered with Dimensionals, which really gives the entire card a "dimensional" feel.


I love the way this turned out, and am SO happy I caved on the Paper Lattices!  They really add a touch of class to the background of this card, and I know I'll be playing again very soon!  

Product List

Wednesday, October 27, 2021

Happy Colors

 My grandson is 11!  How does the time fly?  I can still remember the night he was born; I was called out of a meeting in the afternoon and drove 25 miles to meet my daughter-in-law's mom at the hospital.  It was still fairly early in Sarah's labor, so we played name games, taking all their suggested names and putting them in a hat, then drawing the names out one by one to discuss our favorites (we loved all of them, so it didn't matter to the grammas which they chose).  And finally, just before midnight, Ethan made his appearance!  We were so thrilled to be present for this miraculous occasion.

And now he's 11.  Wow!  

I wanted to make a card that would be fun, but not too "young", as he is now a tween.  So I searched for ideas on Pinterest, and one caught my eye.  And of course, I didn't write down the name of the creator, so for that I apologize, but I loved the card.  This isn't an exact copy, but it's similar...


Isn't this fun?  And bright?  L.O.V.E.

It's also easy...which is probably the best part!  It's a Basic Black card base with a Bermuda Bay layer.  The Basic White is embossed (retired Subtle embossing folder, that I will NEVER get rid of!), and then the fun begins.


Using the Stitched Triangle dies, I cut 5 pieces from bright cardstock colors.  I also stamped them in the same color as the cardstock, using The Right Triangle (now retired, but any stamps with patterns would give the same results).  And that little banner?  There is a banner die in the set, along with a long "edge" die, which I used to cut little tiny triangles to fit the banner...genius, right?  ðŸ˜‰


The letters were cut with the Playful Alphabet dies, but I first adhered some Foam Adhesive Sheets to the back of the cardstock--this gives the letters lots of dimension!


Wishing Ethan a very happy birthday!  


Product List

Monday, October 25, 2021

3D Penguins

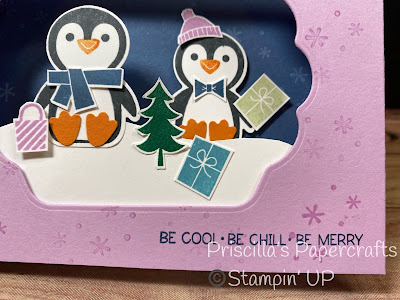
 I have a little different card for today's Merry Monday.  It's a 3D card using the Penguin Place stamp set:


Have you seen these "diorama" cards?  There's an opening on the front and a little scene is created inside:


I recently bought a "Retreat to Go" package from Lorri Heiling, a very talented Stampin' UP! demonstrator.  The basics for this card were in the kit, but I did not have the stamps that were used for the  in-person event.  So I created my own diorama, using the Penguin Place set...and I LOVE it!  

The card does not open - the front and back are adhered together with a little fold on each side so that the card can lie flat for mailing in a standard envelope, but pops up when out of the envelope.  And the little scene is three-dimensional.  So fun!


Here we have two little penguins sitting on a snowbank.  They have each been stamped in Tuxedo Black ink, then punched with the Penguin Builder Punch (which also punches out some cute little feet!).  I stamped the fashion accessories (scarf, bowtie and beanie) and fussy-cut them, along with the little tree and presents.


And what a perfect greeting!  


Because the card doesn't open, there is an added panel on the back for signatures.  This is stamped in Misty Moonlight ink, with some Fresh Freesia snowflakes.

Who wouldn't love a little snow scene full of penguins for Christmas?  


Product List