Showing posts with label Mothers Day. Show all posts

Tuesday, April 21, 2020

Dressed to Impress, Day 2

This week I'm highlighting the Dressed to Impress stamp set and All Dressed Up dies.  I had demonstrated a pretty storage/gift box for cards last week (see that video here), and filled it with cards using items from the Best Dressed suite.  Today I have a second card to show you.


This card uses the Best Dressed Designer Series Paper as a focal point.   And what a beautiful focal point it is!


I started by cutting a frame of Lovely Lipstick cardstock with the new Ornate Layers dies.  Then, using Whisper White, I cut a Stitched Rectangle frame, using two of the Stitched Rectangle dies.  This was layered on the larger piece, and then I cut the Best Dressed DSP with the Stitched So Sweetly dies for the centerpiece.  This is such gorgeous paper!


This card looked very feminine to me, and seemed to be a perfect Mother's Day card, so I whipped out my Well Written dies and cut three Lovely Lipstick "happy"s, stacking them to create a dimensional word.  The greeting is from Well Said, stamped in Lovely Lipstick and cut with the Stitched So Sweetly dies.


It was easy to dress up with some Metallic-edged ribbon (colored with my Lovely Lipstick Stampin' Blends) and some rhinestones (also touched with Lovely Lipstick Stampin' Blends).

Layers of lovely paper and die-cut cardstock - makes for a beautiful card!

I've still got more cards to show you this week; c'mon back to see them.


Product List


Saturday, May 11, 2019

I'm Creating Again!

Well, it's been quite a few weeks!  Three weeks ago I started dismantling my craft room in my California home of 25 years, getting ready for a big move to Oregon.  I was a bit freaked about not being able to create for a few weeks, but with all the move "activities", I really didn't have much time to think about it.

We moved in just two weeks ago, and, naturally the kitchen, bedrooms and bathrooms became a priority.  Not to mention the garage!  Leaving a 3-car garage and moving into a smaller space caused some consternation trying to figure it all out.  But shelving done, multiple trips to the recycling center completed, I was ready to my next challenge.

The craft room.


It started out like this.  And all I wanted to do was run away, screaming!

But then I got a little more organized.


I moved boxes out of the way and designed a plan.  Although my son (the contractor) wanted to build me my dream room, I declined for the time being, and went with a simple idea.  And a trip to IKEA.


Ready to roll!

After a few days of hard work, I was almost ready.


There are still a number of boxes to unpack, shelving to put up and "settling" to do, but I finally made enough space to create.

Take a look:


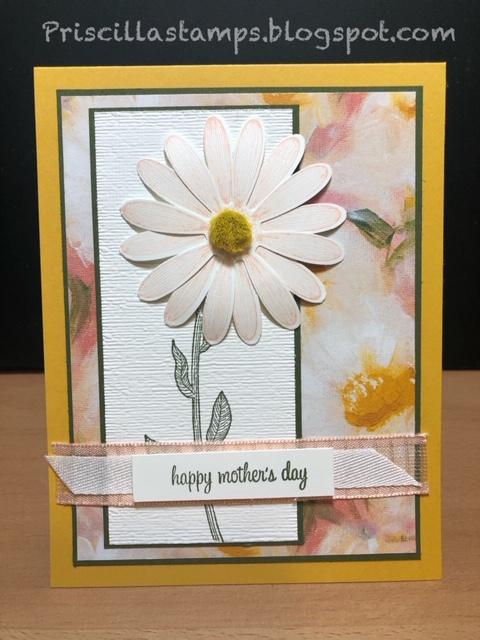
I really wanted to use something new!  I had received two orders of "stuff that is coming" in the new Annual Catalog (starting June 4th!), but made myself wait until I actually had space to create.   So now was the time!


This is the large daisy from a new set called Daisy Lane.  The large flower can be punched with the same Daisy Punch we all know and love, that coordinates with Daisy Delight.  But in June, there will also be a smaller daisy punch--can't wait!  I stamped the leaves in Mossy Meadow, then ran the Whisper White cardstock through my embossing machine with the Subtle Embossing Folder.  I ran it through twice, turning the paper 90 degrees the second time through.  This gives an almost linen-like look to the paper.


And look at the center of this flower!  The Perennial Essence Floral Centers are the perfect touch for these daisies.  Can you see this brand new Designer paper?  Perennial Essence is going to be a favorite; it's absolutely beautiful!  And here's a sneak peek at some new ribbon.  The Petal Pink Organdy Striped Ribbon is lovely to work with and ties a beautiful bow (although I only layered a piece with some soon-to-be retired White Cotton ribbon).  The sentiment is from Itty Bitty Greetings, happily carrying over from this year's catalog.


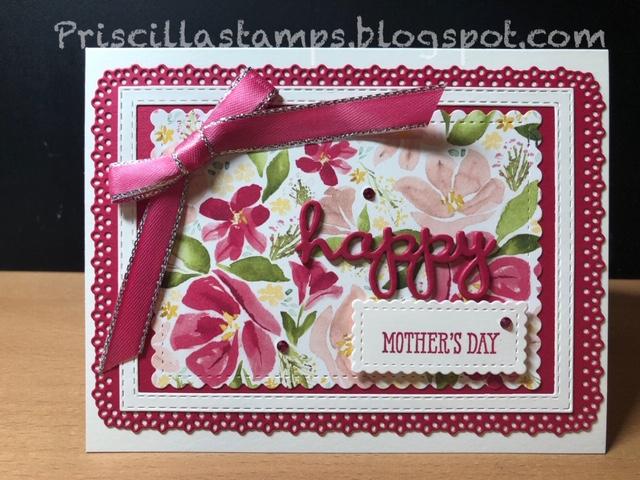
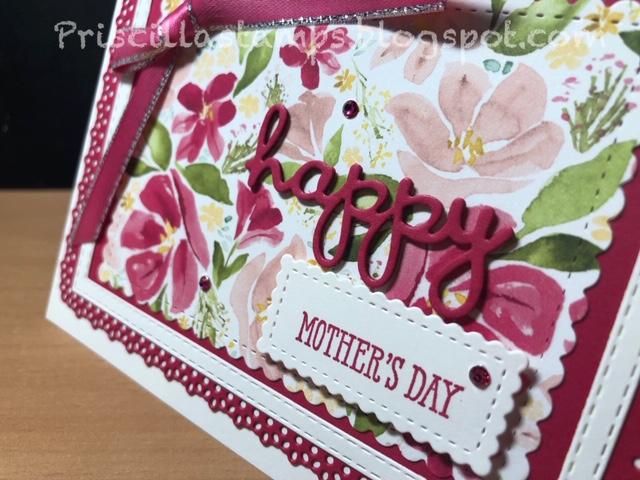
I decorated the inside with a few more daisies, as well as a sentiment from Abstract Impressions, one of my faves!


So now I have Mother's Day cards for my mom and my mother-in-law.  They'll be getting them a little late, but hey, better late than never, right?


Monday, April 30, 2018

Saying Goodbye

I always dread this time of the Stampin' Up! year--time to say goodbye to retiring products.  And this year is no exception.  With a color revamp and a new catalog about to debut, it's exciting, but I have to give up some of my favorite products.

So today's card is one of those featuring a few retiring products:


This was one of the cards we made at my Card Club in April.  And it uses one of my favorite designer series papers - Painted with Love.

What?  You can't see the designer paper?  Well look at those flowers.


Using the soon-to-be-retired Flower Shop stamp set, we stamped one of the pansies directly on the DSP, using Tuxedo Black ink.  The Pansy Punch, also retiring, made cutting these flowers out easy-peasy!  All we had to do was color a Pearl Basic Jewel with a Rich Razzleberry Stampin' Blend, and the flowers were card-ready.


The card is a piece of Rich Razzleberry cardstock, cut 5-1/2" x 8-1/2" and folded in half.  We added a layer of Rich Razzleberry (4" x 5-1/4") with an oval (Layering Ovals Framelits dies) and embossed with the Layered Leaves embossing folder, popped up on Dimensionals.  

After gluing the pansies in place, we added some Old Olive leaves, punched with the Leaf Punch.  And we finished our card with more Stampin' Blends-colored pearl embellishments.  

Stamp directly on your Designer Series Paper--it's a great way to use up scraps, and makes such lovely flowers!

Product List


Tuesday, June 6, 2017

Belated Mother's Day

I have one more Mother's Day card to share today.  I had this card ready to share with you two weeks ago, but got admitted to a hospital for a week, and never got back to it.  Because it uses the Delightful Daisy Suite from the new Annual Catalog, I'm going to let you see it anyway.  Just pretend that it says "happy birthday" or "thinking of you" or "happy anniversary" (any of which COULD be true!).  :)
Isn't this the cutest?  Such a happy card!

Because I created this card before the retiring products were gone, I used the Brights Paper Stack from last year's catalog.  The card base is Daffodil Delight, with alternating layers of Whisper White and the DSP.

I did not use the Daisy Delight stamp set for this card - only the Daisy Punch.  The flowers were punched twice for each one, offset/layered, and I added an old clear embellishment over a circle of Daffodil Delight.

I love the leaves--Pear Pizzazz cut with the Flourish Thinlit dies--such an easy addition.

And of course, a matching envelope:

Everything in the Delightful Daisy Suite of products is now available - EXCEPT for the Daisy Punch, which is backordered until June 26.  If you want the stamps, Designer Series Paper, coordinating ribbon and Faceted Gems embellishments, they can be ordered now.  But wait--if you want the punch, please consider holding your order until the end of June, as the stamp set and punch can be purchased as a bundle, saving you 10% (and who doesn't like saving money?).  I am accepting orders for this bundle, and will hold them until I hear that they are available; if you would like to place your order, please contact me and I will be happy to order for you as soon as I can.

This is a wonderful suite of products; I have other samples here .  And don't let that backorder scare you--the punches are on their way and will be available soon--and they are SO worth the wait!

Product List