Tuesday, August 28, 2018

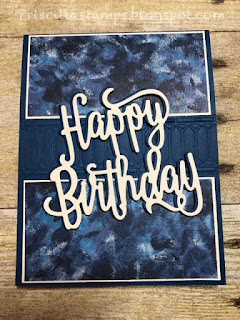
A Garden Impressions Birthday

Here's a pretty, simple and SO effective card for any occasion (I made mine for a birthday):


Combining Garden Impressions Designer Series Paper with the Happy Birthday Thinlits dies makes  celebrating a cinch!  And it's a perfect "masculine" card, which is always a challenge for me.

This card also has a pretty embossed detail:


Can you see the embossing of the Night of Navy strip?

Let's break it down:

1.  Card base is Night of Navy.
2.  I cut the Garden Impressions DSP into two pieces and mounted it on a skinny layer of Very Vanilla.


3.  Using the Big Shot Embossing Mats and the Stained Glass Thinlits, I embossed (instead of cutting - how cool!) the center of the Navy card base.  Then I mounted the layered DSP strips around the embossed area.
4.  "Happy Birthday" was cut twice - once in Very Vanilla and again in Night of Navy.  Using the Multipurpose Adhesive Sheets made it easy to mount them together, slightly off-set to create a "shadow" behind the vanilla letters.
5.  The sentiment was mounted to the card using pieces of Mini Dimensionals.


I love the embossing technique using the Embossing Mats; it's the perfect way to stretch your dies, being able to cut OR emboss them.


And the Garden Impressions DSP is simply beautiful.  If you haven't purchased this yet, you really should add it to your stash!

Product List


Sunday, August 26, 2018

Explore Graceful Glass

Have you seen the Graceful Glass suite of products?  This is such a beautiful collection, and easily makes you feel like an artist.


I've done a few cards with the Designer Series Paper, and have loved coloring it with the Stampin' Blends.  You can see some of my samples here.

But we also made a gorgeous card at a team meeting, using Stampin' Write markers to color our vellum.  Look:


While there are many elements to this card, the standout feature is the colored strip down the middle. This is a strip of the Graceful Glass DSP that was colored, then adhered to the Whisper White base.  To that we added panels of Whisper White (embossed with the Subtle embossing folder) and accented with Copper Foil strips.  Mounted on Basic Black, these panels are popped up with Dimensionals over the stained glass piece.


We stamped and embossed (Copper embossing powder) hearts from Ribbon of Courage, and cut them out with eh coordinating framelits.  They are mounted over a Copper Foil circle and some Black Thread.


Try some Painted Glass; let the hidden artist within shine!


Product List

Friday, August 24, 2018

Happy Birthday, Charlotte!

Today is my granddaughter, Charlotte's, second birthday.  Happy birthday, sweetheart!

While I won't be there for her special day, I left her a card to celebrate:


She's my first granddaughter so I had to use pink!  I make cards all the time for my grandsons, but I was thrilled to be able to use a more girlie color.

Flirty Flamingo fit the bill.


I started with a card base of Flirty Flamingo and added a layer of Whisper White.  Then I ran another piece of Flirty Flamingo through the Polka Dot Basics embossing folder and the Big Shot.

Using a now-retired stamp for the number "2", I stamped it with Flirty Flamingo ink and cut it with the coordinating Large Numbers framelits dies - there are just some stamps and dies I can't get rid of!

This was adhered to a Whisper White circle, cut with the Stitched Shapes framelits, using Mini Dimensionals.  


I stamped and cut 12 candles from Blow Out the Candles.  Love the coordinating framelits!  These were arranged in a circle on my card.  A vellum circle was cut using one of the scalloped dies in the Layering Circles framelit set.  This was adhered to the back of my Whisper White circle and placed over the candles, again using Dimensionals.


I finished with a banner; Birthday Banners is the perfect choice for this job--the coordinating stamps and framelits work together to make the banner just right!

So Happy Birthday, little Charlotte!  I can't wait to see you again next week!

Product List