Showing posts with label Happy Birthday Thinlits. Show all posts

Thursday, December 27, 2018

Mixing Old and New

I mixed some old and new products for my husband's birthday card; take a look:


Can you tell what the "new" product is?  Let's break down this card.

1.  The card base (hard to see against the black background) is Basic Black, cut 5-1/2" x 8-1/2" and folded in half to make a 5-1/2" x 4-1/4" card
2.  There is a layer of Wood Textures Designer Series Paper in the background
3.  I adhered another layer of Wood Textures (the one with the cut tree trunks/logs) to a piece of Whisper White Thick Cardstock and cut this with two of the NEW Rectangle Stitched Framelits Dies - can you see the stitching along the outside and the inside?  This layer was added to the card front with Dimensionals
4.  The Happy Birthday Thinlits dies were used to cut the words with Basic Black card stock.  I used Multipurpose Liquid Glue o the bottom of the "B" and the tail of the "y", along with some slivers of Dimensionals to anchor the letters to the front of the card--it looks like they are floating

And that's it!


An easy, no stamping card.  But so effective!

These Rectangle Stitched Framelits are an absolute must-have for all crafters! With 13 sizes that "nest", they are fabulous for card fronts and layers for all your card-making needs.  They will be available in the Occasions Catalog, starting January 3rd.

Don't have an Occasions Catalog?  Contact me to find out how you can get a FREE copy.  Or check it out online, here.

And don't forget Sale-A-Bration!  Stampin' Up!'s annual offering of FREE products with a qualifying order also starts on January 3rd.  See your choices here.

I have more samples of FREE Sale-A-Bration items coming up; check back often to see what else I'm creating!


Product List


Tuesday, August 28, 2018

A Garden Impressions Birthday

Here's a pretty, simple and SO effective card for any occasion (I made mine for a birthday):


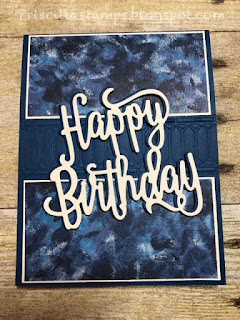
Combining Garden Impressions Designer Series Paper with the Happy Birthday Thinlits dies makes  celebrating a cinch!  And it's a perfect "masculine" card, which is always a challenge for me.

This card also has a pretty embossed detail:


Can you see the embossing of the Night of Navy strip?

Let's break it down:

1.  Card base is Night of Navy.
2.  I cut the Garden Impressions DSP into two pieces and mounted it on a skinny layer of Very Vanilla.


3.  Using the Big Shot Embossing Mats and the Stained Glass Thinlits, I embossed (instead of cutting - how cool!) the center of the Navy card base.  Then I mounted the layered DSP strips around the embossed area.
4.  "Happy Birthday" was cut twice - once in Very Vanilla and again in Night of Navy.  Using the Multipurpose Adhesive Sheets made it easy to mount them together, slightly off-set to create a "shadow" behind the vanilla letters.
5.  The sentiment was mounted to the card using pieces of Mini Dimensionals.


I love the embossing technique using the Embossing Mats; it's the perfect way to stretch your dies, being able to cut OR emboss them.


And the Garden Impressions DSP is simply beautiful.  If you haven't purchased this yet, you really should add it to your stash!

Product List


Friday, October 27, 2017

Masculine Birthday Card

I think most stampers have some problems creating masculine cards.  So when I saw a card on Stampin' Connection by Carolyn King, I knew I had to copy it:


This is so simple and so beautiful (is it OK to call a masculine card "beautiful"?).

I started with a 4-1/4" x 11" piece of Very Vanilla Thick cardstock, scored and folded in half at 5-1/2".  I took another piece of Very Vanilla that was 4-1/4" x 4" and ran it through the Big Shot with the Pinewood Planks embossing folder.

The strip of Wood Textures Designer Series Paper Stack paper is 4-1/4" x 1-1/2", and is adhered to the top of the card base.  I added a 1/8" strip of Basic Black and then the embossed Vanilla piece.


The Happy Birthday Thinlits are fabulous!  Just adding this cut out piece to a card adds texture and a sentiment without any stamping.  I cut mine with Basic Black cardstock (hint:  use the Multipurpose Adhesive Sheets on the back of your cardstock and run through the Big Shot with the Thinlits--makes it SO easy to adhere your thinner die cuts).

And I just finished off my card with some Black Rhinestone Jewels--the perfect embellishment!

So what do you think?  Perfect for those times when you need a masculine card?  I think so!

Product List

Monday, July 10, 2017

Happy Birthday Gorgeous!

Sometimes I overlook the little elements that are included in the stamp sets that I use.  When I bought Happy Birthday Gorgeous, I was looking at the sentiments and the terrific fonts, and didn't focus on the flowers.  But as I started to play, and needed an embellishment for a card, I suddenly realized how wonderful these are...look:

I was using the Happy Birthday thinlits dies and needed something to finish off my card.  They are sweet perfection!

Tranquil Tide is the card base, with a layer of Pool Party.  The designer series paper is Delightful Daisy--I love the shading of the paper, giving it a dimensional feel.

The thinlits were cut with Tranquil Tide and adhered to a panel of Whisper White. But look at that cute trim along the bottom:

That's a new punch:  the Decorative Ribbon Border punch.  Pretty, huh?

So back to those flowers.  I needed something to dress up this card, just a little, without taking away from the die-cut words.  And those little flowers were the perfect touch!

I stamped the leaves in Lemon Lime Twist, cut one of them out, and stamped the flowers in Powder Pink and Berry Burst.  The flowers were fussy cut (thank heavens for my Paper Snips!), and mounted with Dimensionals.  And I finished them off with Glitter Enamel Dots, using the Berry Burst colors.

Pretty, eh?


Product List