Looks pretty cute, but nothing special...
Oh, wait...it slides?
Oh, a card in a sleeve...but wait! There's more:
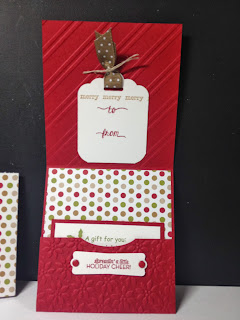
It opens to reveal a pocket for a gift card. Simple, effective, CUTE!
Cut your cardstock to 4-1/4" x 11". Score at 4-1/4" and 9". This will make a 2-1/2" pocket (use Sticky Strip to adhere the sides after first running through the Big Shot with a decorative embossing folder; you can do the top and the bottom flap separately if you want two designs!). Decorate by adding a 4" x 4" piece of designer series paper, along with a pretty tag.
Your sleeve is 5" x 10" of designer series paper, scored/folded around your card. But before adhering the edge with sticky strip, center the front over your card and punch with a decorative punch in the shape of the tag you want to use. Then adhere the ends and slip over your card.
Finally comes the tag--stamp and punch your favorite tag and add "through the hole" in the sleeve, using Dimensionals.
Voila! An adorable (and fairly simple) gift card holder that can be adapted to any occasion!
Let's get creating!

.JPG)
.JPG)

2 comments:
This is really adorable and certainly packs a "wow!" Thank you so much for sharing and for your instructions and measurements too! I love it all! TFS! Donna (SC)
I love this, Priscilla! :) Cute! Thanks for the instructions.
Post a Comment