Yesterday was the anniversary of my marriage to my wonderful husband, Jim. This guy has been around forever, supporting me through the ups and downs, fathering our kids, and letting me have this crazy hobby! So I made a special anniversary card:
This is pretty different from any I've made him before--more playful and fun. I had these left over people from a Paper Pumpkin a few months back, and knew I wanted to use them, but what to do?
I started with one of the Watercolor Wonder Designer Notecards, cutting one in half. This was embossed using the Ampersand Embossing Folder. A piece of Whisper White was sent through the Big Shot with the Framed Tulips Embossing Folder, and after tying a pretty White Organza Ribbon Bow around the Watercolor piece, I mounted it to the White. This layer was adhered to the Gumball Green card base (5-1/2" x 8-1/2", scored at 4-1/4").
My little people were added, using Mini Glue Dots (aren't they the cutest?). But what to do next? I wanted a sentiment...my first choice was just a Happy Anniversary, but it didn't seem right. Then I was looking at the stamp from Perfect Pennants--Me and You--but decided that needed to go inside. Aha! How about a word bubble with the Just Sayin' stamp telling him how I feel?
Perfecto! Stamped in Gumball Green and hand trimmed, then mounted to a piece of Gumball Green cut with the Word Bubbles Framelits! Love it!!! Of course this needed a little heart (punched from the Owl Punch in Real Red) and it was all popped up with Dimensionals.
Done...and now for the inside:
Stamped in Gumball Green, cut out with the Chalk Talk Framelits and mounted on another layer of Gumball Green, with a Happy Anniversary from Hugs & Wishes (a vintage set) stamped below...Just what I wanted for my perfect hubby!
Items can be ordered here--you can even shop in your pj's.
Let's get creating!
Showing posts with label Chalk Talk Framelits. Show all posts
Showing posts with label Chalk Talk Framelits. Show all posts
Friday, March 28, 2014
Friday, January 3, 2014
Are You Sick of Gift Card Holders Yet?
Here's another idea for a gift card holder. This one is unique in the way that it opens:
Looks pretty cute, but nothing special...
Oh, wait...it slides?
Oh, a card in a sleeve...but wait! There's more:
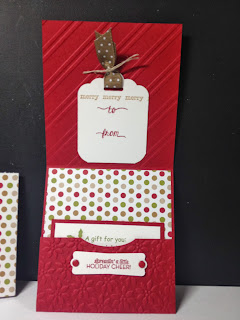
It opens to reveal a pocket for a gift card. Simple, effective, CUTE!
Cut your cardstock to 4-1/4" x 11". Score at 4-1/4" and 9". This will make a 2-1/2" pocket (use Sticky Strip to adhere the sides after first running through the Big Shot with a decorative embossing folder; you can do the top and the bottom flap separately if you want two designs!). Decorate by adding a 4" x 4" piece of designer series paper, along with a pretty tag.
Your sleeve is 5" x 10" of designer series paper, scored/folded around your card. But before adhering the edge with sticky strip, center the front over your card and punch with a decorative punch in the shape of the tag you want to use. Then adhere the ends and slip over your card.
Finally comes the tag--stamp and punch your favorite tag and add "through the hole" in the sleeve, using Dimensionals.
Voila! An adorable (and fairly simple) gift card holder that can be adapted to any occasion!
Let's get creating!
Subscribe to:
Posts (Atom)
.jpg)


.JPG)
.JPG)
