Tuesday, September 26, 2017

BIG Thanks!

I needed some thank you notes for customers and pulled out the Great Big Greetings set.  How fun is this:


The sentiment is the only thing needed on the front of this card - it's a show-stopper!

I decided that, although I stamped the sentiment in Basic Black, I would go with a pastel card to make the words stand out even more.


The card base is Powder Pink, with a layer of Basic Black, and then the main image is on Whisper White.


But after looking at the image, it seemed awful lonely all alone on that piece of Whisper White.

So I grabbed Happy Celebrations; this set has come great round stamps, and I stamped the circles in two sizes, using Powder Pink ink.  Much better!  But it still needed something...aha!  How about some bling and splatters?  Using my Basic Black Stampin' Write Marker, I flicked the large brush against the inside of the cap - instant splats!  And Black Rhinestones finished it off.


How about a little ribbon?  Easy--just wrap the Powder Pink 1/2" Finely Woven Ribbon around the edge of the card, and add a knot with a Glue Dot!


Easy to create, and fun to receive!


Product List


Sunday, September 24, 2017

Succulent Garden

Check out this cute succulent garden:

My mother-in-law has been attending an Annual Birthday Bash for all of her friends for about 25 years.  They all get together once a year and celebrate EVERYONE'S birthday at the same time, regardless of when their actual birthday is.  My mother-in-law will be turning 90 in December.  This party started with 12 women, way back when; today the group only consists of seven ladies. 😢  But still a celebration for those continue to attend after all these years!  What a group of friends!

Several years ago, my mother-in-law asked me to make favors for their party.  They were a hit.  And this year, she is once again in charge of the favors...and who did she turn to?  Me!  😉  So I put on my thinking cap and tried to come up with a new idea (last time I made matchboxes for everyone), and although the Succulent Framelits retired, they are currently on the Clearance Rack (for a GREAT price!), so I pulled mine out and made these.


I started with the Clear Tiny Treat Boxes.  What a bargain!  These come 16 boxes to the set for only $7.50!  And they hold 8 Hershey Nuggets.  So I started by cutting strips of Designer Series Papers just under 2" x just under 8".  Then I scored them at just under 2", every 2".  This allowed me to insert the strip into my box.

Next I wrapped the Nuggets in matching DSP, and finished off two of them with a tiny punched flower and a pearl.

 I cut a square, using the Stitched Shapes framelits, and stamped a birthday greeting in an ink color matching the DSP.  Each box has a different greeting.  And this was slid inside the box front, between the acrylic and the DSP:


Then I closed up my box and wrapped it, on the outside, using another strip of the DSP.


And it was time to decorate the top.  I cut seven sets of succulents, using varying colors of cardstock.  Then I sponged the edges of all the layers, curled the edges using my Bone Folder, and adhered the layers together. 

Doesn't that look real?  LOVE!

All they have to do is slide off the outer wrapping to get to the goodies inside.  But I bet a few of the ladies will just leave their boxes alone and set them out on display.

Happy Birthday to the Ladies Group!  What an impressive group of friends!


Product List


Saturday, September 23, 2017

Hugs!

I like to send thank you notes to my customers, and here is one from last month:

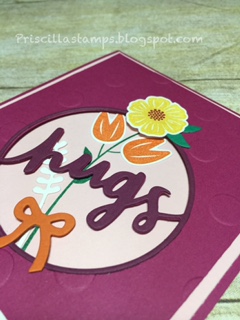
Berry Burst and Powder Pink make such a wonderful combination--cheery and bright!  Add in some polka dots and flowers, and you have a happy card.

Berry Burst cardstock was cut to 4-1/2" x 11", along with a layer, sized 3-3/4" x 5", which took a trip through the Big Shot with the Polka Dot Basics embossing folder.  The Powder Pink layer is 4" x 5-1/4".

The polka-dotted layer also had a Layering Circle cutout of the middle, letting the Powder Pink layer show through.

"Hugs" comes from the Lovely Words Thinlits; it was cut using Fresh Fig cardstock, the Lovely Words circle and a larger circle from the Layering Circles.

The flowers are from Beautiful Bouquet, cut with the coordinating Bouquet Bunch Framelits.

And the sentiment was stamped in Berry Burst, with a White Perfect Accent to finish it off.


Product List

Friday, September 22, 2017

A Daisy Collar

Remember my Collar cards?

Well one of my blog readers asked for directions, which I happily sent her, and while I was checking out my our instructions, I made this card, just to be sure I had the dimensions right:

I wrapped the card front in Delightful Daisy Designer Series Paper, and then created a cute focal point in the center.

My flower was made using the Daisy Punch, and I stamped the leaves from Daisy Delight on Old Olive cardstock and fussy-cut them out using my Paper Snips.  There's a beautiful Gold Faceted Gem in the center, catching the light and looking very sparkly!

The daisy is mounted on a Whisper White circle, cut with the Stitched Shapes framelits, which is atop two layers--Night of Navy and Daffodil Delight, both cut using the Layering Circles framelits.

The sentiment is from Eastern Beauty, and is stamped in Night of Navy.


Try wrapping your card in DSP--it makes such a statement!  And maybe it keeps your card warm too!  😁


Product List