Showing posts with label Love What You Do. Show all posts

Tuesday, February 11, 2020

It's Sale-a-Bration Time

I know, I've been touting Sale-a-Bration for weeks now, but it's only because I LOVE this time of year!  With every qualifying purchase, you get to choose a FREE Sale-a-Bration item!  What could be better?

One of my new favorite items from this product offering  is the Thoughtful Blooms stamp set along with the Small Bloom Punch.  Take a look:


I was fortunate to be able to get both of these products for FREE.  So look what I made:


Such a sunny card!  Makes me feel like Spring is just about here!

In addition to the Thoughtful Blooms stamp set and Small Bloom Punch, I added a strip of the Pleased As Punch Designer Series Paper.  This coordinating paper has 12 sheets of double sided paper; one side has a pattern (like the stripes, here) and the other side coordinates with punches--the Umbrella Builder Punch, the Heart Punch Pack, the Tulip Builder Punch and the Small Blooms Punch.  Making cards has never been easier!


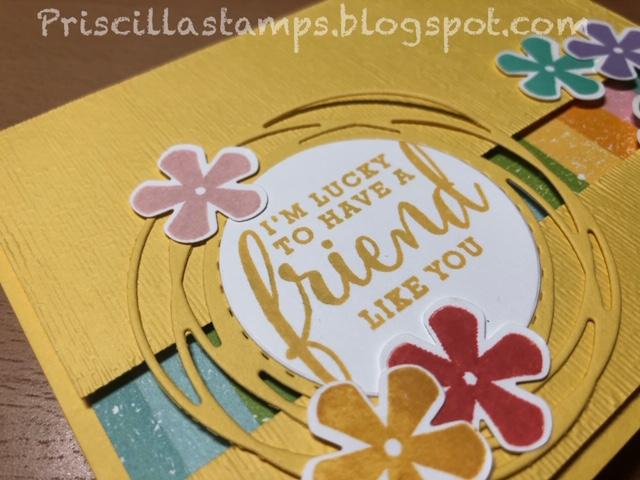
In addition to the FREE stamps and punch, I used the dies from the Painted Labels set, along with the Layering Circle dies.  My greeting, from Love What You Do, is the perfect fit!


Don't miss out!  Place your qualifying order today to receive the Thoughtful Blooms stamps and Small Bloom Punch now!


Product List


Wednesday, August 14, 2019

Amazing Cards with DSP

If you're like me you have lots of Designer Series Paper that you feel guilty using, because you like both sides of the papers and can only use one on your card.

Well, feel guilty no more!  I have a great card for you that is easy to make, is a "WOW" card, and uses BOTH sides of the paper.  Take a look:


One of my very favorite new Designer Series Papers, See a Silhouette, and I get to use both sides!  LOVE!

I started with a piece of DSP that is 5-1/2" x 11-1/2".   It is scored at 4" 6-3/4" and 9-1/2", and then you have to decide which side of the paper will be the showcase on the inside of the card.  I decided to have the leaf design on the small flap on front and the beautiful "night sky" on the inside.

All you need for the card base is a piece of cardstock cut to 4-1/4" x 5-1/2"; here I used Pretty Peacock.


See that glossy stamping?  So easy to do with the Stamparatus!  Stamp once in your ink color of choice (I used Pretty Peacock).  Then clean the stamp and re-stamp it with Versamark ink.  Add Clear Embossing Powder and heat set--you can emboss in any of our ink colors!  Another LOVE!


When opened, the card is looonng....but this is when you can get the full effect of the DSP.  And you have several options for decorating.  I chose to use two panels.  The first is 1-1/2" x 5"; the other is 2-1/2" x 5".  You just want to be sure to adhere them all the way to the score line on the left, so the panel doesn't show when the card is closed.

Here's the back:


What a great way to showcase your DSP!

Want another sample?  I made this one using the same directions:


Same DSP, with a Silver Foil card base.

And again, using the Versamark over ink technique, I was able to get Night of Navy embossing:


and I embossed the rest with Silver embossing powder.


I also chose to add more panels to this inside; there are two of the smaller ones, and two of the larger. It covers up more of the DSP, but allows you to add many more stamps.


Pull out some of your DSP and try this...I know you'll love getting to see both sides of your pretty paper!


Product List


Thursday, October 4, 2018

Watercoloring without Paint

Last week I attended an all-day stampin' retreat with a number of local-area Stampin' UP! demonstrators.  One of the speakers, Judy Pinner, demonstrated watercoloring techniques, and I really fell for one idea.  Take a look:


Gorgeous!  And really easy!

It all starts with a template.  Taking a piece of Window Sheet (I cut mine the same size as the card front, 4" x 5-1/4") use a die to cut the oval.  Here I used the Layering Ovals dies, but you can use circles, squares, hearts, anything!

Lay the template over your card front (Whisper White, Very Vanilla, Glossy, or Shimmery White are best); you'll want to be sure the template doesn't move - some Washi Tape can hold it in place.  Then using sponge daubers, ink the sponge, tap off some of the excess ink, and begin coloring in the negative space of your template.  Here I used Balmy Blue, Lemon Lime Twist and Soft Sea Foam.  Lay down the color lightly - you can always add more color, but you can't take it away.  Sponge in small circles, gradually working your way around the template and blending the colors where they overlap.

When you like what you see, remove the template - be careful - there may be some ink on the outside edges, so lift straight up.  Set your template aside, and admire your beautiful, water-colored shape.


Then ink up a stamp (here I used Rooted In Nature) using Tuxedo Black or Staz On Black, and stamp; overlap your stamp on the colored shape, and allow some of it to stamp on the outside--the tree trunk is outside the colored portion.


The sentiment is from Love What You Do, and nicely complimented the style of the tree.  The panel is layered on Basic Black, and the card base is Balmy Blue.

This is a simple, beautiful card, good for any occasion.  Give this "watercoloring" technique a try!  

Product List