Showing posts with label Scallop Tag Topper Punch. Show all posts

Thursday, September 25, 2014

Got Treats? A Cute Gum Holder

When I was starting this post, I was trying to think of a good title...a cute gum holder?  Made me think of false teeth and something to keep your gums in!  Yowsa!  I must really be tired tonight!

So on to the project.   Over the weekend I participated in another Wacky Watercooler Blog Hop.  Here are my projects, and I have been posting the "how-to's" for the past few days.  You can see those ideas here and here.


Today I want to show you how to make the pack-o-gum holder:
This is a VERY simple way to dress up a pack of gum, using only a few supplies.  Starting with a strip of Bermuda Bay cardstock, measuring just a hair under 2" x 11", I punched one end with the Scallop Tag Topper punch.  I then measured my pack of gum and ended up cutting off about 1/2" from the strip of cardstock; then I punched the other end with the same punch.

I used a pen to mark the edges of the gum pack onto the Bermuda Bay strip (on the inside), creating guides for scoring.  The strip was scored and I cut pieces of Motley Monsters Designer Series Paper to fit each section.

I tied Bermuda Bay and Crushed Curry 1/8" Taffeta Ribbon to close it up (I did use some adhesive on the bottom of the gum pack so it didn't fall out), and added a little tag (stamped with the bat and the "boo" from Project Life Holiday Cheer, and punched with the 7/8" Scallop punch).

A strip of sequins from the September Paper Pumpkin kit adds some bling...and it's done!

How do you dress up your Halloween treats?

All supplies can be ordered here.

And let's get creating!


Saturday, August 16, 2014

Another Birthday!

Yes, August is a busy month for us.  I've already shown you the wedding card for my niece and my daughter-in-law's birthday card.  Now it's time for my daughter's birthday card: 

I loved this card!  So bright and cheery!

I started with a base of Lost Lagoon, and added a layer of Flower Pot Designer Series Paper.  Those two pieces dictated my color scheme.

A piece of Hello Honey took a trip through the Big Shot with the Large Polka Dot embossing folder.  But I wanted a little extra oomph--so I punched a 1/2" circle in the middle of a piece of scrap cardstock and placed the hole around one of the polka dots--it fit perfectly!  Then I just sponged some Hello Honey ink over the raised area, removed the mask, and voila!  "Highlighted" polka dots!

Now for my tag:  Using Amazing Birthday, I first stamped it on a piece of Whisper White using Lost Lagoon ink.
I then stamped three more times using Tangerine Tango, Hello Honey and Real Red.  Each strip was carefully snipped and added to my tag (Amazing was popped up on Dimensionals after first adhering a thin banner in Lost Lagoon). 

I needed a "topper", so I pulled out my Scalloped Tag Topper punch and punched a piece of the Flower Pot DSP, added my tag, and tied it off with some Lost Lagoon Stitched Satin Ribbon and a piece of Whisper White Bakers Twine.

A cheerful birthday card for my cheery daughter!  Happy Birthday, Aly!


All supplies can be purchased here

And let's get creating!

Tuesday, May 27, 2014

An Open House Bookmark

As noted in a previous post, I hosted an Open House on Friday to introduce my customers to our brand, spankin' new 2014-15 Catalog!  What fun we had playing with new goodies!

Here is one of the projects, highlighting the Tag Topper Punches:

This simple, cute bookmark was made using the Scalloped Tag Topper Punch, and couldn't be easier!  Taking a piece of Whisper White card stock cut to 6" x 2" (and actually just a SLIVER less than 2" to have it fit perfectly into the punch) insert one end into the punch.  It makes the scalloped end AND the little hole for the ribbon at the same time!  This is the perfect punch to use for any length tag, and is especially good for journaling tags in your scrapbooks. 

We added three strips of the Retro Fresh Washi Tape (yea!  This will be back in the new catalog).  And stamped our sentiment from Yippee Skippee in Tangerine Tango.

To make our medallion, we first punched the butterfly using the Elegant Butterfly punch in Whisper White card stock.  Then we used Circle Framelits to cut it into a circle.  For the Coastal Cabana ring, we first punched the card stock with the 1-3/4" circle punch, and then used the next size framelit to cut the circle.  The butterfly piece was glued to the ring using a 2-way Glue Pen, and the piece was added to our bookmark using Dimensionals.  Finally a Rhinestone Basic Jewel was added to the center and the beautiful Tangelo Twist Satin Stitched Ribbon was tied with White Bakers Twine to top it off.

A fun and useful project that would also make a cute gift for that special reader in your life. 

All supplies can be purchased here.

Let's get creating!

Tuesday, March 11, 2014

Happy Birthday, Holly!

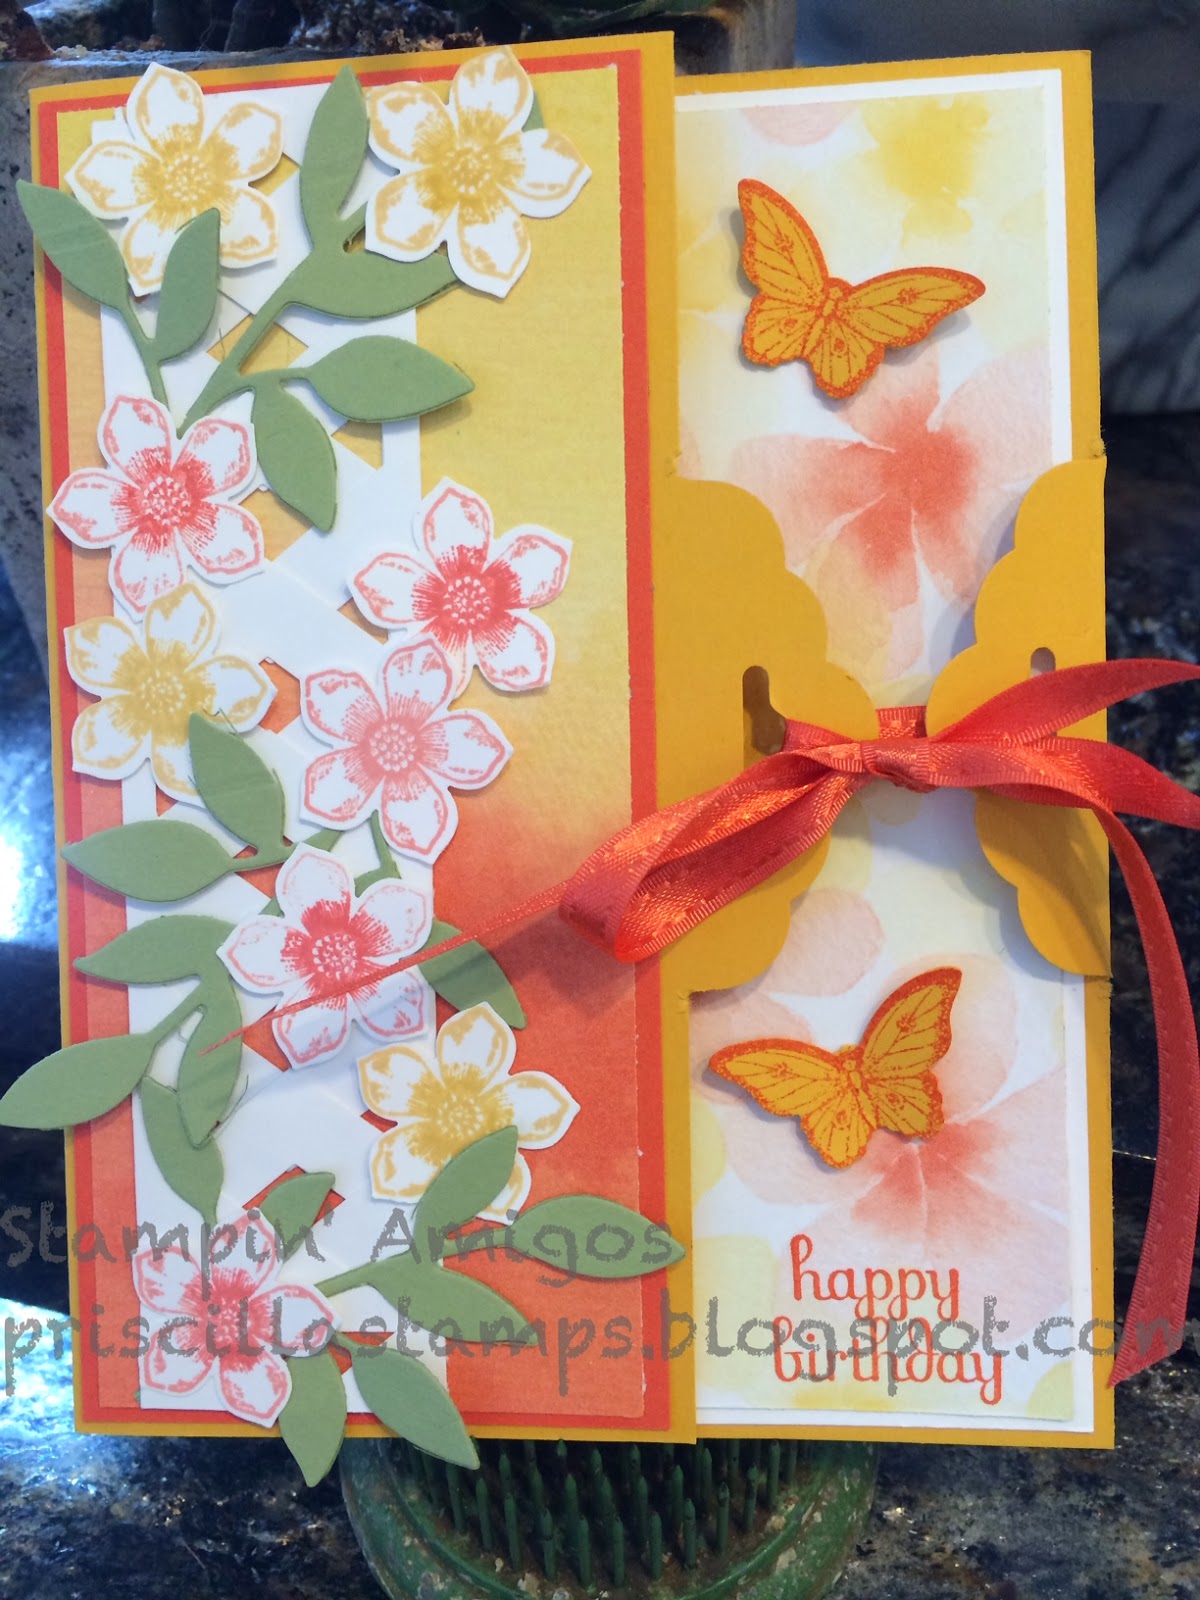
Today is my sister's birthday!  More than a sister, she's my best friend, so here's a special card for her:
Lots of punches going on here (and no, I have never punched my sister, even though there were days when we shared a bedroom that I sure wanted to! *grin*). 
This started with the Chevron Punch, with which I made the lattice for the flowers.
Punch one row of chevrons, then a second one.  Layer them over each other, and "push" the top piece through the bottom layer, overlapping the points of the chevrons and creating a lattice.  It's fun to slide the two pieces back and forth, widening the lattice until you get the look that's just right for your card. 

The lattice was lightly (but securely) adhered to a layer of Watercolor Wonder Designer Series Paper from the Occasions Catalog.  I then cut several Little Leaves from the sizzlet and stuck them through the lattice.  Next came a lot of flowers from Petite Petals, stamped in Tangerine Tango, Crisp Cantaloup and Daffodil Delight, and punched with the Petite Petals Punch.  These were adhered with Mini Glue Dots.  This entire layer was adhered to another layer of Tangerine Tango.

Now the fun part of this card is the ribbon closure. 
This is made using the Scallop Tag Topper Punch.  It's easy to do, first making a light tick mark at the 1" mark, then sliding your card stock (Crushed Curry used here) all the way into the punch, using the tick mark as a guide at the edge of the punch.  Punch, and flip your card stock over; repeat.  Remove the excess tabs created when you punch, and score along the base of one of the scallops, then score your card at 4-1/4".  Easy peasy!  And makes such an elegant closure.

Another piece of coordinating Watercolor Wonder DSP (with flowers that go with my little punched ones) was layered on the Whisper White of the inside of the card, and some small butterflies were stamped (Papillon Potpourri) in Tangerine Tango on Crushed Curry, and punched with the Bitty Butterfly punch.  These are adhered with Mini glue dots. 
Enjoy, from Simply Celebrate, is stamped in Tangerine Tango on the inside, and the card is closed with a piece of vintage Tangerine Tango ribbon. 

An elegant, beautiful, and fun card for my special sis...Happy Birthday, Holly!

All products used can be purchased at my on-line store, here.

Let's get creating!