Showing posts with label Amazing Thanks. Show all posts

Tuesday, April 18, 2023

Thanks in Bermuda Bay

 It's retirement time, and this week I'm featuring the cards we made in my clubs this month, where we celebrated retiring colors. 

Here's one in Bermuda Bay, a color I am sad to see go!


This is also a fun-fold card.  The base color is Bermuda Bay.  It's cut to 5-1/2" x 6-1/2" and scored at 2-1/4".  This has a 2" x 5-1/4" piece of patterned paper (some left over from Sale-A-Bration).  

Then we have a flap of Bermuda Bay, cut to 3-1/2" s 3-1/4", with a 1/2" score on one side.  This piece is attached to the right side of the card base (under the Basic White inside), and folds over the front.  It has a piece of DSP cut to 2-1/2" x 3-1/4".

And then the top, focal point:


The focal point of the card is "thanks" cut with the Amazing Thanks dies.  The base layer is Bermuda Bay and the detailed word is Coastal Cabana.  


Here is the card when you first start to open it - you can see where the smaller flap meets up with the edge of the card on the right.

And fully opened:


Imagine my delight when I discovered the Pastel Adhesive-Backed Sequins have some in matching colors!  


I can remember when Bermuda Bay was added to the Core Colors - I was so happy!  I've loved it for several years, and will certainly miss it.  But just wait til you see some of the new colors, coming soon...I really won't be sad for too long!  

Be sure to check out the Last Chance List - these retiring products (many with severe discounts) are going fast!  


Product List

Wednesday, March 23, 2022

Amazing Thanks

 One of my customers mentioned she really liked a white-on-white card I had sent her, so when planning my Cards-by-Mail this month, I included one:


And as it turns out, it is one of my favorite looks too!  Do you ever make white-on-white cards?

This starts with a Thick Basic White base, and then a layer of Basic White, embossed with the Seashells embossing folder.  I cut a circle (Layering Circle dies) in the paper before embossing it.


I also cut a slightly smaller circle in a piece of the Silver Foil (from the Blue Foils pack), and adhered it under the top layer.  Then the whole piece was added to a piece of (now retired) patterned paper.


The ribbon was wrapped around the top layer and fastened in the back; then I slid a small piece underneath and tied it in a knot - easy bow!

This whole layer was then applied to the card base with Dimensionals.


And then that "thanks" - die cut from the Silver foil and Night of Navy cardstock, using the Amazing Thanks dies.  I love the wide silver layer with the navy on top!


I haven't heard from my class participants yet, but I truly expect this will be a fan favorite!  What do you think?  


Product List

Sunday, January 23, 2022

Amazing Eclipse

 Show of hands - Who remembers the "eclipse" technique?

I thought about it when playing with some of my new patterned papers, and decided it was time to give it a go.

For those who have not heard of this, it's where you cut an image (in this case, a word) from the patterned paper, and then fit the image back into the space where it was cut from, but lifting it on Dimensionals.  Take a look:


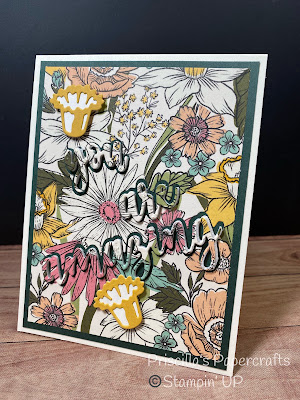
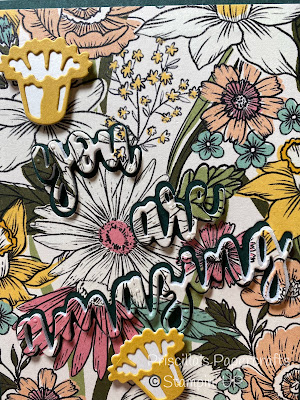
Can you see the words?  "You are amazing"

I used the new Amazing Thanks dies along with the FREE Daffodil Afternoon paper, cutting the words from the paper (I used the "word bubbles" - the outlines of the actual words first) leaving the outline holes in the paper.


I then used the detailed word along with the pieces I had cut out, laying the detailed die on top of the cut piece (now with some Foam Adhesive Sheets on the back) and running it through my Stampin' Cut & Emboss a second time.  This gave me the detailed word on foam, and I was able to place the words back in the holes of the patterned piece of paper.


But wait!  There's more!  See those little daffodil centers?  I used the Daffodil dies to make the "cups" and popped them up over the printed image of the paper.  Cute little detail!


Now you can see the raised flowers and the words.


Such a fun and impressive card!  

Give the Eclipse Technique a try!


Product List