Tuesday, May 14, 2019

Ya Gotta Love the Cows!

Do you like cows?  I, myself, am more of a pig fan, especially flying pigs.  But my sister is a huge fan of cows.  So...


Just had to make her a card!

This is one of the new stamp sets, Over the Moon, arriving in June in the new Annual Catalog.  And I'm in love (even though This Little Piggy is more my style).

I also tried some techniques, one of them new to me.  See that cow on the left?  That is NOT how the stamp comes.  It's actually facing left, like the cow on the right.  So how did I do it?


With my Stamparatus!

I started by positioning a Silicone Craft Sheet in a corner of my Stamparatus.  Then I stamped my cow three times, using Tuxedo Black ink, directly onto the Craft Sheet.  The ink won't dry, giving me time to place my Whisper White cardstock on top of the Craft Sheet and stamp my cow one more time (on the "back" of the white cardstock).  This transfers the image to the cardstock, but in reverse, so my cow faces the other direction.  Brilliant, huh?  You can do this with any stamp.   


My next technique was masking.   I stamped my cow on a sticky note and carefully snipped out the image with my Paper Snips.  I cut directly on the stamped line, with no border.  Then I placed my mask over my cow so I was able to sponge the sky and the grass.

And how did I make the clouds?  I used a retired scallop circle punch (but the Pretty label punch would work just as well) to create a template, then sponged around the edge with Balmy Blue ink.  

Finally I cut some grass from the Lakeside dies, and also stamped a few blades with a stamp from High Tide.  

And I had to add something to the inside:


Hahaha!

I love Over the Moon...coming soon.

Need a new Annual Catalog?  Don't have a demonstrator?  Drop me an email and I'll let you know how to get one.  FREE!

Product List


Sunday, May 12, 2019

Happy Mother's Day (and a Sneak Peek)

Happy Mother's Day to all my mom friends.  I get to spend the day with my son and grandson, part of the reason my husband and I just moved to Oregon.  My daughter-in-law is on a business trip, so the guys are coming to visit.

Here's a quick little pretty that I put together last evening.  I only recently got my craft room put together enough to create a card, and I had two boxes of new products waiting for a little love.  So even though I'm going to be late with my cards, I made a few for my daughter and daughters-in-law.


When I went to OnStage last month, I saw this new set, Bloom and Grow, and the coordinating dies, Budding Blooms.  And I had an idea that just needed to get out of my head and onto paper.

There are two dies that cut a small scalloped line.  The sample shows it being used to cut two borders, but I had another idea.  I made a pocket.


This is essentially a card that doesn't open - it pulls a tag out of the pocket.

I made a flat base of Mint Macaron cut to 4-1/4" x 5-1/2".  I cut the scallops in the middle of a piece of 4" x 5-1/4" Whisper White.  I also stamped a few of the smaller stamps across the bottom of the card, using So Saffron and Mint Macaron inks.


Then I stamped two of the floral borders an a piece of scrap Whisper White, and colored them with Stampin' Blends.  When done, they were cut using the matching dies.


I cut a piece of Mint Macaron to 3"x 3-1/2" to slip into the pocket.  The Whisper White piece was adhered to the card base using Stampin' Dimensionals.  The small Mint Macaron piece was slipped into the pocket and then I adhered the floral borders using Stampin' Dimensionals.  All it needed was a ribbon (new Mint Macaron 1/4" Textile ribbon, coming 6/4) and a sentiment, from Itty Bitty Greetings and punched with the Classic Label punch.

Another Mother's Day card will be late, but I know my daughters will appreciate them, none-the-less.  

Product List


Saturday, May 11, 2019

I'm Creating Again!

Well, it's been quite a few weeks!  Three weeks ago I started dismantling my craft room in my California home of 25 years, getting ready for a big move to Oregon.  I was a bit freaked about not being able to create for a few weeks, but with all the move "activities", I really didn't have much time to think about it.

We moved in just two weeks ago, and, naturally the kitchen, bedrooms and bathrooms became a priority.  Not to mention the garage!  Leaving a 3-car garage and moving into a smaller space caused some consternation trying to figure it all out.  But shelving done, multiple trips to the recycling center completed, I was ready to my next challenge.

The craft room.


It started out like this.  And all I wanted to do was run away, screaming!

But then I got a little more organized.


I moved boxes out of the way and designed a plan.  Although my son (the contractor) wanted to build me my dream room, I declined for the time being, and went with a simple idea.  And a trip to IKEA.


Ready to roll!

After a few days of hard work, I was almost ready.


There are still a number of boxes to unpack, shelving to put up and "settling" to do, but I finally made enough space to create.

Take a look:


I really wanted to use something new!  I had received two orders of "stuff that is coming" in the new Annual Catalog (starting June 4th!), but made myself wait until I actually had space to create.   So now was the time!


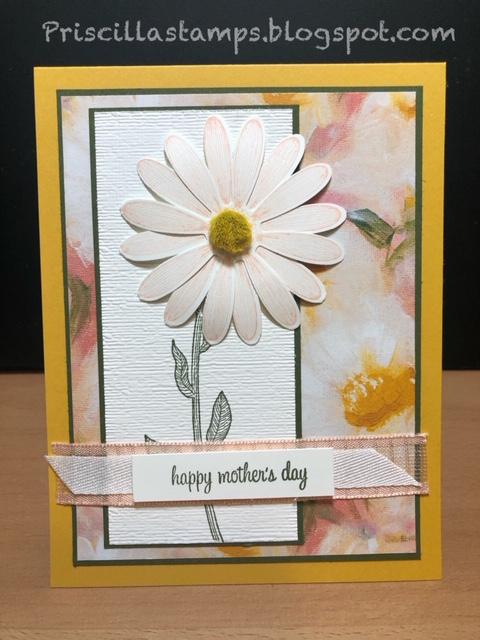
This is the large daisy from a new set called Daisy Lane.  The large flower can be punched with the same Daisy Punch we all know and love, that coordinates with Daisy Delight.  But in June, there will also be a smaller daisy punch--can't wait!  I stamped the leaves in Mossy Meadow, then ran the Whisper White cardstock through my embossing machine with the Subtle Embossing Folder.  I ran it through twice, turning the paper 90 degrees the second time through.  This gives an almost linen-like look to the paper.


And look at the center of this flower!  The Perennial Essence Floral Centers are the perfect touch for these daisies.  Can you see this brand new Designer paper?  Perennial Essence is going to be a favorite; it's absolutely beautiful!  And here's a sneak peek at some new ribbon.  The Petal Pink Organdy Striped Ribbon is lovely to work with and ties a beautiful bow (although I only layered a piece with some soon-to-be retired White Cotton ribbon).  The sentiment is from Itty Bitty Greetings, happily carrying over from this year's catalog.


I decorated the inside with a few more daisies, as well as a sentiment from Abstract Impressions, one of my faves!


So now I have Mother's Day cards for my mom and my mother-in-law.  They'll be getting them a little late, but hey, better late than never, right?