Showing posts with label Sleigh Ride. Show all posts

Thursday, November 19, 2015

It's Christmas with the Wacky Watercooler Gang!


 photo November 2015 Banner.jpg

It's time for another Wacky Watercooler Blog Hop and this month we are celebrating Christmas and Hanukkah.  It doesn't matter where you begin; just click on the blog buttons and follow around the entire hop.  You may have just hopped over from Deb Smart's blog - she's always a tough act to follow! - and I thank you for coming to visit me.

Our mission this month is to showcase the upcoming holiday season using our choice of products from the Annual Catalog, the Holiday Catalog, AND (bonus for me!) anything in our "stash" of old products...and boy, do I have old products!

But let's start with some creative inspiration using current supplies:

I absolutely LOVE these edgelit dies (Sleigh Ride) and incorporated them into a technique card.  I used the "Salted Background" idea (tutorial to come soon), which created a beautiful base for my trees and houses, which were cut using Shimmery White cardstock.

The "wash" was a combination of Tempting Turquoise and Pacific Point on Watercolor Paper; after I was satisfied with the color I sprinkled table salt on the paper which gives it an interesting texture.  The Watercolor Paper layer is mounted on a layer of Silver Glimmer Paper (and I punched tons of little stars with the Star Border Punch) so this card really sparkles.

Card number two is a fancy fold card:

Similar elements to the first card include use of the Sleigh Ride Edgelits and Star Border Punch, but this time I used Dazzling Diamonds Glimmer Paper and then cut a second and third set of the edgelits in Real Red and Early Espresso.  Isolating just the sled in red and horse in Espresso, I glued them on top of the glimmer paper figures.

This card also has a touch of "spin" - Using the Circle Framelits, I cut a circle in the center of the card front.  I stamped the sentiment from Among the Branches in Night of Navy ink two times and punched them out with the 2" Circle Punch.  These were glued together, back to back, with a length of Whisper White Bakers Twine in the middle.  Some Tear & Tape Adhesive adheres the twine to the inside of the card (all covered with a circle of white) so my sentiment spins around.


And now for my stash of hoarded supplies.  Why do I do this?  I have absolutely no idea.  As new catalogs come out, I'm still in love with products from the old one, so I order more -- don't want to run out!  Then I can't use them anymore (for demonstrating cards)...and then I fall in love with the new stuff...and my old things get relegated further and further to the back of shelves and deeper and deeper in the drawers.

Until today!  Thankfully my friends of the Watercooler understand...and today I'm allowed to bring you some inspiration using my old stuff!  Now just for the record, what I have created here, you, too, can create!  It will just look slightly different than mine (unless you happened to hoard the same goodies that I did!).  So no discouragement please--just get out your stuff and create!

An Advent Tree!

Many of you know that I have recently become a lonely grammy--my grandsons have moved from California (my home) to Maryland!  So here is how I will connect with them this holiday season.

I took retired Under the Tree Specialty Designer Series Paper (extra thick cardstock) and used the Box Punch Board to make 26 of the smallest (1.75" x 1.75" x 1.75") boxes.  And I used the retired Metro Type Alphabet to stamp the numbers.

Each number was punched with the 1-3/8" circle punch and mounted on a Metallic Foil Doily (I used gold--and these are still available from the Annual Catalog) or a Cherry Cobbler, Garden Green, Early Espresso or Crumb Cake scalloped circle (punch also current).  Then I hot-glued my boxes into the shape of a tree.

The star on top is Gold Foil Sheets cut with Star Framelits (all current)--five of them scored in the middle and adhered over a skewer which is pushed into the top box.  And then some Cherry Cobbler Organdy Ribbon (retired - oh darn) is tied in a big bow.  Each box opens to reveal a small treat. 

Well that's it for me!  Thanks so much for dropping by; come back again soon.  And now on to see what the incredibly creative Marsha Reed has to offer! 


 photo nextwatercoolercrockbutton.jpg


http://stampandcreate.net/

http://wackywatercoolerstamping.blogspot.com


Sunday, October 25, 2015

Christmas Wrapping

Last week I showed you some easy Christmas packaging (see here). 
Today I want to give you a little more detail about what I did to make this special.

These boxes use the Tag a Bag Gift Boxes, which are wonderful, food safe, boxes that come with acetate sleeves.  They are essentially good to go, but you can have lots of fun decorating them.

This box was dressed up using the Season of Cheer Designer Series Paper.  I cut a piece the same length as the box, with a 1" overlap on either side.  The corners of the DSP were rounded with the Project Life Corner Rounder and I scored each side at 1".  Then I just laid the paper over the box and slipped it inside the sleeve.

The box was tied using White Organza Ribbon.  Under the knot, I slipped a 3/4" circle with Silver 1/8" ribbon looped over it, and then I added some Silver Sequins.

But it's the tag that makes this special:
I first cut a piece of Whisper White Thick Cardstock with the Chalk Talk Framelits.  I sponged "sky" using Marina Mist and Night of Navy inks.  I then used my Sleigh Ride Edgelilts to cut Dazzling Diamonds Glimmer paper and then cut another one of the trees using Lost Lagoon, and the sleigh from Night of Navy.  The horse was cut using Early Espresso.  I carefully trimmed the trees, sleigh and horse, and adhered them right over the original piece.

Very soft and sparkly gift packaging.

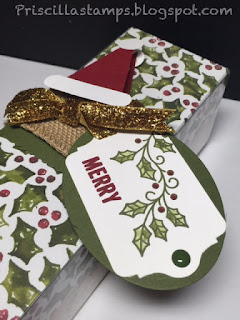
Then I took another box and stamped it using the mistletoe stamp from Embellished Ornaments.  I covered it with another piece of Season of Cheer DSP:


And I decorated the acetate sleeve using Mossy Meadow cardstock, Burlap Ribbon and a sparkly piece of Glitter Ribbon.

The tag (another Chalk Talk Framelit) was stamped and colored and added to a Mossy Meadow oval:

I finished it off with a Home for Christmas Enamel Dot embellishment and a cute little Santa hat (it uses a SU Clothespin to hold it in place).

So I'm already getting a head start on my holiday wrapping!  Yippee!

All products can be purchased here


Built for Free Using: My Stampin Blog

Thursday, October 15, 2015

October Wacky Watercooler Blog Hop


It's that time again...time for another Blog Hop from the Wacky Watercooler gang.  This month it's all about the holidays!  From Halloween through New Year's, let's see what our friends have come up with to help get you in the spirit!  You may have just hopped over from the ever-awesome Heidi Weaver--she never fails to WOW me!  And if you've just joined us now, don't neglect to make your way around and see what everyone has created.

I couldn't choose just one holiday, so I chose three--let's start off with Halloween.  I simply couldn't resist the adorable Howl-o-Ween stamp set and matching Boo To You framelits dies. 


This Cascading Card uses nearly every stamp in the set.  My owl is getting ready to Trick or Treat--see his little pumpkin candy holder?

This card also uses Happy Haunting Designer Series Paper.  

And the best part?  The card folds flat so it can be mailed:

Because it's rather tall, I used my Envelope Punch Board to make my own, matching envelope--easy peasy!
I'll feature this card later next week, so you can have directions on how to put it together.


Next up (for us Americans) is Thanksgiving (our Canadian friends celebrated earlier this week--Happy Thanksgiving!).  This is a holiday that goes hand in hand with beautiful autumn colors, and I SO love seeing the leaves turn.  So what could be better than seeing the trees through your window?
 I used the always-classic stamp set Lovely as a Tree.  I mean, who doesn't own this?  On my card base of Whisper White Thick cardstock, I stamped my trees after coloring directly on the stamp with Stampin' Write markers in Old Olive, Crushed Curry, Pumpkin Pie, and Cherry Cobbler.


I then took a piece of Whisper White, adhered Envelope Paper "wallpaper" to the top half and cut a rectangular opening.  A "chair rail" of Tip Top Taupe was scored and glued down.  The window was cut out with the Hearth and Home Thinlits die and a piece of Window Sheet was added to the back; this was adhered to my "wall".  Then this layer was popped up with Dimensionals to make it look like you are looking through a window.


And of course, every window needs a little "dressing"--Tip Top Taupe 1" Dotted Lace Trim made a perfect valance!


And finally, let's have a little Christmas spirit.

I'm getting a jump start on my Christmas wrapping.  Using the Tag a Bag Gift Boxes makes it easy!  These food-safe Kraft boxes (6-7/8" x 2-1/8" x 2-1/2") with acetate sleeves are perfect for treats and small gifts.  And decorating them is fun and easy.

I took one and covered the box with Season of Cheer Designer Series Paper.  Then I slipped the box inside the acetate sleeve and tied it with White Organza Ribbon.  There's some fancy looped Silver 1/8" ribbon and some Silver Sequins, and then a pretty tag.

But I'm not done:

This time I used the same DSP but in traditional Christmas colors, Mossy Meadow and Cherry Cobbler.  I wrapped the sleeve with Mossy Meadow and Burlap Ribbon, then tied on some sparkly Gold Glitter Ribbon. 

This tag uses Embellished Ornaments and Project Life Season of Cheer...and check out the little Santa hat!  Cute!

OK that's it for me.  Come back next week for directions on my samples here.

And now on to Buffy Cooper, who has something fantastic to show you!

Thanks for stopping by...enjoy the Hop!


 photo nextwatercoolercrockbutton.jpg
http://heidistampinalong.blogspot.com/

http://wackywatercoolerstamping.blogspot.com


Thursday, September 3, 2015

Another Spooky Sky!

So have you placed your order from the Holiday Catalog yet?  No?  Why ever not?

Let me give you a reason...

Somehow I must like spooky skies.  I have done quite a few (see them here and here).  But I got to playing with some of my new "schtuff" and decided I HAD to sponge another spooky sky.  Take a look:
Got lots o' new stuff going on here.  Let's start with those adorable houses.

The Sleigh Ride Edgelits are truly going to be a huge hit from this catalog.  I LOVE these houses!

Now what might be a bit difficult to see is the paper I cut them out of...That's Black Glimmer Paper!  OMG, so sparkly and fabulous!  Just makes my heart go pitter-patter!

I backed each house with a snipped of Crushed Curry cardstock to give the windows a spooky glow.

I sponged my sky, starting with Crushed Curry ink.  Once the corner was done I punched a mask using my 2" Circle  Punch and a post-it note.  This was placed over the sponged area to keep it yellow, and I began layering my sky colors:  Island Indigo, Elegant Eggplant and Night of Navy.  Then I removed my mask and sponged Tangelo Twist over the moon and outwards for a spooky glow.

"Boo" is cut (again from the Black Glimmer Paper - oh I wish you could see the sparkly goodness in person!) using my Big Shot and the new Boo to You Framelits Dies.  So cute!

Wanna see even more sparkle?
Again, this photo does NOT do it justice, but that white ribbon is the new 3/8" White Glitter Ribbon!  Bears repeating - OMG, OMG!  Especially since it also comes in Gold...and better still--YOU GET BOTH THE GOLD AND THE WHITE IN ONE PACKAGE!  I squished up one section with a little bow of Black Bakers Twine; can you say LOVE?.

I went with an oldy-but-goody for my sentiment - Teeny Tiny Wishes, punched out with the Washi Label Punch, and some Rich Razzleberry Candy Dots

I'm just about ready for Halloween...

All items can be purchased here