Showing posts with label Going Places. Show all posts

Saturday, May 14, 2016

Where has this week gone?  I stayed up last Saturday to post a Mother's Day card, and now it's Saturday again...how DOES that happen?

Well I have had time to do some crafting.  Maybe that's it--did I lose track of time in my craft room and week just flew by?  Nah...But I have done some cards and I'll share them with you starting now.

This is a shaker card I made for my grandson, Ethan.  Ethan is five, and loves the moon, stars and anything "space".  So when I saw Going Global in the Occasions Catalog, I knew I had to have it for Ethan.  Add the matching Going Places Designer Series Paper, and I'm all set for lots of cards for him!

The "world" was stamped using Archival Black Ink on Very Vanilla Cardstock.  I used brand new Foam Adhesive Strips (coming June 1!), shaping them into a circle around my world, added a bunch of punched stars and Brights Sequins, and added a circle of Window Sheet.   I punched a 2" circle in the DSP, lined it up over my world and adhered it.  Then I used lots of Dimensionals to pop this layer up on my card base.

The sentiment was embossed with Gold Embossing Powder and punched with various circle punches, layered on Basic Black and Gold Foil.  And my card was finished off with a piece of retired Thick Bakers Twine.

And look what he wrote in school the other day:
Love it!

Don't miss out on Going Global--this set is retiring at month end, along with items listed here.

Purchase your favorite items here. 


Monday, February 8, 2016

"CASE-ing" the Catalog

Do you know what CASE is?  In our stampin' world, we CASE cards designed by others when we see something we like.  CASE stands for Copy And Share Everything.

I've been admiring a card in the Occasions Catalog since it came out.  I had purchased all the supplies and got ready to re-create it for my grandson.  And then something happened!  I realized that I had used the designer series paper for my January card clubs and only had one piece left!  Uh-oh...need to be very careful.  This is the card I wanted to make (the one with the star, on the left):


I was trying so hard to get that yellow background right.

And I blew it!

Yes, I miscalculated my trimming and made it too small...ARGH!

So back to the drawing board.

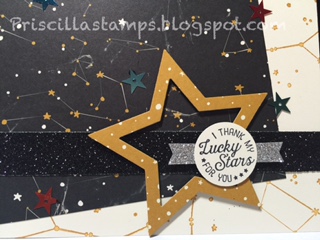
I had another piece of the Going Places Designer Series Paper Stack, so I ended up doing something different:


When you CASE a card, it doesn't always mean you copy it exactly.  In this case the layout was nearly identical, but there are subtle differences.  Can you spot them?


First, I stamped my Very Vanilla base using the constellation stamp from Going Global and using Delightful Dijon ink.  Then I cut my black constellation DSP and added it to my card front.

Using my Stars Framelits in two sizes, I cut the star from the DSP I was originally trying to use (that's called making lemonade out of lemons!) and I popped it up on thin strips of Dimensionals over a piece of (retired) Black Glimmer Paper.

The stamp was inked with Archival Basic Black ink; once stamped it was punched using the 1" circle punch.  And there's a time strip of Silver Glimmer Paper with notched ends (Banner punch).

I added a few stars from the Brights Sequin Assortment, using the Fine Tip Glue Pen.  Then, with some matching DSP on my envelope (and another star cut from the same DSP on front) I was ready to send this to my grandson.

Try a CASE - and then add your own ideas to make it an entirely new card!

All products can be purchased here.


Built for Free Using: My Stampin Blog

Thursday, January 21, 2016

What? Another Blog Hop?

You betcha!  It's time for a new


January 2016 Mini Blog Hop #2 photo 2016 January Mini Blog Hop Banner 2.jpg

Yes, we're having a second blog hop this month featuring even more new goodies from the Occasions and Sale-a-Bration catalogs! This time we have 10 artists showcasing their work with new stamps and accessories.  Please take some time to visit everyone, and be sure to leave a quick message!  We love to read your comments!

You may have just come from Marie Green's fabulous blog.  I always love seeing what she puts together.  And if you've just joined us here, please click on the "next" button when you are done and go see what else we have to show you.

I've had such fun creating with all my new things.  Today I am featuring one of my favorite new sets, Number of Years.  Take a look:

I love the flowers and leaves of this set, and since it's photopolymer (clear) you can see right through the stamps in order to make a perfect placement.

I inked the leaves in Pear Pizzazz and stamped on Whisper White cardstock.  I then took the little flowers and stamped in Pool Party, Watermelon Wonder and Blushing Bride--so pretty!

I would have used a sentiment from the set (there are MANY reasons to use this set!) but I really needed a retirement card for a friend, so I used one from Wild About Flowers.

The Whisper White strip was first given a wash of Blushing Bride ink, using my Aqua Painters; after it was dry, I stamped the sentiment using Soft Suede Ink.  A strip of Blushing Bride Glimmer Paper (be still my heart!) was added just below the sentiment and popped up on Dimensionals.

The card base is Whisper White Thick Cardstock, on which I scored double lines around the edges--looks like embossing on fine stationary--using my Simply Scored Scoring Tool.  So elegant!  And to finish it off, some random Blushing Bride Sequin Trim and a stamp of flowers on the envelope! 

Now on to a completely different project, using another of my favorite stamp sets, Going Global.
How about a Valentine and little treat holder?

 
Those of you who know me know I like non-traditional Valentines--no pink and red for me!  I like black and red!  And gold!

I started with a Basic Black base, and adhered a thin strip of Red Glimmer Paper to one edge.

I cut a little strip of Basic Black using my Rotary addition and Small Scallop blade for my Stampin' Trimmer.  This was glued to a piece of Going Places Designer Series paper and added to the front of my card.

My world was stamped using Archival Basic Black ink (so black!) and then I used the new Wink Of Stella clear Glitter Brush and painted over the continents--the photo above catches the glimmer on the continents.  Very subtle and pretty when it catches the light.

The world was punched with the 2" Circle punch, along with two more Very Vanilla circles, adhered off-center to the back of the globe and popped up on Dimensionals.  The sentiment was stamped and adhered, and a little heart from Red Glimmer Paper was cut, using the Confetti Hearts Border punch.

And a cute treat holder:
Same color combination:  Basic Black wrapped with Going Places DSP.  A sentiment from a Sale-a-Bration set, Honeycomb Happiness is the perfect way to introduce this:

a line-up of Hugs and Kisses! (You can get this set FREE with a qualifying order!  Be sure to check out the Sale-a-Bration offerings this year--great items and you can't beat the price!)

A red glimmer heart (with a smaller one of Gold Foil Sheets) echoes the heart on the Valentine.   I'll have directions for making this cute treat holder next week, just in time for Valentines Day.

Now off to see Gail Allen, who JUST received her new toys to play with and got into the hop by the skin of her teeth!  Can't wait to see what she's come up with--she always thrills me!  Thanks for stopping by!


 photo nextwatercoolercrockbutton.jpg


http://mytanglewoodcottage.blogspot.com/


http://wackywatercoolerstamping.blogspot.com


Saturday, December 12, 2015

Something New

We're about 3 weeks away from the new Occasions Catalog release and Sale-a-Bration.  This weekend I'll be showing you a few ideas using new stamps from both.

Here's an easy card with a masculine feel:


This set, Sky is the Limit, is a FREE offering through Sale-a-Bration, starting January 5, 2016.  But if you like it, you'll need to snap it up quickly, as this year a few of the Sale-a-Bration items will only be available for a limited time.


The cute little biplane was stamped using Memento Tuxedo Black ink on Very Vanilla card stock, then hand-snipped and popped up on Dimensionals.  I also stamped and snipped the clouds.


The sentiment, from Teeny Tiny Wishes, was cut using the Bitty Banners dies; I punched a small hole and threaded some of the lovely Gold Metallic Thread through the hole and to the back of the plane.