Saturday, October 21, 2023

Rustic Panorama

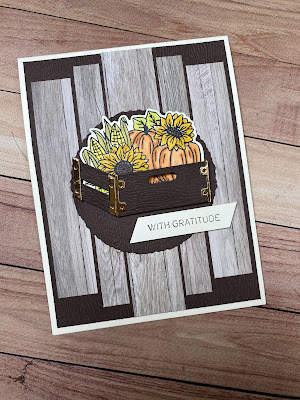
 Have you ever created a Panorama Card?  This uses strips of Designer paper, usually one with a scene, as a background.

But I changed it up with my card, using strips of wood-grained paper from All About Autumn.  Take a look:


The five strips are cut at varying widths and lengths; the center piece is cut to 1" x 5-1/4".  The next two are skinny - 1/2" x 4-3/4".  And the outer strips are 3/4" x 4-1/4".

The only real trick is lining up the strips at the top and bottom of the card, along with leaving a small space between them.  So if you try this, first lay out your strips, then when you have the pattern you want, pick one up and add adhesive, then glue it down before moving the other strips.  


My strips were adhered to a piece of Early Espresso cardstock, embossed with the Timber embossing folder.  I gave the same treatment to the Early Espresso Deckled Circle for the center.  


And then there's the crate!  So adorable!  It's actually a 3D box, but it's skinny, leaving just enough room to tuck in your vegetables.  When cut with the Rustic Crate dies, the box is embossed at the same time!  


Love this so much!  Now I need to try a Panorama card with a scenic background.  Watch for it!


Product List

Wednesday, October 18, 2023

Falling Leaves

 One of our Sunday Crafternoon cards was made with autumn leaves that we colored ourselves:


Following directions from Artisan Demonstrator, Tami Wilson, we used Blending Brushes and inks to add color to Thick Very Vanilla cardstock.  After blending Crushed Curry, Pumpkin Pie and Old Olive inks we used Water Painters to drip/splash water on the sheet.  Once dry, we used the Autumn Leaves dies to cut some shapes.


Of course, every leaf was different, depending on how each attendee blended their ink colors.  

Once cut, we used the leaves for our card.  


A greeting was stamped on the Very Vanilla layer, and then it was passed through the Stampin' Cut & Emboss machine with the Exposed Brick embossing folder.  

A strip of Old Olive cardstock ties in the top to the second layer.  The leaves were added at random, using Dimensionals for a little "lift".


This lovely card is so versatile; attendees could choose various greetings to say "thank you", "happy birthday", or one like this "thinking of you".  

Don't you love "multi-purpose" cards?  I like to keep a stash of them on hand, so I always have a card ready to send.  


Product List

Monday, October 16, 2023

Merry Monday in Neutrals

 I recently challenged myself to create a holiday card in neutral tones.  And I found it to be quite easy and super effective!  Take a look:


Although I usually celebrate Christmas in reds and greens, and an occasional blue, I had never used browns before.  So when I was thinking about this challenge, I pulled out my Glorious Gingham DSP and settled on Pecan Pie.  And I'm so happy I did!


I also decided to use Christmas Classics stamps and dies.  The beautiful frame (with embellished edges) is stunning.  So I got to work.

I cut the frame in Pecan Pie.  Then I stamped the images from the stamp set using Pecan Pie for the corners and Mossy Meadow for the greeting.  But before adding the label to the frame I threw in a few Vellum sprigs, also cut with the dies.

But I knew I needed just a tad more color - Mossy Meadow to the rescue, with die cut holly leaves that tuck in behind the frame.


Then it was time to put it all together - I adhered the gingham DSP to a skinny layer of Basic White, and then ran a strip of the Burlap ribbon around the layer.  This was then added to the Pecan Pie card base.  

Finally I popped the frame on top with Dimensionals, and finished off with some Brushed Metallic Dots.


I'm so happy I tried this!  It's a stunning card and I'll be proud to send this out during the holiday season, even if it isn't red and green!  ðŸ˜Š

Have you tried a neutral or non-traditional Christmas card?  


Product List