Tuesday, January 8, 2019

Hoppy Birthday

One of the Sale-a-Bration FREE offerings is So Hoppy Together, and it's really cute!  Take a look:


I've got a birthday card to make for my nephew and I know he'll love this.  And it was pretty easy, thanks to some of the products from the Happiness Blooms Suite.

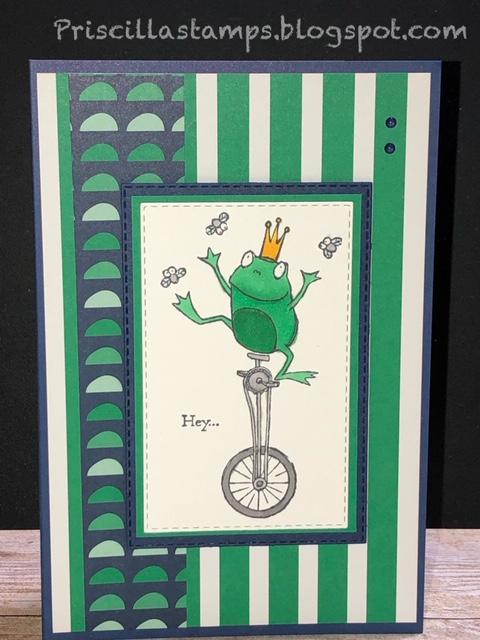
I started by stamping the juggling frog image on Whisper White using Tuxedo Black ink.  I then used my Call Me Clover Stampin' Blends (light and dark) to color the image; Smoky Slate was used on the unicycle, and Daffodil Delight on the crown.


And I fussy cut those little flies!  Yes I did!  Thank goodness for my Paper Snips!

The Rectangle Stitched Framelits were used to cut the image layer, and it was added to some Call Me Clover and Night of Navy cardstock.


Then I pulled out the Happiness Blooms Memories & More Card Pack.  See the stripes?  That's a full size card, and the half-circle pattern is another one that I cut down.   They are layered on the Happiness Blooms Memories & More Cards & Envelopes, Night of Navy cards with a white inside.  LOVE!

And look inside:


I combined two sentiments (Hoppy is from So Hoppy Together, and Birthday is from Well Said), masking some of the additional words to create a new sentiment.  I hand cut around it, and added it to the inside.

So Hoppy Together is a FREE stamp set with a $50 qualifying purchase.  And now is the time to pick it up for yourself.  But wait!  There's more!  For EVERY $50 spent, you can choose more FREE items, and there are so many to choose from.  Take a look at the Sale-a-Bration catalog here.

The Occasions Catalog is live (see it here) so place your order and choose your FREE items!


Product List


Monday, January 7, 2019

Look at THIS FREE Offering

With Sale-A-Bration, every $50 purchase can get you a FREE bonus gift!  There are several choices and you'll love all of them!

Take a look at these gorgeous Grapefruit Grove & Lovely Lipstick Foil Sheets:


Aren't they fantastic?  And they can be yours for FREE!  Check out the Occasions and Sale-A-Bration catalogs (click on the pictures on the right) and place your orders now!

Saturday, January 5, 2019

Simply Well Said


Have you seen Well Said in the Occasions Catalog?  It's on page 27, and it's absolutely the bomb!  Why?  First of all, it comes with 51 stamps!  WOW.  And then, there are coordinating Well Written framelits dies - a set of 24 dies containing all sorts of individual words to group with the stamps or with each other, or to just use by themselves.  Nearly any occasion can be covered.

So here's a few samples, very simply done to spotlight the wonderful die cut words.  Take a look:


Using Petal Promenade Designer Series Paper makes these cards a snap to create.  The DSP is beautiful, and there are two pages of "frames"; simply cut them apart and stamp on them to make lovely cards.

Then there's the stamps and framelits.


I cut the "happy" with the framelits, and all I had to do was stamp "anniversary" from the stamp set.  This sample uses a Grapefruit Grove layer (cut with the Rectangle Stitched Framelits - woohoo!) and then a layer of Berry Burst.  The top layer is the Petal Promenade, and it's all on a Thick Whisper White base.

And how about this one:


I reversed the colors and cut the "birthday" with Grapefruit Gove cardstock.  But the rest of the card is the same.

And finally:


Just a simple note to someone who is having a hard time right now; the sentiment is from a FREE Sale-a-Bration set called Part of My Story.  These wonderful stamps have a great selection of  phrases, motivational,  celebrational, and just plain fun!  And you can choose it for FREE with any $50 purchase.  Purchasing the Well Said Bundle will enable you to earn the Part of My Story set for FREE!

Take a look at the Occasions and Sale-a-Bration catalogs - you won't be disappointed, and you can place orders now.  Here are the links:

Occasions - click here
Sale-A-Bration - click here

Products used:

Friday, January 4, 2019

Time to Sale-a-Brate with the Occasions Catalog

It's here:


Time to get out your (long) wish list and place your orders.  Your husband said it's OK!  ðŸ˜‰

Thursday, January 3, 2019

Introducing CLING

It's here!

The 2019 Occasions Catalog and Sale-A-Bration is now live and available for you to place orders.  This fabulous selection of stamps, dies and gorgeous papers is sure to please everyone!  And with every $50 purchase, you get to choose a FREE offering from Sale-A-Bration, Stampin' UP!'s annual give-away of wonderful extras.

And there's more:

Effective today, January 3rd, you will see fewer and fewer wood-mounted stamp sets.  Starting with the Occasions Catalog - live NOW - red rubber, wood-mounted stamps will no longer be sold/manufactured.  Other than what is currently available through the Annual Catalog, these wood-mounted stamps are going away.

So what's taking their place?  CLING!  Stampin' UP! is switching to a new type of very sticky label that will easily and completely stick to your acrylic blocks, but are still the same red rubber that we love and that gives us crisp, clear images.

Take a look:


I wanted to ensure that you know how to mount your new CLING stamps.  It's a little tricky the first time you do it, so be sure you understand the directions.  And pay attention to removing them from your blocks so you don't tear them.  Once you try them, though, you'll love how well these stamps stick to your blocks AND produce superior images.

CLING - available now!

Wednesday, January 2, 2019

Time for a Puzzle?

I love Love You to Pieces!  So when I wanted to write a note to a friend about getting together, what could be more perfect?


Isn't that sentiment the cutest?  And that font!  ðŸ’œ

I also love this Gingham Gala Designer Series Paper Stack.  The only problem is that it comes in 5 colors, and I can't decide which to use - DILEMMA!

So for this card, I chose the Highland Heather.


And when pairing the Gingham with the puzzle pieces, it all came together (get it?  Sometimes I just crack myself up 😂).

Anyway, back to my card.  The base is Whisper White Thick cardstock, with a layer of Gorgeous Grape.  Then comes the Gingham Gala DSP.


The puzzle was cut with the Puzzle Pieces Thinlits Dies - these cut an actual puzzle.  I pulled a few pieces away and randomly adhered them with Dimensionals and Multipurpose Glue.

And of course there's a matching envelope:


I had a few puzzle pieces left, so they were added to the front for a "sneak peek" at what is inside.

I'm determined to send more cards this year.  I make so many, and they sit in my craft room, so instead of picking up the phone or sending a text, I'll be mailing cards to my friends.  Someone on Facebook asked: how many of your friends or relatives save texts on their fireplace mantles?  But your cards are cherished and always make an impact (and are often saved!).

So how about joining me in stepping up your handwritten communication this year?  Take an extra moment to create something special AND MAIL IT!

Product List


Tuesday, January 1, 2019

Welcome to 2019

Note:  this post is edited to include measurements and directions; see the end of the post.

Happy 2019!

I like to make a little thank you for my customers who order in January, and here is my gift to them this year:


I made desk calendars, complete with note pads and pen.  They really came out cute (so cute in fact, that I used this project for my Ink Masters Team meeting project, and we all had a great time putting them together).

I started with a piece of 4" x 11" of cardstock, and added coordinating Designer Series Papers.


What's fun is that these stand up:


From the side:


And you can see that little pen holder "box", which is how the calendar stands up.

I found the short pens at Office Max, and the calendars are from Tailored Expressions.  Everything else is Stampin' UP! (the Little Numbers dies are retired, but we have stamps and Large Number dies that work too).


Would you like to get one of these?  Simply place an order in January and I'll get one out to you.  And don't forget:


It's time for Sale-a-Bration, and for every $50 you spend, you can choose a FREE product from the SAB catalog.  See it here.

Here's a tutorial for those of you who want to make one of these calendars.  I've been asked to supply measurements, so here they are:


  •  Cut a piece of cardstock to 4" x 11"; this is your base
  • Score the cardstock at 5-1/4", 5-3/4" and 8".  This will allow the holder to stand up, and will make allowances for the note pad when closed 
  •   For the pen holder:  cut cardstock to 2-1/2" x 3-3/4"
  •   With the 2-1/2" side on the top of your scoreboard, score at 1/2", 1", 1-1/2" and 2"
  •  You will need a number of pieces of cardstock in a coordinating color:
                 Two pieces cut to 3-7/8" x 5-1/8"
                 3-1/4" x 3-1/4" (for the inside, under the notepad of 3"x 3" sticky notes)
                 3-1/4" x 2-1/2" (for the outside, under the calendar, which is 2-1/4" x 3")
                 3-1/8" x 1" (for the front where the numbers are--if you use the Large Numbers Dies, adjust accordingly
                scraps for the numbers

  •  Choose your DSP and cut:

                Two pieces at 5" x 3-3/4" (for the front and the inside)
                Three pieces at 3/8" x 3-5/8" (to cover the pen holder; the last side gets Tear & Tape adhesive to stick it above the pad)

Assembly:

  • Adhere DSP to cardstock and apply to front and inside
  • Add little strips of DSP to the pen holder on 3 sides; add Tear & Tape to the fourth side
  • Fold pen holder on the score lines, and adhere to make a little box.  On the 4th side (without DSP) add another piece of Tear & Tape--don't adhere to the inside yet
  • Place 3-1/4" x 3-1/4" to inside, centered and towards the bottom; adhere and add note pad
  • Now take the pen holder and adhere it above the note pad
  • Fold the front on score lines so that it stands up by placing the top behind the pen holder 
  • Ensuring you can see the bottom of your calendar, adhere the 3-1/4" x 2-1/2' piece of cardstock just above the pen holder.  Add calendar
  • Cut numbers and adhere to 3-1/8" x 1" strip; add above calendar
  • Decorate your calendar holder with coordinating stamps
Please feel free to contact me if you have questions; I'm happy to help!