Saturday, October 6, 2018

It's Beginning to Feel a Little Bit Like Christmas!

No, I am NOT one of those people who start decorating for the holidays on September 1.  Nor do I start my Christmas shopping in July.  I like one holiday at a time, thank you very much.

But...

Who can resist playing with new stamps and dies?  Not ME!

So, here is a card I made for a team swap last week.  I was so excited to play with Peaceful Poinsettia stamps and the Detailed Poinsettia Thinlits Dies, (save 10% by purchasing the bundle) and this is what I made:
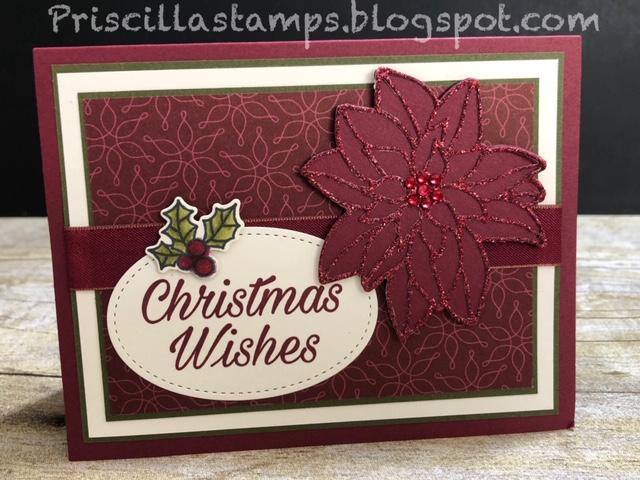

Can I tell you how much I love this?

And it's a fairly simple card to make.  Let's break it down:

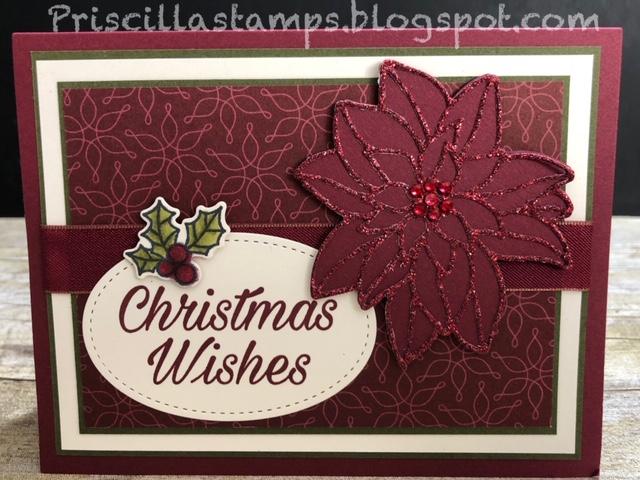
1.  The card base is Merry Merlot, cut 5-1/2" x 8-1/2" and scored/folded at 4-1/4" 
2.  Layer number two (from the bottom) is Mossy Meadow, cut  5-1/4" X 4"
3.  On top of that is a Very Vanilla piece, cut, 5-1/8" x 3-7/8", so just a teeny bit of the Mossy Meadow shows
4.  Another layer of Mossy Meadow - 4-7/8" x 3-5/8"
5.  Then a piece of Joyous Noel Specialty Designer Series Paper, cut at 4-5/8" x 3-1/2"


6.  Before laying my layers on the card base, I wrapped a piece of the beautiful Merry Merlot and Copper 5/8" Reversible Ribbon around it.

7.  The stamping was done using Merry Merlot ink on Very Vanilla cardstock.  It's cut using the Stitched Shapes dies and adhered with SNAIL adhesive


8.  Look at that shine!  I cut the poinsettia flower with the dies; one solid flower with Merry Merlot cardstock and the outlined image with the Merry Merlot color of Joyous Noel 6" x 6" Glimmer Paper - fabulous!  Using the Multipurpose Adhesive Sheets made it easy to adhere it to the cardstock flower.  Then it was popped up with Dimensionals.

9.  Red Rhinestone Basic Jewels were placed in the center of the flower, using my Take Your Pick tool (you really NEED one of these!)

10. And I finished off the card with a little holly sprig from the same stamp set, colored with Stampin' Blends and cut with the dies.  I also added some Wink of Stella to give a little more sparkle.

So what do you think?  Are you beginning to look forward to a little Christmas?

I've got many more samples to show you over the coming days, so check back in and see what else I've been playing with.  

And if you want to start your own holiday cards, I'm including a list of supplies; just click on a photo and go straight to my online store.  I truly appreciate your business and would love to be your Stampin' UP! demonstrator.

Thanks for stopping by!


Product List


Thursday, October 4, 2018

Watercoloring without Paint

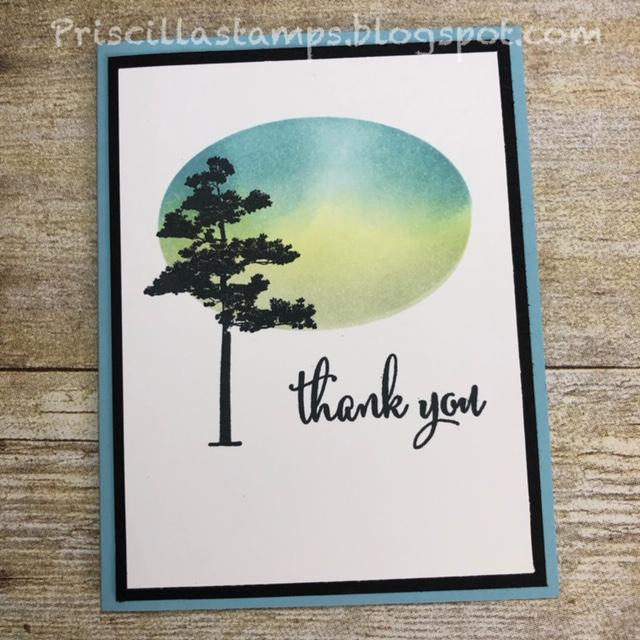
Last week I attended an all-day stampin' retreat with a number of local-area Stampin' UP! demonstrators.  One of the speakers, Judy Pinner, demonstrated watercoloring techniques, and I really fell for one idea.  Take a look:


Gorgeous!  And really easy!

It all starts with a template.  Taking a piece of Window Sheet (I cut mine the same size as the card front, 4" x 5-1/4") use a die to cut the oval.  Here I used the Layering Ovals dies, but you can use circles, squares, hearts, anything!

Lay the template over your card front (Whisper White, Very Vanilla, Glossy, or Shimmery White are best); you'll want to be sure the template doesn't move - some Washi Tape can hold it in place.  Then using sponge daubers, ink the sponge, tap off some of the excess ink, and begin coloring in the negative space of your template.  Here I used Balmy Blue, Lemon Lime Twist and Soft Sea Foam.  Lay down the color lightly - you can always add more color, but you can't take it away.  Sponge in small circles, gradually working your way around the template and blending the colors where they overlap.

When you like what you see, remove the template - be careful - there may be some ink on the outside edges, so lift straight up.  Set your template aside, and admire your beautiful, water-colored shape.


Then ink up a stamp (here I used Rooted In Nature) using Tuxedo Black or Staz On Black, and stamp; overlap your stamp on the colored shape, and allow some of it to stamp on the outside--the tree trunk is outside the colored portion.


The sentiment is from Love What You Do, and nicely complimented the style of the tree.  The panel is layered on Basic Black, and the card base is Balmy Blue.

This is a simple, beautiful card, good for any occasion.  Give this "watercoloring" technique a try!  

Product List


Wednesday, October 3, 2018

Wednesday's "What's On the Desk?"

Well I was a fairly busy beaver this past week, and had a few things left on my desk:


I was making swaps for my team meeting, and had also attended a workshop, so had leftovers of Christmas-themed cards.  What to do...

Here's an idea:

I kinda like it.  What else?


Some Designer Series Paper?  Since the sentiment is stamped with Merry Merlot ink, I should probably use the Joyous Noel Specialty DSP.  And this should probably be a square card.


How about some yummy ribbon?  Yeah, that Merry Merlot & Copper Reversible Ribbon is perfect!


I've cut my DSP and my Very Vanilla Thick cardstock base, and am adding the ribbon, using a piece of Tear & Tape adhesive.


Love (sigh)


Now to get the Crumb Cake cardstock, that's been embossed with the Corrugated embossing folder to stick - I spread some Multipurpose Liquid Glue on the raised "bumps".


Now to finish my card:


The sprigs of holly, cut with Detailed Poinsettia Thinlits Dies and Shaded Spruce cardstock are tucked under my sentiment (from Peaceful Poinsettia).


And these little Merry Merlot twiggy things - truth be told, I cannot remember where they came from.  They were on my desk, and I cut them apart, but I can't recall what I was working on when I made them.  So I'll have to get back to you on that.  


Just a few little Metallic Pearls in gold and I'm done!


So that's what I made with leftover items on my desk this week.  Not bad, huh?

All items can be purchased here; or click on the link below and go straight to my online store.


Product List


Tuesday, October 2, 2018

World Card-Making Day and a Sale


It's almost time for World Card Making Day, and Stampin' UP! is having a special, one-week only sale just to celebrate this day to create!

There's a list of items that are marked down 10% just for this week:

Click here to see the items, then place your order, save 10%, and get ready to create!