Showing posts with label Notes of Kindness. Show all posts

Sunday, August 5, 2018

Notes of Kindness, Part 2

Yesterday I shared this post with you.   My July Card Clubs used the Notes of Kindness Card Kit for our class.  And it was a hit!

Part of the deal to try this unique class (I had never used a kit before and wasn't sure how it would be accepted) was that I would provide two more cards, using some of the elements from their kits, so they would go home with SIX completed cards (we usually do 4) AND the kit to make another 16 cards at home.  Wow!  That's a lot of cards!

So today I will show you the two bonus cards that were made.

Here is the first:


The card base is Soft Seafoam.  Then we cut one of the included kit card bases in half to give us the striped panel.  Using the Stamparatus, we stamped "WISH" from Broadway Birthday, and "Happy Birthday" from Blow Out the Candles in Blushing Bride and Mossy Meadow inks.  Because we used the Stamparatus, the images were perfectly aligned!


Everyone cut one of the dies in the Stained Glass Thinlits set with Mossy Meadow cardstock and adhered it to the front of their card.  Using the Multipurpose Adhesive Sheets prior to cutting out the die made this easy!  We then attached the die cut Gardenia (from the kit) using Dimensionals.


A little tab of Blushing Bride ribbon and some Artisan Pearls finish off this pretty card.

And then we made this:


Can you say "over the top"?  But SO gorgeous!

I CASED this idea from Tami White, and added a few more details.  

The Blackberry Bliss base is 5-1/2" x 8-1/2", scored and folded in half.  But we built the entire card on a slightly smaller panel of Blackberry Bliss - 4" x 5-1/4" (which was then adhered to the card front with Dimensionals).


Let's look at all that's going on with this card:

1.  After swiping our cardstock with the Embossing Buddy, we inked our stamp with Versamark and embossed it with Silver Embossing Powder.  Some attendees chose an alternative phrase for birthdays.
2.  The Blushing Bride-striped banner - we cut one of the kit-included banners down slightly and placed it in the corner.  
3.  The Blushing Bride ribbon - a strip was adhered with some Tear & Tape.
4.  Everyone cut two squares - a Stitched Shapes square of Mossy Meadow, and a smaller one of Blackberry Bliss using the Layering Squares Framelits.  These were placed in the center of the card, just above the sentiment.
5.  We used two of the die cuts from the Notes of Kindness kit - the succulent and the leaves.  The leaves were placed first.
6.  We added loops of Silver Thread and retired Silver Cord to the back of our succulent and adhered it with Dimensionals.


7.  We finished off our card with a few Clear Faceted Jewels.

And everyone went home happy!

Check out the Notes of Kindness kit, on page 7 in the Annual Catalog.  You will NOT be sorry...and you'll have a blast putting together 20 (!) cards.  

To order any of the supplies used on today's cards, click on the link below and go directly to my online store.


Product List


Saturday, August 4, 2018

Notes of Kindness

For my July Card Clubs I tried something new.  Because of some unexpected travel, I had little time to prep for my classes.  So I suggested we all order the Notes of Kindness Card Kit from Stampin' UP! and make them together.  And I was thrilled that 8 of my customers took advantage of this offer.

We got together and everyone received their kits.  We opened them together and then went through ALL the contents.  WOW!  There is SO much in that pretty box!  It truly contains everything you need to make 20 cards - the exclusive stamp set, an acrylic block on which to mount the stamps, a Basic Black Archival Ink Spot for stamping, and beautiful die cut images, labels, stickers, pearls and copper twine for embellishing your cards.  There are 20 lovely printed card bases and lined envelopes.

Then we got started.  We all made one of each card so that everyone could go home and complete their kit.  Let's take a look at the 4 cards:


They are SO pretty!

The first one we put together was this one:


The card base is printed with Mint Macaron stripes.  We added the Blushing Bride-striped banner and the die cut leaves, along with a loop of copper twine.  The sentiment was stamped on the included stitched label and adhered with Dimensionals (also included!).  So pretty!

Number two was easy:


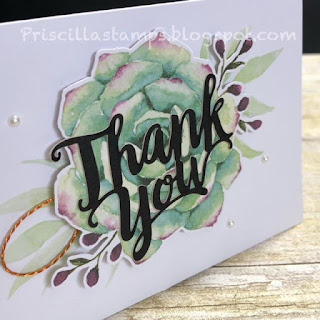
No stampin' involved here - the die cut succulent was adhered with Dimensionals and we added the "Thank You" sticker, the copper twine and some pearls.


Done!  But it was one of the favorites.

Our third card was this one:


Another beauty:  I love the watercolor wash of Soft Seafoam on the pre-printed card base.  We stamped the little "x"s and adhered the two stickers and the pretty die cut gardenia.  We tied a bow with the copper thread and stamped the sentiment, which is on Dimensionals.  


And finally:


Again, the printed card base is SO pretty!  A small Blushing Bride label was added and we stamped the sentiment.  


Just a loop of copper twine and some pearls finished off this card in no time.  

If you haven't checked out the lovely kits available in the Annual Catalog, you're missing out.  The cards are fabulous and relatively easy to complete.  Just imagine making all 20 cards and packaging up groups of each sample, giving you 5 beautiful gifts!  Or keep one set for yourself and make four other friends happy.  

When we completed our 4 cards, we then made two more, using elements from the kits.  Come back tomorrow and see our two "over the top" samples!


Product List