Yes, it's time to say "hello" to the new Occasions Catalog (and the Sale-A-Bration brochure!) with the Wacky Watercooler gang. This is the first of TWO blog hops this month; c'mon along and see what our artists are showcasing from the new catalogs. As always, our "hop" is a circle; join anywhere and click the links to the next blog for more samples. You may have "hopped on" here - Welcome! - or you may have come from my virtual friend, Penny. Penny has inspired me on many occasions; don't you love what she has done this time?
January is a month full of birthdays for my family. We have five to celebrate this month, so I always start off the year needing lots of birthday cards. How fortunate for me to have some brand new birthday-themed toys to play with!
Although I had many new stamps to choose from, I decided to demonstrate a few samples using
Birthday Blast and the matching
Star Blast Edgelits Dies--such a fun set! Lookie:
Now THAT'S how to get the birthday rockin'! This happy set has a huge sentiment (actually two!) to build your card around. I love the color combo of
Watermelon Wonder, Pool Party and
Silver--isn't it fresh and lively?
My card base is Watermelon Wonder, and the front took a trip through the
Big Shot with the
Festive Embossing Folder. I used two small strips of striped Watermelon Wonder paper from the
Tasty Treats Specialty Designer Series Paper (so yummy!) and adhered them to the Pool Party paper from the same pack.
The sentiment was stamped in
Watermelon Wonder; I added some embossing by running my stylus down the lines of the
Simply Scored Scoring Tool on the back side of the paper.
The fabulous "star explosion" was cut with
Silver Glimmer Paper and the Star Blast Edgelits, and it was adhered to the back of my sentiment piece; the entire strip is popped up on
Dimensionals so it looks like the stars are standing in air. I also cut the Star Blast with Pool Party and Watermelon Wonder, punching out the stars to add to the front of my card.
And what's a birthday without a present?
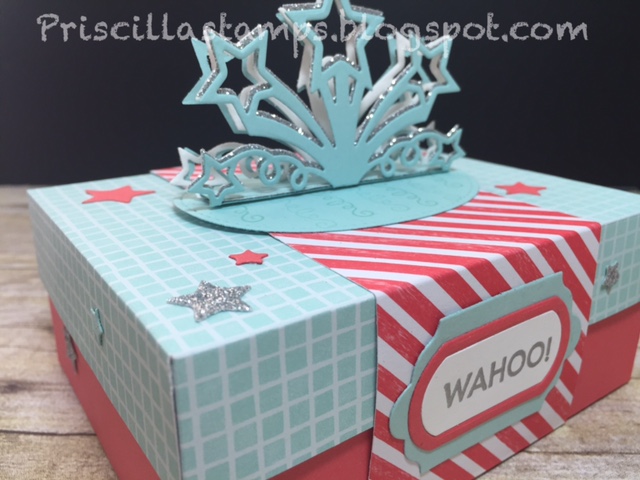
I designed a matching gift box to go with my card. This 4" x 5" box is generous enough for a small gift and was very easy to make.
Start with a piece of Watermelon Wonder, cut 8" x 9". Score at 2" on all four sides; trim the corners to the score lines:
Add
Tear and Tape Adhesive:
and fold into a box:
Be sure to use your bone folder on all the creases to get a good fold:
Repeat the process for the top, cutting your Designer Series Paper a "smidge" larger than 6" x 7", and score at 1" on all four sides. This will give you a top that fits snugly and leaves the Watermelon color showing on the bottom.
A bellyband of DSP that is 2" x 12" is wrapped around the box--it doesn't quite meet on the top, but an oval (cut with the
Stitched Shapes Framelits) hides the gap. I stamped little "party squiggles" on the oval, using
Pool Party ink:
And that embellishment? How cool is that? The Star Blast Edgelits can stand up on your package top! I cut four pieces--two in Pool Party and two in Silver Glimmer paper--and nested them together. A mini
Glue Dot keeps the tallest stars stuck together, leaving a see-through show-stopper on the top of your box!
I finished by "recycling" all the punched out stars, adding them to the top and sides of my box, along with a cute label:
Who wouldn't love to receive this set?
All of the goodies I used to create this set are available now! Grab yours and start creating!
And now it's time to go see what the fabulous Christine Guida has to show you; I'm sure you'll be itching to place your Occasions order after seeing her projects!
Thanks for stopping by!