Showing posts with label Gift Packaging. Show all posts

Tuesday, February 18, 2020

Tropical Packaging

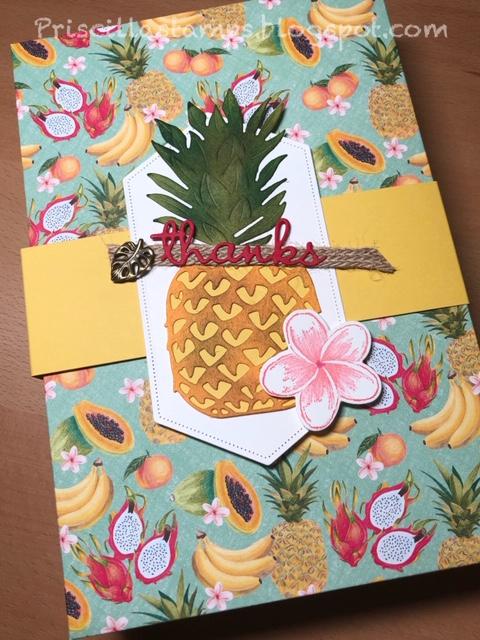
I love to use our Designer Series Paper to make gift packaging, and here's an example of my latest creation:


Isn't that cute?

The Tropical Oasis paper is the bomb!  I love the beach-y images and retro feel, and the page with all the fruit just makes me smile.  So when I needed to wrap up a special gift for a customer, this is what I reached for.


I started by measuring the goods I needed to wrap, obtaining a length, width and height.  Then I added 1-3/4" to each measurement (to make up for the height of the box), ending up with a piece of Daffodil Delight cardstock cut to 9" x 11-5/8" (for the box bottom).  This was scored at 1-3/4" on all four sides, the corners were snipped and the box bottom was folded into shape.

For the top, I added just a smidge to all the sides (to give it room to fit over the bottom), and used the Tropical Oasis paper.

Then it was time to decorate my box.


I started with the pineapple dies from the In the Tropics dies.  I cut the pineapple body with Mango Melody cardstock and "dirtied" it up with some Soft Suede sponging.  I used the die to trace the pineapple body and hand-snipped it with Daffodil Delight to layer under the die-cut piece.  The top was cut with Old Olive cardstock that was sponged with some Mossy Meadow.

The flower was stamped and cut out, and I used the Well Written dies to cut out "thanks", which was adhered to some Braided Trim.  Did you catch that little leaf?  The Tropical Oasis Trinkets are the perfect embellishment to anything you make with this suite.


My customer was delighted with her free products in this adorable box.

And I'm already looking forward to coming up with my next gift-packaging idea!


Product List


Tuesday, May 9, 2017

Pretty Packaging

I've made up some card packets as thank you gifts to some friends who have recently provided meals when I was ill.  I really like the packaging of this one:

I placed two cards and envelopes in a Glassine Gift Bag and tied it with some Dapper Denim Ruched Ribbon.

Jar of Love came in handy to make a little bouquet on the front.  I stamped the jar in Smoky Slate and cut it out with the matching Everyday Jars framelits.  Flowers were stamped in Peek-a-Boo Peach and Pool Party/Marina Mist, and the leaves with Pear Pizzazz or Lemon Lime Twist.

Doesn't this make a cute thank you gift?


Product List


Thursday, September 18, 2014

Got Treats? Another Wacky Watercooler Blog Hop


Welcome to our September Wacky Watercooler Blog Hop!  Whether you started here or hopped over from Stefanie's blog (aren't her projects the cutest?), just hit the "next" button and you can travel all the way around the hop. 

This month we are highlighting the upcoming holidays.  And what's first?  Halloween, of course!  I enjoy giving little treats to grandchildren, friends and co-workers and I decided to create some fun ways to present them.  So here's a peak (details will be on my blog all next week; please come back):


Stampin' UP! has great gift packaging and I used two--the Chevron Tag a Bag Gift Bag and the Decorative Window Gift Boxes.
Stamp, tie and embellish with a cute banner or tag, and you're ready to go!  Easy peasy!

Like to craft?  Here's a simple little box made from the Gift Box Punch Board:
This started as a 8" x 8" piece of Crushed Curry cardstock.  Some Motley Monsters Designer Series Paper, a bow (made with the Gift Bow Bigz L die), some ribbon and a banner finished it off.  Perfect for my little Jacob!

Using the Scalloped Tag Topper punch on both ends of a 2" x 11-1/2" strip of Bermuda Bay cardstock gave me enough length to wrap a pack of gum for Isabella.  Decorated again with the Motley Monsters DSP and tied up with Bermuda Bay and Crushed Curry taffeta ribbon, it makes a sweet gift with a little tag (from Project Life Holiday Cheer and the 7/8" Scallop Circle punch).

My last project was totally handmade--a gift container made from a Stampin' UP! embellishment container:
I decorated the bottom and top rims of the container with Motley Monsters DSP,then rolled up a piece of Window Sheet and Sticky-Stripped it to the inside of the bottom.  Love it!.  It's all tied up with beautiful Tangelo Twist Stitched Satin Ribbon.

My label stands up, thanks to a little strip of Window Sheet:
Crushed Curry was punched with the 2" circle punch and stamps from Project Life Holiday Cheer and And Many More make up the tag, cut with the Word Bubbles Framelits.

So how do you wrap your Halloween treats?
Check back next week for directions and more photos.

And hop on over to Marsha's blog to see what great items she has to show you.  Thanks for visiting!


 photo nextwatercoolercrockbutton.jpg
http://www.craftymedic.blogspot.ca/ - s.pletscher@me.com

http://wackywatercoolerstamping.blogspot.com