Showing posts with label Wacky Watercooler Blog Hop. Show all posts

Thursday, January 19, 2017

Back to the Watercooler


Yes the Wacky Watercooler gang returns for "part II" of our introduction to the Occasions and Sale-a-Bration catalogs.  We have 13 "hoppers" and I hope you'll be sure to visit each site to see what our artists have created.

Our hop is a circle; if you have joined here, welcome!  And please be sure to click the links below to see all the sites.  If you've just come from my friend Penny's blog I know you've been blown away by her skills--I frequently CASE her cards, and today is no exception.

Our goal is to show you some of our favorite new products from these new catalogs, and I will start with a stamp set that surprised me.  I first saw it at the On Stage "convention" in November and decided I didn't "need" it...and then it grew on me.  So here is my rendition of Beautiful You:

This set is a TOTALLY MUST HAVE stamp set!  The gorgeous, stylized drawings of women, added to the fabulously wonderful sentiments AND fantastic fonts make this a go-to set for those special female friends in your life for just about any occasion.

I decided to make a simple, elegant set of cards, all in black and white.  I actually created this first one for my daughter...and the rest is history.

My daughter is very stylish (and skinny) and this just looked like her.  I had a little gift for her, and wanted to include a card, and this was born.  Whisper White Thick cardstock (5" x 10" and scored at 5") is the base for all three cards in the set, along with a 4-7/8" x 4-7/8" Basic Black square.  Then I took a variety of black and white Designer Series papers (from the Neutrals Paper Stack and Pop of Pink) and created my background.

The stamps are all inked with Memento Tuxedo Black ink on Whisper White.

And each card has a different, subtle embellishment--Metallic Enamel Shapes on the first card, Basic Black Solid Bakers Twine on the second, and black Sharpie-colored Pearls on the last one.

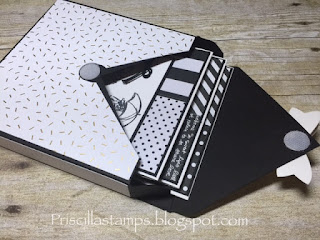
I thought this would make a lovely gift, so I created a special gift box:

Using a 10" x 10" square of Basic Black and the Envelope Punch Board, this box came together easily.  I covered it with the specialty paper from Pop of Pink (it has gold flecks), and added a Gold Foil bow (from the Bow Builder Punch).


The box is perfect for holding the three cards and envelopes.

So there's project #1 - what do you think?

And Project #2?  Easy peasy:

I LOVE the simplicity of this card.  I needed a special card for a former colleague who just began a new job, and I wanted to use the new Celebrations Duo Textured Impressions Embossing Folders.  I also wanted to try the Falling in Love Designer Series Paper, and BAM!  It all came together!

First, that embossing folder.  It actually DE-bosses; the word is sunk into the paper, not raised up.  I ran it through the Big Shot with the embossing folder and then took the circles (2 sizes) from the Happy Celebrations stamp set.  Using Tip Top Taupe (stamped off), Soft Sky and Blushing Bride (stamped off) I stamped right over the letters.  But since they are de-bossed, the letters stay white.  Cool, huh?

The ribbon edging the panel is a FREE item from the Sale-a-Bration brochure.  The 3/8" Metallic Ribbon Combo Pack comes with two rolls of ribbon; the white one is woven with shiny silver accents, and the vanilla ribbon has shiny gold accents--really pretty!

The card base is Soft Sky.  There is a skinny panel of Tip Top Taupe and then a layer of the Falling in Love DSP--a beautiful bokeh look (which I copied onto my de-bossed panel).  And the "New Beginnings" is from the Happy Celebrations set too.  I really loved the way this came out!

So there you have it--my two projects using new items that I wasn't in love with at first, but REALLY grew on me!  Sometimes you just have to try something new!

Now it's time to go visit a favorite virtual friend of mine (who I actually once met in person!), Jean Fitch.  Jean is extremely creative and dares to try new things.   Let's go see what she has to show us today.  Thanks for stopping by!

https://jlfstudio.wordpress.com


http://wackywatercoolerstamping.blogspot.com
http://pennytokensstampinspot.blogspot.ca


Thursday, November 17, 2016

Christmas with the Watercooler Gang!


 It's time for another Wacky Watercooler Blog Hop and we have holiday ideas to share with you.  Our hop is a circle; join anywhere and click the "next" or "previous" buttons to visit another blog on the hop.  You may have just come from my pal, Christine's, blog and were certainly wowed!  And if you've just joined here, enjoy; and please take a few minutes and see what the other artists have created for you.

We're focusing on the holidays, so I will start with a holiday card, and what says "holiday" more than gingerbread cookies?
And gingerbread cookies fresh from the oven and still on the cookie sheet?  Yum!

This card uses the adorable Cookie Cutter Christmas and matching Cookie Cutter Builder Punch, along with Oh, What Fun.


The cookie sheet is a piece of Silver Foil Sheets.

And something new--The Stitched Shapes Framelits dies (get yours now--they are just about gone until a new shipment comes in!) surrounds the phrase and layer perfectly with the Layering Squares Framelits.  Oh, what's that?  These aren't squares?  You're right--I re-cut them with the framelits to make rectangles.  Come back Sunday for details.

Next up - a little treat for a neighbor or co-worker:

I love, {LOVE}, these White Gift Boxes!  Such a fun way to dress up a small treat or present.

I made a little "tray" to hold two of them, and wrapped them up with the scrumptious Real Red 3/4" Stitched Edge Ribbon.  The tag is made with the Cheerful Tags Framelits Dies and the Here's to Cheers stamp set.

Inside is a small treat:
Cocoa and "mix ins":
I found these tiny mason jars at Target and made new lid toppers; one says "cocoa" and the other says "mix-ins" (and holds crushed candy canes and mini marshmallows).  A cute way to give a little heart-warming treat for the holidays.

Finally, let's enjoy a little wine:

And how better to gift a bottle than to dress them up!

My Christmas bottle is "bare", but has a great bottle tag:

Another die from the Cheerful Tags Framelits and Here's to Cheers--this tag is all dressed up in Christmas colors.

But wait...wanna celebrate the New Year?

Then how about decking out your bottle in Blushing Bride Glimmer paper and presenting it in a 6" x 17" Gusseted Cellophane Bag with a special silvery tag?  Sparkly and pretty!  Don't forget the fabby ribbon--beautiful 3/8" Glltter Ribbon Combo Pack (comes in Sweet Sugarplum and Silver--just delicious!)

I'll have details on my Sunday post, so I hope you'll come back for another visit.  And now on to see what Libby has created--I always love to see her ideas!  Thanks for stopping by!


http://stampandcreate.net

http://www.dancinstamps.blogspot.com


http://wackywatercoolerstamping.blogspot.com


Thursday, September 15, 2016

The Wacky Watercooler Blog Hop--What We Love About the New Holiday Catalog


Yes it's time once again for another Watercooler Blog Hop, and this time we'll show our new Holiday Catalog a little love.  Whether you've hopped on here, or come from Marie's fabulous page (weren't her ideas over-the-top wonderful?), I hope you'll enjoy our creations and get some inspiration for your holiday projects.  There are nine stops on this tour; just click on the buttons below to move along.

We have been asked to prepare three items featuring our favorite products from the Holiday Catalog, and I had a hard time choosing.  So I just started creating, and ended up picking three of my creations to share with you.  I hope you like them.

Let's start with Halloween and a double Z-fold card:

Oh my what a fun time I had creating this beauty!  I love Halloween and I especially LOVE creating spooky sky images.  So this card was right up my alley...

Featuring Spooky Fun, I used almost every stamp, and then I used almost every framelit in the Halloween Scenes Edgelits Dies.  Look what happens when I open up the card:

I sponged the sky on three panels of Whisper White card stock, then added the die cut trees.

The fence was cut and added to the border, and I created my own phrase using the Labeler Alphabet stamp set.

My only problem was that my Halloween phrase was longer than my card (insert frowny face), but that didn't stop me--I just added another fold-out extension, and kept on going.  My my, I really love this card!


Let's move on to something more sedate.  I couldn't wait to play with the White Gift Boxes.  Is there anyone else like me who just can't resist a good gift box?  And these are perfect--3" x 3" x 3", and include an acetate sleeve to slide over the box; take a look:

Did I mention these are white?  Because of the "food-safe" quality, they are slightly waxy on the outside, so stamping on them would prove challenging.  But no problem for me--I just covered them with another fantastic product from the holiday catalog--Presents and Pinecones Designer Series Paper!

2-3/4" squares for all sides made these boxes so pretty.  And I added a little trim from the Flourish Thinlits dies and some Cherry Cobbler card stock.  Then I slipped on the sleeve and tied it all up with yet another wonderful new item--Candy Cane Lane Baker's Twine.  It has red metallic thread that is so sparkly!


And see that tag?  Oh my my...another favorite new thing--the Merriest Wishes stamp set with matching Merry Tags Framelits Dies.  But with a twist--this tag is supposed to have a cut out tree; instead, I saved the pieces from the cut out, and glued them together to make a tree.  Such fun!

And I topped it off with a tassel from the Tin of Tags Project Kit--just an extra piece of fun to make your packaging special!

OK, OK, now to my very favorite project--I fell in love with the Detailed Santa Thinlits Dies when I first laid eyes on them.  HAD. TO. HAVE. THEM!  But all the cards I started making with them looked similar, until...

BOOM!  I filled in the cut out face and head with Blushing Bride and Real Red pieces, and suddenly my Santa came alive!  And I put him on a Window Sheet, so you can see through to the inside of the card.

Ain't I clever?

Oh, I'm in love...

Well that's it for me.  I'll have details for each project over the next week, so be sure to pop back in starting Sunday.

And now off you go to Christine's blog, where you are sure to find more creative inspiration!  I love her work.  Thanks for stopping by!


http://mytanglewoodcottage.net/

http://wackywatercoolerstamping.blogspot.com/


http://mytanglewoodcottage.net/


Thursday, August 18, 2016

Stepping it Up with the Wacky Watercooler Gang


It's time for another blog hop by the Wacky Watercooler Gang.  And this month we're stepping it up: One, Two, Three--one card three ways.  You'll see an easy, quick card, one that's a little more elaborate, and then a sample where we've pulled out all the stops!

Our hop is a circle; you may have just come from Gail's fabulous blog - don't you just love her samples? - or you may hopped on here.  However you joined us, thanks for visiting, and please continue on the journey by clicking on the "next" button at the bottom of this post.

I began my projects with an idea I had for my third card.  I purchased the Jar of Love set, and while playing with it I had an idea to combine it with Swirly Bird...so here are my end results.

First up, a simple card you could complete in minutes:


A base of Dapper Denim with a layer of Whisper White, and then a layer of the beautiful Serene Scenery Designer Series Paper Stack.  This paper can be the star of your cards; all you need is a little embellishment or sentiment.


I merely stamped the boat from Swirly Bird (using Soft Suede for the boat and Mint Macaron for the sails), snipped it out and added it to the front of my card.

A simple sentiment from Places You'll Go, in Dapper Denim ink, finished my card.
Easy peasy!


So let's step it up a notch:


Same boat, same scene, but it took a bit more work.  This time the card base is Whisper White Thick cardstock, with a layer of Marina Mist.  The top layer is Soft Sky.


The boat was stamped in Dapper Denim and Marina Mist with a Cucumber Crush flag.  Then it was all snipped and ready for the card.  The waves were created with the Swirly Scribbles Thinlits dies and Marina Mist cardstock.   And the boat was added with Dimensionals.  The sentiment from Cottage Greetings was stamped with Marina Mist.


The sun was stamped with Crushed Curry on Crushed Curry cardstock and cut out with the thinlits, and then I just cut some white clouds using the Umbrella Weather Framelits.

Boom--a card in 20 minutes.

And now it's time to step it up even more...a card that took me a few days to perfect, but was the original idea for these cards:


As I was planning a trip to Cape Cod, Massachusetts (lots of beaches and retired people!) and I was playing with my Jar of Love set, I had an idea to put a boat in a bottle.  And I wanted a neutral color scheme with a pop of color.


The boat is the same one used above, Swirly Bird, stamped in Basic Gray and Smoky Slate, and once again snipped out.  I stamped Hardwood in Basic Grey on Smoky Slate cardstock and then sponged it heavily with more Basic Gray.  Then I just cut a strip of the "wood" to make a "table".

The jar was stamped in Versamark ink on a Window Sheet, and embossed with Silver Embossing Powder, as was the lid (on Whisper White paper).  Then it was cut with the Everyday Jars Framelits dies.  I used some REALLY skinny strips of Dimensionls to pop it up over my boat.

The layers:
Whisper White Thick cardstock
Basic Gray
Neutrals Designer Series Paper Stack
Silver Thread, scrunched up and added with Dimensionals
Whisper White, stamped with Timeless Textures and sponged with Basic Gray
Strip of Hardwood
Jar

The sentiment from Wild About Flowers was stamped in Real Red.


And it's finished with Real Red Brights Enamel Shapes.

Whew!  I really liked how it came out, but I must say that this card will have to go to someone very special!

So that's it for me!  I hope you liked my stepped up cards and will try this yourself.  Now on to see what Marie has created; I often find myself CASEing her work, so I know it will be wonderful!

Thanks for stopping by!


http://stampingandotherstuff.blogspot.ca/


http://wackywatercoolerstamping.blogspot.com
http://stampingandotherstuff.blogspot.ca/