Showing posts with label Wrapped in Christmas. Show all posts

Monday, November 16, 2020

A Christmas Ornament Gift Box

 Yesterday I told you the story of my virtual family movie night watching a Hallmark Christmas movie.  I mentioned that I was sending my 10 "sisters" (actually sister, daughter, daughters-in-law, sister-in-law, and nieces) a Hallmark Christmas ornament to commemorate our fun evening of virtual togetherness.  You can see the post here.

I promised a look at my packaging, so here it is:


First and foremost is the greeting - is that not perfect?  It's from Wrapped in Christmas, and is truly one of my favorites!  


I chose a Stampin' UP! Acetate Card Box for sending my gift.  The size is perfect for my card, the ornament and a little shredded paper.  All I had to do was create a belly band.


I started with a 1-3/4" x 12" piece of Heartwarming Hugs patterned paper.  By scoring it at 2-7/8", 3-1/2", a smidge over 8" and 8-3/4" it fit perfectly around the box.  I used SEAL+ to hold it closed on the front of the box, but with no adhesive on the box itself (so it can slide off and the box can be used again).  

A Stitched Shapes circle was adhered over the front, then some Gold Foil sprigs and the sentiment, cut with the Stitched So Sweetly dies were added.  Finally I stamped the holly from Christmas Gleaming, cut it out with my Scan 'n Cut, and colored it with Blends.  I love the way it all came out!


Stampin' UP! has many packaging options, from Mini Paper Pumpkin Boxes to Mini Pizza Boxes, to several sizes of acetate boxes.  Check them out on page 152 of the Annual Catalog.  They hold all kinds of treats and are easy to decorate--just perfect for the holidays!

And catch a Hallmark Christmas movie - the happy endings always make you feel good!  ðŸ˜Š


Product List

Monday, November 2, 2020

Leftover Christmas

Have you ever found some leftover pieces on your desk and tried to make a card, and it came out even better than you dreamed it would?

That's what happened to me with this card.  


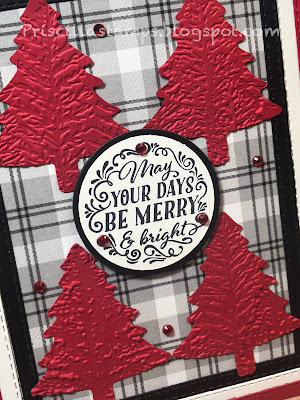
I've been prepping for a Cards by Mail class (a monthly offering) and had a bunch of leftover pieces on my desk.  There were Real Red frames, Whisper White frames and lots and lots of Real Red Christmas trees.  

I picked up the pieces and was going to move them off my desk when inspiration struck.  I layered the red frame over the white one and stuck a few of the trees in the center, and I was hooked - HAD to make a card!


But it needed something in the background - Plaid!  A piece of Plaid Tidings patterned paper was just the ticket!  But there was still something missing...

Black!  I quickly cut another Stitched Rectangle using Basic Black, and I was happy.

These three frames are layered over the plaid on a card base of Thick Whisper White.

And those trees:


I carefully lined them up inside the Evergreen Forest embossing folder and ran them through my Stampin' Cut & Emboss machine, creating an embossed pine tree on each.  

The greeting, from Wrapped in Christmas, was stamped in Tuxedo Black, punched with a 1-1/2" circle punch and layered over a black Layering Circle die-cut.


 I still have a bunch of these trees, so I expect I'll make some more "spur of the minute" cards.  Hmmm, let's see...what else can I do with them?  I guess you'll have to come back and see!  


Product List

Friday, August 28, 2020

Team Swap

My Ink Master team gets together on Zoom every two weeks.  When the new August - December 2020 Mini Catalog came out a few weeks ago, we all decided to participate in a card swap.  We would each make a card (actually we all made 9 of the same cards) using at least one new product from the new Mini, and we would send them to each other, thereby collecting 9 cards with new stamped images, new patterned paper, or a new accessory.

Fun, right?

So my swaps were mailed last week, and by now I think everyone has it, and it's safe for me to share. This is what I did:


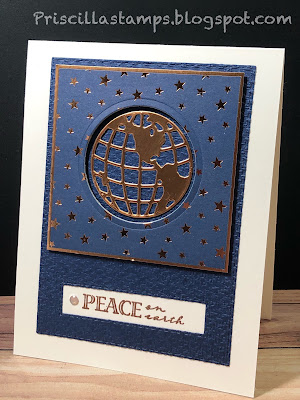
I chose to use the Wrapped in Christmas stamp set, along with the Brightly Gleaming paper (a returning goody from last year, and one I couldn't wait to get my hands on!).


And when your card says "Peace on Earth", what better image to use than that globe?  The World Map dies were perfect for this card.

Let's break down the steps:

  • The card base is Thick Whisper White, cut to 4-1/4" x 11" and scored at 5-1/2"
  • There is a layer of Misty Moonlight, 4-3/4" x 3-7/8", which has been embossed with the Tasteful Textile embossing folder
  • I cut a rectangle toward the bottom of the Misty Moonlight layer, using the Stitched Rectangle dies
  • Before adhering the Moonlight layer, I held it in place and stamped my greeting through the hole, using Versamark ink (I lined this all up once, using the Stamparatus, then I stamped all my cards in the same place)
  • The greeting was heat-embossed with Copper Embossing Powder
  • Then that Brightly Gleaming paper with the copper stars - a 3" x 3" square, mounted to a pieced of Copper Foil that is 3-1/8" x 3-1/8"


  • Before adding the Brightly Gleaming layer, I cut a circle (through both layers - Brightly Gleaming and Copper Foil), using the World Map dies - there's one that is the perfect size for the globe to fit in; then I popped the layer on the card front using Dimensionals
  • The globe was cut from Copper Foil using the World Map dies (there are two - one for north/South America, and one for the other hemisphere, including Europe), and nestled into the cut circle using tiny slivers of Dimensionals

  • And the card was finished off with a Gold Glitter Enamel Dot.
Here they all are, lined up and getting ready for mailing:


Whew!  I usually don't like making multiples of cards, but using the Stamparatus and cutting all the pieces, then using an assembly line to put them together was actually quite rewarding!

Over the next few days, I'll share the cards I received from my teammates.  It's a great collection!


Don't forget to redeem your Bonus Days Coupons this month!  They expire August 31.


Will you be placing an order today?
If your order is less than $150.00 please consider adding my current host code to the bottom of your order form.  For every order added, I'll send you a hand-made thank you card and a FREE gift.  If your order is over $150.00, do NOT add the code - you'll be eligible for host benefits and I will still mail you a card and gift.

E2YP2B67


Product List