Showing posts with label Season of Cheer DSP. Show all posts

Monday, December 21, 2015

Pretty Wrapping

I held my team meeting two weeks ago and got to award two of my downline members for some recent achievements. 

Judy reached a new level, Senior Associate, and I made her a little bag to hold some Glitter ribbon:

I used the Season of Cheer and the Gift Bag Punch Board, then topped it off with a Tea Lace Paper Doily and a Metallic Foil Doily.
I punched a gold bow using the Gold Foil Sheets and Bow Builder Punch, and added a sentiment cut out with the Tags and Labels Framelits.

Congrats to Judy!

Michelle was not able to come, but she had her highest sales ever; her gift was wrapped in a Tag a Bag Gift Box:
Adding a piece of Season of Cheer DSP over the top (and inside the plastic sleeve) really dresses this up.  It's tied with some Organza Ribbon and embellished with Silver 1/8" ribbon and Silver Sequins.  The tag is a sneak peek at a sentiment from Suite Sayings, coming in January.  It was stamped in Soft Sky and Pear Pizzazz and added to a tag of Silver Foil.  Sparkly!

Fun and easy ideas to dress up your holiday gifts!


Built for Free Using: My Stampin Blog

Tuesday, November 10, 2015

One Layout, Two Cards

I love it when see a great layout!  Today I'm going to share one layout, from which I created two cards.  And although they are basically the same, you'll note that they also look totally different.  Take a look:


I started with a pack of Season of Cheer Designer Series Paper.   The yummy prints scream Christmas!  So I chose just two pieces and with a little careful cutting, was able to make these cards.

My card base is a standard 4-1/4" x 11", scored and folded in half.  I then took the DSP and cut a 3-3/4" x 5" piece (I wanted to preserve the wider cardstock edge, so this is a bit smaller than my usual layers).  Measuring 1" down from one side, and 1" UP from the other side, I drew a light pencil line, then cut my DSP on the diagonal.  Then I simply flipped the bottom of my paper--the beauty of DSP is that it is printed on both sides, and the colors of the pack all coordinate.  It's hard to get it wrong!

After adhering my DSP on my card base, I took another piece of cardstock (in this case, Mossy Meadow) and cut it 1" by 5-1/2", then carefully snipped the ends to match up with the DSP.


Using the fabulous Christmas Greetings Thinlits Dies, I cut "merry" from Dazzling Diamonds Glimmer Paper.

All that was needed was a simple embellishment--two Corrugated Paper stars were cut with the Star Framelits, I popped the small one up with a Dimensional and added a pretty Iced Rhinestone Embellishment - DONE!


These would be simple cards to mass-produce and there are lots of coordinating patterns in this paper pack.  Give it a try and see if you can make your cards look different than mine!


All products can be purchased here.

Built for Free Using: My Stampin Blog

Sunday, October 25, 2015

Christmas Wrapping

Last week I showed you some easy Christmas packaging (see here). 
Today I want to give you a little more detail about what I did to make this special.

These boxes use the Tag a Bag Gift Boxes, which are wonderful, food safe, boxes that come with acetate sleeves.  They are essentially good to go, but you can have lots of fun decorating them.

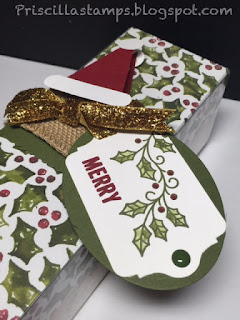
This box was dressed up using the Season of Cheer Designer Series Paper.  I cut a piece the same length as the box, with a 1" overlap on either side.  The corners of the DSP were rounded with the Project Life Corner Rounder and I scored each side at 1".  Then I just laid the paper over the box and slipped it inside the sleeve.

The box was tied using White Organza Ribbon.  Under the knot, I slipped a 3/4" circle with Silver 1/8" ribbon looped over it, and then I added some Silver Sequins.

But it's the tag that makes this special:
I first cut a piece of Whisper White Thick Cardstock with the Chalk Talk Framelits.  I sponged "sky" using Marina Mist and Night of Navy inks.  I then used my Sleigh Ride Edgelilts to cut Dazzling Diamonds Glimmer paper and then cut another one of the trees using Lost Lagoon, and the sleigh from Night of Navy.  The horse was cut using Early Espresso.  I carefully trimmed the trees, sleigh and horse, and adhered them right over the original piece.

Very soft and sparkly gift packaging.

Then I took another box and stamped it using the mistletoe stamp from Embellished Ornaments.  I covered it with another piece of Season of Cheer DSP:


And I decorated the acetate sleeve using Mossy Meadow cardstock, Burlap Ribbon and a sparkly piece of Glitter Ribbon.

The tag (another Chalk Talk Framelit) was stamped and colored and added to a Mossy Meadow oval:

I finished it off with a Home for Christmas Enamel Dot embellishment and a cute little Santa hat (it uses a SU Clothespin to hold it in place).

So I'm already getting a head start on my holiday wrapping!  Yippee!

All products can be purchased here


Built for Free Using: My Stampin Blog

Sunday, October 4, 2015

Christmas Card Class

I had an idea and decided to make it happen.  Does that ever happen?  Not often!  LOL  I think about ideas, and then talk myself out of why it's good.  Like taking walks when I'm tired at work, or eating the healthy salad instead of the loaded-with-calories sandwich (and cookie "for only 99 cents!).  But this time I actually followed through!  Wowsa!!

I'm hosting three months of Christmas cards, using only one to two sets each month.  I want to show the versatility, AND show my customers that they don't have to spend alot to make very different cards, using just one (maybe two) stamp sets.  So my September class used the beautiful Embellished Ornaments along with the Delicate Ornament Thinlits Dies.  I also showcased the Season of Cheer Designer Series Paper.  And here are the cards we created:

First up  was a square card with a special opening in the center.  The gorgeous ornament was stamped with Lost Lagoon ink and hand cut with Paper Snips.  Then we cut a Silver Foil ornament using the framelits to place behind the stamped one.


The "merry" was cut using Christmas Greetings Thinlits Dies; only one half of the ornament and the greeting was adhered to the left side of the card so that it could open.

This card also used Rhinestone Basic Jewels  and 1/8" Silver Ribbon.

Then we made this:
Similar to a card previously posted here, we used the bokeh technique for the background.  The ornaments were cut with Silver Foil and "hung" with Silver Cording Trim.  "peace" was cut with the Christmas Greetings Thinlits, once from our bokeh effect cardstock and again using Coaster Board.

The "peace"s were pushed back inside the cut out to create a very subtle, raised sentiment.

For the next card (a total CASE of Mary Fish), we used the fabulous Red Foil Sheets:

Simplicity at it's best, this card uses Whisper White Thick Cardstock as the base, with a layer of the Red Foil on top.


The top layer of Whisper White is cut using the framelit, and the cut piece is adhered to the red foil sheet.  Then the top layer of Whisper White is popped up with Dimensionals.  A beautiful card.

And finally, some fun:

A shaker card using the Season of Cheer DSP with a cut out using the ornament that looks like a Christmas light.  The background is Hello Honey, embossed with the Lucky Stars Embossing Folder.


Our shaker card was filled with lots of stars punched with the Confetti Stars Border Punch and Gold Sequins.

Wish you had come?  Well don't fret; I'm holding my next class on Friday night.  We'll be using Your Presents along with Holidays Fancy Foil Designer Vellum and Merry Moments Designer Series Paper Stack.   Attendees who place a minimum order earn a half-price or FREE class.  Watch for an e-mail invitation (or contact me for your invite!).

Thanks for stopping by!