Now isn't that an interesting name for a blog post? Joseph's Coat...hmmm, am I getting ready for winter?
Nah! Just a technique I tried (I've been putting this one off for a decade, and finally decided to give it a try).
And here are my results for two cards that I created:
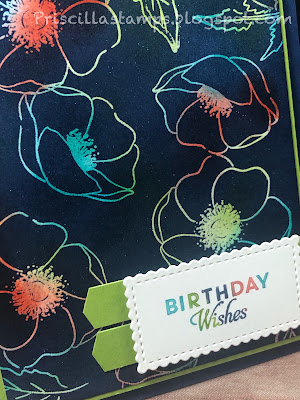
They are seriously gorgeous, but the lighting made it difficult to capture the one on the right. So let's start with the other one:
In order to create a card like this, you start by using sponge daubers to "paint" splashes of colors all over a piece of Whisper White cardstock. I used Bermuda Bay, Calypso Coral, Daffodil Delight and Granny Apple Green. I just randomly daubed the colors all over the paper.
Next I inked my Painted Poppies stamps with Versamark ink (clear, sticky ink) and stamped a random pattern right on top of the colored cardstock. It's a bit hard to see where you've stamped, but if you tilt the cardstock into the light, you can make out a faint image. Then I poured (liberally) Clear Embossing Powder all over the cardstock, tapped it off, and heat set it. The images come up shiny, but still hard to see.
Then it's time for the magic - I used a sponge brayer with Night of Navy ink and brayered all over the page. Completely covered it with Night of Navy ink (lots of layers) but...those colors came popping through! Because of the clear embossing, the navy ink was resisted, and the flowers glowed. So pretty!
Of course a card this pretty needs a matching greeting...I colored the stamp with Stampin' Write markers in coordinating colors and stamped.
So how about my other card:
Hard to photograph due to the yellow on the card, but I think you get the idea. This time I used Forever Fern and my sponge daubers added Pear Pizzazz, Pumpkin Pie, Daffodil Delight and Old Olive to the base. Once embossed and heat set, I used Mossy Meadow on my brayer to make the colors stand out.
Such a beautiful technique!
I warn you, though, it can get a bit messy. Between the sponge daubers and the sponge brayers, I had inky fingers! Nothing a good shampoo won't clean off. 😆
Joseph's Coat (it comes from the Coat of Many Colors) - a great technique that will have recipients of these cards wondering just how you got all those colors on your card...shhh...let's keep 'em guessing! 😏
Product List 
Stampin Write Markers - Brights Collection
[119702]
$28.95

Stampin Write Markers - Subtles Collection
[119700]
$28.95


