Showing posts with label Forever Fern. Show all posts

Friday, April 21, 2023

CASEing Gail Ellis

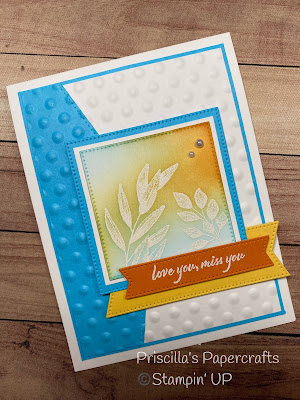
 Australian demonstrator, Gail Ellis, is one of my favorite papercrafting artists.  I'm in awe of her eye for color, texture and balance.  So when I saw a few cards she created for the Demonstrator website, I decided to CASE (copy and share everything) one of them.

Her card was a 4" x 4" card, and I changed up a few things, but basically this is a Gail Ellis card (my apologies to Gail, as mine is nowhere near as perfect!).  


L.O.V.E.!

This was our "technique" card, as it contains an emboss-resist image and uses Blending Brushes.


We started with two leaf-image stamps from Forever Fern, stamped in Versamark and heat-embossed with White Embossing Powder.

Using Blending Brushes, we added Tahitian Tide, Daffodil Delight and Pumpkin Pie inks.  Then we used a Kleenex to rub off any ink on the white images - the embossing "resists" the ink and stays white.  


Tahitian Tide was cut with the Basic Borders dies to create an "arrow" pointing at the focal point.  Adhered to Basic White, it was run through the Stampin' Cut & Emboss machine with one of the OnLine Exclusives Basics Embossing Folders.  

Our greeting, from Very Best Occasions, was heat-embossed on a Pumpkin Pie banner. 


 Sweet Perfection!  Thanks, Gail, for the inspiration!  I love this card!

Do you love the polka-dotted background?  You might want to check out the OnLine Exclusives to see the Basics 3D Embossing Folders.  A set of three, you'll love having them in your craft room.  


Product List

Thursday, September 1, 2022

A Sympathy Re-do

OK, I want to hear stories about how you've messed up the card you were making and what you did about it.  

Here's mine.

A friend recently lost her sister.  I wanted to make her a card.  So I sat down to create, pulling out Forever Fern and my Soft Sea Foam and Garden Green inks.  Sounds nice, so far, right?

My first attempt was a little off - the Soft Sea Foam was a little too light, and just didn't give me the look I wanted.  So another piece of Basic White to cut.  Try again.  This time, I used Garden Green, and stamped the leaves twice without re-inking.  Nice.  And then the greeting.  Good.  And I wanted to cut out a window at the bottom of the page so an image underneath could be visible.  Great!  All looking good so far.

And then I decided to stamp the leaves again on Vellum, cut them out and place them over the image in the window.  Really nice!  

Except - I smeared the ink and got it on the whole card!  ðŸ˜¡

Starting over...Cut the window first and stamped the leaves, then the greeting - oh no!  The greeting is too low.

Another piece of cardstock...And it all goes well!  Finally!  Whew.  I'm liking this card!  All I need to do is stamp the inside and I'll be done.

Stamped...and...OH NO!  I stamped upside down, on the back of the card front! Argh!

After another try, using a different stamp from the set, I decide that I really liked the first card better.  So what do I do?

I cut off the front of the first card and adhere it to a new card base!  Tada!  

And here it is:


Yes, three cards later, this is what I sent to my friend.  


This is the piece of vellum, stamped with the Forever Fern image and cut with the coordinating dies.

And here is the inside:


And here is the card I made with the other image:


The vellum image just doesn't fill the window like the first card.


So does this sound familiar?  Have you ever had an experience like this?  Creating over and over until you FINALLY get it right?  Geesh...

Tell me about your stamping booboos.  I want a little vindication...😕


Product List

Sunday, January 31, 2021

A Week of Misty Moonlight

 Almost sounds like a weather report, doesn't it?   A week of Misty Moonlight?  

Misty Moonlight is one of the 2020-22 Stampin' UP! In Colors.  It's one of my favorites, and pairs well with so many other colors.  So I have a week's -worth of cards to show you, all of them using Misty Moonlight as the main color.  

So let's start with this, a beautiful, monochromatic card:

Not only is the color stunning, the simplicity of the card is just perfect!  


I started with a sheet of Misty Moonlight cardstock and ran it through the lovely Seashells embossing folder. Once done, I used a Sponge Dauber to carefully brush on some Frost White Shimmer Paint.  I carefully brushed over the raised images using small circles of sponging, and it created a beautiful, subtle shimmer of highlights on the shells.


The piece was mounted to a skinny layer of Seaside Spray, and it was "hugged" with a Seaside Spray Metallic Ribbon.  Then it was all added to a Misty Moonlight card base.  The greeting is from Forever Fern, stamped in Misty Moonlight on Seaside Spray and adhered to the ribbon with Tear & Tape Adhesive.


I finished with a few Opal Rounds to mimic the "bubbles" from the embossing folder.  

So pretty!  And it's only the first of an entire week of Misty Moonlight!  What else could be coming?  


Product List