Saturday, July 21, 2018

Free Ink Pads

Don't forget!  Free family of ink pads (10 full-sized pads) can be yours by becoming a Stampin' UP! demonstrator.


Why should you become a Stampin' UP! demonstrator?

1.  Always purchase products at 20-25% off!
2.  See new products (and get them in your hands) before anyone else!
3.  Opportunity to attend On Stage (this year's 30th Anniversary party is in Orlando, Florida)!
4.  Have a business...or don't!  The choice is yours!
5.  Receive $125 worth of products (your choice) for only $99--and FREE shipping!
6.  FREE ink pads!

Why wouldn't you take advantage of this deal?  But it ends in 2 weeks, so act now.  Click here to sign up now!

Friday, July 20, 2018

July's Paper Pumpkin

Can you say "cute"?  "Fabulous"?  "Adorable"?

Well, once you've seen the newest Paper Pumpkin projects, you'll be screaming all three.  Take a look:


Not a Paper Pumpkin subscriber?  Well it's time you were!  Click here to subscribe before August 10th so you don't miss another month of cute, fabulous, adorable projects/cards, delivered right to your door each month!

AND, you can get your first month for 50% off!  That's right.  Be sure to use the code, BLOOM818 and you'll save on your first kit!


Thursday, July 19, 2018

Enjoy Life

I love this set:


Enjoy Life is such an uplifting stamp set, with two silhouettes (male and female) and some great phrases.

I had fun putting this card together for my open house last month (I just found some photos of cards I had made for that and never posted!  Yikes!  Better late than never, right?)


This card has a different front flap.  Instead of being a full-size 4-1/4 "x 5-1/2", I cut off 3" of the base and then layered on a a slightly smaller flap.

Starting with a piece of Whisper White, I sponged on the color - Daffodil Delight, Pumpkin Pie and Real Red, then stamped the grass across the bottom using Mossy Meadow.  The silhouette was stamped with Tuxedo Black (I used the Stamparatus to stamp it a few times in order to get a true, black image) as was the sentiment.


The Whisper White panel was adhered to a slightly larger Mossy Meadow panel, then adhered to the card base (Soft Suede) with adhesive only on the left side.  The white panel below is the inside of the card.  Neat, huh?

Pick up Enjoy Life!  I know you'll love using it for all types of cards--encouragement, celebration, 'miss you', 'love you', and more!  


Product List


Wednesday, July 18, 2018

Half off?

Yes!
Now is the time to subscribe to Paper Pumpkin and save 50%.  Here's how:


That's right!  Use code BLOOM818 and you'll get your first month for half price.


Get in on the fun!  Click here to start receiving your own little orange box of fun!

Tuesday, July 17, 2018

Stamparatus Circle Stamping

I finally got a chance to try "circle" stamping with the Stamparatus, and was really thrilled with the outcome.  Look at this:


Look at that gorgeous wreath!

I started with a template that I made from a 6" x 6" square.  I then took the largest Layering Square Framelit and cut one square smack in the middle, and then rotated it 90 degrees and cut again, creating a hexagon shape in the middle.

Then I took another of the same largest square framelits and cut another piece of Whisper White.  I fit it in the template and stamped the Lovely Lipstick flowers from Tropical Chic.  I rotated the piece of paper in the template, using every other corner for the Lovely Lipstick flowers and then did it again with Mango Melody.  I loved the effect!


The sentiment is from Eastern Beauty, and stamped in Garden Green ink.  I fussy cut around the flowers to create the wreath.


This is a pocket card - I cut the Mango Melody base at 5-1/2" x 11" and scored it at 4-1/2" and 9".  This gave me a 2" flap to create the pocket.  Before adhering it closed, I ran it through the Tufted embossing folder.  So pretty!

The inside pull-out is 4-1/2" x 5-1/4".  I put a little tab on the top so it can be easily pulled out.


For the card front, I cut a piece of Garden Green and used the Trio corner punch on the top corner.  Then I made a bellyband from the Tropical Escape Designer Series Paper.  The leaves were stamped and/or cut with the Tropical Chic sets and the Tropical thinlits.


 I'm traveling at the moment but will put together a tutorial for the Stamparatus circle stamping technique when I get home.  It's so easy, and such fun!

Thanks for visiting today.  Here are the colors and supplies used; click on a picture and order in my online store!


Sunday, July 15, 2018

Inspiration Sunday

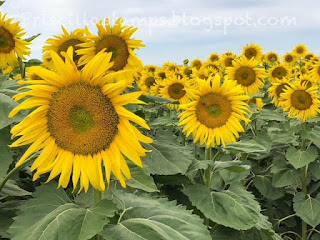
I love this time of year in the region where I live.  It's known for it's agriculture, and during spring and summer, the scenery can be breathtaking.  Just about a mile from my home in Davis, CA (outside of Sacramento) there is a huge field for growing.  When I first moved to Davis (24 years ago) this field was full of tomatoes; there was a cannery for Hunts, and in the late summer we would wake up thinking we needed to eat spaghetti for dinner.  And then we would realize we were smelling the scent of canning tomatoes.

Today the cannery is gone, but the field is not.  And every year in June and July, there is the most magnificent display of sunflowers.  It's impossible to describe so here is the picture, worth a 1000 words:


And just so you can get the full effect, here are a few more:


So gorgeous!  (Not me!  The sunflowers!). 😏

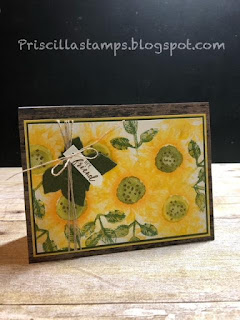
And of course, these photos inspired me to make a card:


The field of sunflowers immediately made me think of Painted Harvest.

I started with a Whisper White Thick base, cut 5-1/2" x 11" and scored in half.  To this I added a 4-1/4" x 5-1/2" piece of Wood Textures DSP in order to get a "barn" background.


I randomly stamped the sunflowers, using Daffodil Delight and Crushed Curry inks for the flowers and Pear Pizzazz and Old Olive for the centers.  I then added Garden Green seeds.  The leaves were stamped in Old Olive and Garden Green.


Rooted in Nature gave me the perfect embellishment for the corner.  I used the thinlits dies to cut and emboss the leaves using Mossy Meadow cardstock and used Glue Dots to secure them to the corner of my card.  Linen Thread was wrapped around the card and through the sentiment from Itty Bitty Greetings.


I love the inspiration that nature provides...such a beautiful display - I hope I've captured just a small part of the beauty of this field.  

Thanks for visiting; if you would like to create a sunflower card of your own, you can click on the photos below to order the products I used for this card.


SaveSave Product List