Friday, August 12, 2016

Do You BOGO?

Do you know what a BOGO is? 
Buy One, Get One!

And it's time for a BOGO from Stampin' UP!'s Paper Pumpkin...what could be better?
 PP_BOGO_FB-Thumbnail
 
From August 11th through October 10th, first time Paper Pumpkin subscribers who sign up and pay the usual monthly subscription price of $19.95 will get their second month FREE!  Yep, that's right--buy one and get the second one FREE!

What a great time to try Paper Pumpkin!  Click here and use the promotion code BOGO, and you'll be getting a second month of Paper Pumpkin absolutely FREE! 


Thursday, August 11, 2016

A Little Washi Card

Do you love Washi?  That wonderful little roll of thin, pretty, low-tack tape that is so great for decorating cards?  Do you use your Washi?  I don't!

What?  Why not?  I actually have no idea.  I tend to purchase my Washi Tape because I love the colors and/or the patterns, and then the little rolls just sit on the shelf above my desk, wallowing in self-pity, waiting for a little love.

Well, I found a way to give them the love they deserve.  Look:

  Check out that lovely Floral Boutique Designer Washi Tape!  Navy and White!  So pretty!

I started with a base of Whisper White Thick cardstock, 4-1/4" x 11", and scored at 5-1/2".  I cut a piece of Night of Navy that was 4-1/4" wide by 4-3/4" long.  This was run through the Big Shot with a (vintage) embossing folder, and then I cut a wavy line across the bottom 2/3's.  These two pieces now covered the entire front of the card, with a 1-1/4" gap in the middle.  But don't adhere them yet!

I took a piece of Whisper White cardstock, 4-1/4" wide by about 2-1/4" long, and adhered my Washi strips to it.  Very simple, just added strips of Washi that I tore and folded over the ends.

Using the larger piece of the Navy as a guide, I lined up where my Washi piece would go, and adhered it to my card base.

Then I just laid the Navy over the base using LOTS of Dimensionals to pop it over the Washi tape strip.

This card didn't need any stamping-- I used Swirly Scribbles Thinlits dies to cut the hearts with Silver Foil Sheets, and the LOVE was from Sunshine Wishes Thinlits.

This card is going to my niece and her husband for their second wedding anniversary--I know they'll love it!

So pull out your Washi and make a pretty card!

Most items can be purchased here.


Tuesday, August 9, 2016

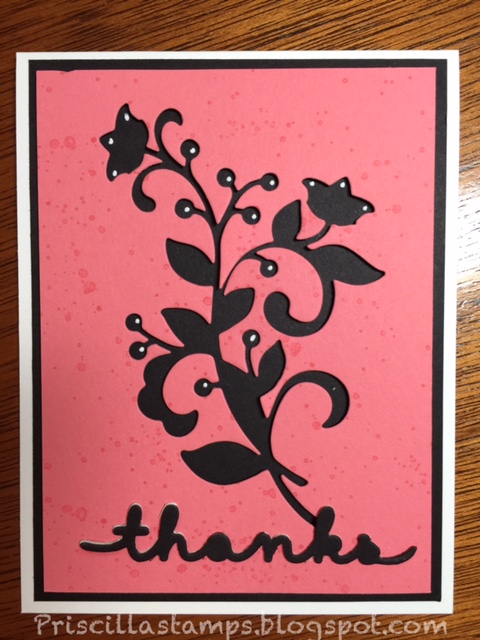
July Thank You Cards

Here's the Thank You cards I made for my customers in July.

Despite my desire to hold out on these thinlits, I finally caved and went for it.  One of my customers had purchased them and had asked for a demo on how to use the Precision Base Plate (a must-have with these thinlits!).  So while showing her how easy it is to use, I kinda fell in love with them.  Curses!

But when playing with my own, I found that I really liked the negative spaces that are left behind when you cut out the flourish.  So for these cards, I centered the flourish on Flirty Flamingo card stock, cut out the flourish, and then mounted it over Basic Black.

Now there is a little caveat to the ease of making this card.  Since I can't do anything the easy way, I first stamped "splats" on the front using Gorgeous Grunge and Flirty Flamingo ink.  Then I "lifted" the entire layer over the black one with a ton of Dimensionals.

And finally, although you can just barely see it here, I cut "thanks" twice; one with Basic Black, and again with retired chipboard.  This gave heft to my phrase and lifted it up.

I finished by using a white gel pen to give my flowers a little focus.

I'm sure you'll be seeing more creations with this bundle--can't wait to try more!

All items can be purchased here. 


Sunday, August 7, 2016

Team Get-Together Part II

I shared with you that my wonderful team of Stampin' UP! demnstrators had a meeting, and today I'll show you the projects that we created.  Bonnie, Crystal and I all had "make & takes" for everyone to enjoy.

Crystal brought us a tag.
It was fun to see the new Petal Burst embossing folder and to use some of the new In Colors (Flirty Flamingo and Sweet Sugarplum) along with Bermuda Bay and Whisper White.  And that cute flamingo (Pop of Paradise)--isn't she wonderful?

Bonnie brought us a little box, with a surprise inside:

I love the colors (Pacific Point, embossed with Petal Burst) and Cucumber Crush (my all-time favorite green!).  Bonnie had these cut and scored, but we didn't know what we were making yet...

But once they were put together, we were all excited to see:

Business Card holders!  What a great idea!

I had two projects, a card and a little tag:

Loved this card (thanks to Debbie Henderson for much of the idea), using Places You'll Go (and excuse the gray splatter at the top, where an ink pad was dropped on my sample--oops!).  The Soft Sky and Peekaboo Peach were nice colors to use together.

Then we made this:

A little table favor or place card.  We used Jar of Love and the matching Everyday Jars framelits.  I had cut folded Whisper White Thick cardstock with the largest jar framelit, leaving a little room where the fold is (so the framelit doesn't cut through the fold).

Then we stamped another jar and added the flowers, before adhering to the previously cut tags.  The result is a cut little, stand-up jar, just perfect to add a little bouquet at each table setting.

A little business, a little celebrating, and a whole lot of stampin'!  What a great team meeting!

If you'd like to join my team, click here.  I love hobby stampers, and enjoy getting together and sharing so many idea.  I'd love to have you join us!


Saturday, August 6, 2016

Team Get-Together

I recently held a meeting for my Stampin' UP! downline, a really great group of demonstrators.  We try to get together at least quarterly, but sometimes life gets in the way and it's a while before we actually get to see each other and play with new products.  But this one worked well in many of our schedules, and there were 7 of us!  Woo hoo!

I forgot to take a photo as we were all working on our projects (thanks, Bonnie, Crystal and Tani for bringing creations for us to make!), and we were just starting in on our fabulous snacks (thanks Ceresa, Michelle and Judi!) and I remembered!  So here we are, messy table and all, but having a great time.

Two of the gals have recently promoted with Stampin' UP!  Tani has achieved the Silver level, having recruited a new downline member herself, and Bonnie has made it to Silver Elite!  Another woo hoo!

So I had cards for each of them to commemorate their special achievements; take a look:

For Tani:
I recently purchased the Letters for You set and matching Large Letters Framelits (a LARGE expenditure, but SO worth it!  Be sure to buy the bundle to save 10%!).  And since Tani is now at at the Silver level, what else would I use but Silver Foil sheets!

I cut the letters and exclamation point, and added them to my card.  But first:

I had stamped "Way to Go" from the now retired Bravo set, using Versamark ink on Basic Black (can you just make out the words under the silver letters?).  After adhering the letters I added some silver stars from the Metallic Enamel Shapes embellishment pack.  A fun way to celebrate.

Then for Bonnie, I had to step it up a little:

This large card, 4" x 7", fit the letters perfectly!  The base is Basic Black and there is a layer of Silver Glimmer Paper.  Next comes a piece of Whisper White, with Timeless Textures stamped randomly in Smoky Slate all over it (love this set!)  Then the letters!

So shiny!

Congrats ladies!  This is a great accomplishment!

All products can be purchased here.

And look how we ended--playing Pokemon Go with Crystal--caught one!  :)

Fun night.  Want to join my team?  Click here--just $99 gets you $125 in products (your choice), a FREE Paper Pumpkin kit, discounts and new friends!  No obligation; I like hobby stampers! 


Thursday, August 4, 2016

Another CASE the Catalog Card

Time for another CASE the Catalog card, one we made in our July Card Clubs.

I'm in love with this Fruit Stand Suite, and especially the Fresh Fruit stamp set and coordinating Fruit Stand Designer Series Paper.  I'm not sure why this struck such a chord in me; could it be because one of my favorite things to do on a Saturday morning is visit the Davis Farmers Market?  We have such a fabulous Farmers Market twice a week, and I love to shop there for fresh fruits and veggies (and flowers!).  So when I saw this set, I HAD. TO. HAVE. IT.

This card is nearly a straight copy of one in our Stampin' Success magazine (exclusive for Stampin' UP! demonstrators).  Since I only had one package (so far) of the DSP, and I knew we would have lots of attendees in our class, I had to come up with a way to make my paper stretch.  Strips!  How easy and fun!

The card base is Pear Pizzazz.  Strips of the Fruit Stand DSP were added, varying the length and width of each.  There are also strips of Watermelon Wonder and Peekaboo Peach.

Then we stamped the fruits on a piece of Whisper White.  First the pear, in (are you ready for it?) Pear Pizzazz.  Then we masked the pear (I had previously cut a bunch of masks to make it easy for everyone), and stamped the peach in (what else?) Peekaboo Peach and the strawberry in - can you guess the color? - HA!  Watermelon Wonder!

Either Happy Birthday or Thank You (both included in the stamp set) was stamped with Memento  Tuxedo Black ink.

Using a retired star punch, we nipped tiny "V"s in the cardstock and wrapped Basic Black Bakers Twine around the layer, tying it in a bow.  And a quarter of a doily was added, peeking out at the bottom of the layer.  Then it was adhered to the card with Dimensionals.

My card, unfortunately, got a little ink splat in the upper left corner.  What an opportunity!  I got to place three of my new Subtles Enamel Shapes in the corner, and I love how it looks.

A fun and easy card.  Need inspiration?  Try CASEing the Catalog (Copy and Share Everything)!

All products can be purchased here. 


Tuesday, August 2, 2016

One Card, Two Ways

Here's such a pretty (and very easy) card, one we made in our July Card Clubs.  I usually don't offer cards THIS easy, but it was so pretty and versatile, that I went ahead--and everyone loved it!

This beautiful stamp is from Floral Phrases, part of an absolutely gorgeous suite of products.  I so loved the simplicity of this rose--the stamp is textured, so part of it stamps lighter than other parts, giving it depth even though you are only stamping it once.

The base is Whisper White Thick cardstock, cut 4-1/4" x 11" and scored in the center (5-1/2").  There is a layer of Dapper Denim, with a larger border around it, and then we stamped on the Whisper White layer.

The flower stamp was stamped at the top; we then flipped the cardstock 180 degrees and stamped it again (there is a blank white are between the two stamps, which is covered by the banner).  The banner is about 1-1/4" wide and about 4" long; the stamp from Timeless Love was stamped in Dapper Denim and the ends were flagged.  This was popped up with Dimensionals, and two Pearls Basic Jewels were added.  Done!

I had created this card and then found that my colleague was using the same stamp set with Night of Navy, so I quickly changed out my colors:

Easy, peasy--Sweet Sugarplum!  And this time I used a sentiment from Butterfly Basics.  Just as lovely, just as easy, and just as effective! 

All supplies can be purchased here.