Showing posts with label Snow Front. Show all posts

Friday, December 4, 2020

Christmas Night

 I almost never (and I mean NEVER) stamp a card using only stamps, ink and paper.  And technically (more on that in a minute), I didn't do it for this card either 😁   But this is about as close as I get to #SimpleStamping:


But I LOVE it!  😍

And I got to use a new product, coming in January in the upcoming Mini Catalog - Blending Brushes.  That's how I got that beautiful background!


I started with a piece of Whisper White cardstock.  I punched a "moon" from a piece of sticky note and placed it in the "sky".  And I had a piece of cardstock that I had previously cut using the Curvy dies, so I grabbed it to use as a mask.  See that snow on the ground?  That's where I put my mask.  Then I got busy.


These are the new Blending Brushes.  They come 3 to a pack (probably all you'll ever need).  And they are super soft pompoms of hundreds of tiny bristles:


And SUPER soft!  Makes me think I should be using these to put on my makeup!  But I digress..

Anyway I laid my "snow" mask on the bottom of my cardstock and took my Blending Brush, rubbed it in Highland Heather ink and started to rub it just above the mask.  I added a little more ink until I got a nice "haze" of ink, then I started in with another color - Misty Moonlight.  I didn't clean my brush in between, just brushed it on a piece of scrap paper until I didn't see any more ink.  And blended some more.  

I repeated the process with one more color along the top part of the cardstock, using Night of Navy ink.  

Once I was happy with the colors of my "sky" I used some Frost White Shimmer Paint in a Spritzer with a little rubbing alcohol and gave the cardstock a good spritz:


Can you see the shimmer?  Hard to capture with a camera, but it's definitely there.  

Then I removed the mask and the post-it circle:


And I had my background.  The trees (from Snow Front and Merry Moose) were stamped in Tuxedo Black, as was the greeting from Itty Bitty Christmas.


I added a few of the Adhesive Backed Snowflakes (and THAT'S why this card would not qualify as #Simplestamping) and mounted it to a skinny layer of Basic Black and then to the Misty Moonlight card base.  

And inside:


This would be an easy card to reproduce, and I may just do that when I realize I'm running short on my Christmas cards!  


Product List

Monday, December 9, 2019

More Christmas Cards

I was fortunate to be asked to provide a Christmas card-making class for the employees of a business near my home.  I had 9 ladies sign up to make 8 cards, so I was very busy prepping and preparing for their class.  Not being sure of their stamping experience, I wanted cute cards that were not too hard for a beginning stamper.

Today I bring you one of the cards we made:


This super-cute card was a great "first" card, as it wasn't too difficult, but it had lots of fun details, starting with the background.  I thought the attendees should get familiar with the Stamparatus, so they first stamped their card base with the Crackle Paint background stamp.


I had pre-cut the circles, so all they needed to do was create their snowy scene - they stamped a cabin, the trees and the river, then mounted their stitched shape circle onto a Shaded Spruce scalloped circle and then a Night of Navy Layering Circle.  Simple!

The label was stamped and cut with a retired punch, and they learned how to cut their Gold Foil label in half to layer under the white one.  Easy!


Finally they put it all together, layering the Wrapped in Plaid DSP onto a strip of Whisper White, adding the stamped elements, and finishing with a few Holiday Rhinestones.  Done!

And here is Susan, proud of her first cards, while Lisa finishes hers!


I'll be featuring the other cards we made throughout the week, so c'mon back for more holiday cards you still have time to make!


Product List


Sunday, November 24, 2019

A Team Swap

I had such a wonderful time last weekend visiting with all my Stampin' UP! buds in Portland!  The OnStage event (Stampin' UP!'s "convention") was being held in my  home town, and I was really fortunate to have 8 of my team members come.  We enjoyed a day of learning and stamping (and playing with new, yet-to-be released products) and then headed back to my home for an "after-party".  And party we did!

My two long-time stampin' friends, Bonnie and Tani, helped me put the evening together, and over the next few days I'll be sharing our projects.

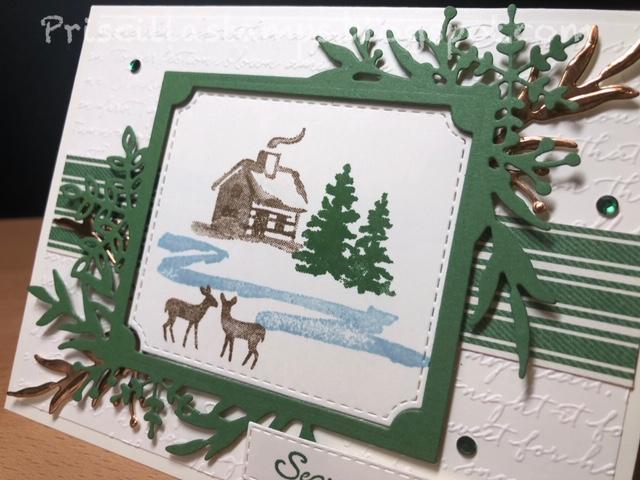
But first I want to show you the swap card I made.  We all created something to share with each other; here's mine:


I love the Snow Front stamp set, and chose it for my card.  With 17 individual stamps in the set, there is almost no end to the different scenes you can create.  I decided on a simple, serene scene, with the cabin, trees, river and deer.  All set off by the gorgeous Frosted Frames die.


I started by cutting the Very Vanilla insert with the stitched die.  The images were stamped using Soft Suede, Garden Green and Seaside Spray inks.


The card base is Thick Very Vanilla, cut 5-1/2" x 8-1/2", and scored at 4-1/4".  There is another layer of Very Vanilla that is embossed with the Scripty embossing folder.  I added a 1-1/4" strip of Toile Tidings Designer Series Paper.

And then that frame:


Lifted with Dimensionals, and then some Copper Foil accents (included in the dies) for a little added pizzazz!

The greeting is from Itty Bitty Christmas, stamped in Garden Green on a Stitched Rectangle shape.  And finished off with some Holiday Rhinestones..

And here they are, all lined up:


Don't you just love getting together with friends?


Product List